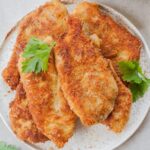
Breaded chicken cutlets
Servings: 6 cutlets
Ingredients
- 1 lb (450g) chicken breast 2 medium/large chicken breasts or 4 large / 6 small chicken cutlets
- 1/4 cup flour 1 oz/30g
- 2 eggs
- 1/2 cup breadcrumbs 2oz/55g
- 1/2 cup grated Parmesan cheese 1.6oz/45g, optional
- 1 heaped teaspoon grated lemon zest optional
- 2 tablespoons chopped parsley optional
- salt and pepper to taste
- 6 tablespoons frying oil
Instructions
- Prepare the chicken cutlets: Cut the chicken breast in half horizontally. Place a thick ziplock bag on top and pound the thickest part of each cutlet. The cutlets should be of even thickness, about 1/4-1/3 inch (1/2-3/4 cm).
- Prepare the breading: Add the flour to the first shallow plate. In the second, deep plate beat the eggs with grated lemon zest and chopped parsley. Add the breadcrumbs and grated Parmesan to the third shallow plate (stir them together).
- Bread the chicken: Pat the chicken fillets dry with paper towels. Season with salt and pepper on both sides. Dredge in flour on both sides (shake with the cutlets allowing excess flour to fall off), then dip in the egg mixture (allow the excess egg to drip back into the bowl), then coat in the breadcrumb-Parmesan mixture until coated on all sides. Place on a clean plate.
- Fry the cutlets: Add the oil into a large frying pan, warm up until well heated, over medium-high or high heat. When the oil is hot cook the cutlets on both sides until golden in color and cooked through in the middle.
- Enjoy!
Notes
- If your chicken breast was small you're probably done as the two halves of the breast are often already thin enough. If your chicken breast was medium-sized or large, the cutlets are often not uniformly thick or too thick so you need to pound the thickest part of the cutlet with a meat mallet. Instead of a meat mallet, you can use a rolling pin, the bottom of a heavy skillet or even a wine bottle.
- Always use one hand to pick up the cutlets and dredge them with flour and breadcrumbs, and the other hand for dipping them into the egg mixture.
- For extra crispy cutlets, you can make double breading, this means to dip the cutlets again in the egg mixture, then in the breadcrumbs. This way the breading will be thicker and more crispy (note: you would need to have more ingredients on hand as this recipe calls for ingredients for only one breading layer).
- The thickness of the fillets: it depends on your preferences - how much meat to the breading ratio you like. I prefer my fillets 1/3-inch (3/4 cm) thick.
- Amount of frying oil: it should be minimum 1/3 of the thickness of the cutlets and better 1/2-2/3.
- To make this recipe even quicker you can sometimes buy already prepared chicken cutlets then bread and cook them yourself.
- How to know when the cutlets are done? Just cut them in half to see if the meat turned its color to white and the juices are running clear. Measuring the internal temperature of thin cutlets with a meat thermometer is not accurate.
- How long does it take to cook the cutlets: It will depend on your pan and the thickness of the cutlets. I'm frying mine over high heat in a heavy-bottom frying pan. When the breading is golden they are also usually cooked through. If you have a frying pan with a thin bottom, the cutlets may brown very quickly but not be cooked through in the middle so you need to cook them over medium heat. The same goes with the thickness of the cutlets - thicker cutlets will need more cooking time than thinner cutlets, so you would also need to reduce the temperature a bit.
- What can you do with leftover egg and breadcrumbs: double coat the cutlets or form small patties from the leftover ingredients and cook them in the pan.
- Storage:
- breading chicken cutlets ahead of time: Lay the breaded cutlets on a tray, cover with plastic foil and put in the fridge. You can cook them a couple of hours later or the next day. Take the cutlets out of the fridge about 30 minutes before you plan on cooking them. After this time, coat the cutlets again in breadcrumbs and pan-fry. The coating will be crispy, but not as good and thick as fresh coating.
- breaded and cooked chicken: Leave the cutlets to cool after cooking them, then put into a tightly closed container or wrap in plastic foil. Reheat the next day on a dry non-stick pan (or use a small amount of oil) and warm up over medium heat on both sides until warm. Such cutlets will be only partially crispy and not as crispy as freshly cooked.
- Freezing:
- breaded but not cooked cutlets: Leave the cutlets to cool after cooking them, then put into a tightly closed container or wrap in plastic foil. Reheat the next day on a dry non-stick pan (or use a small amount of oil) and warm up over medium heat on both sides until warm. Such cutlets will be only partially crispy and not as crispy as freshly cooked.
- breaded and cooked cutlets: This option results in really good cutlets. Defrost the cutlets in the fridge. When the cutlets are thawed, warm them up in a small amount of oil in a frying pan. Cook the cutlets over medium heat for about 20 seconds on one side, then about 20 seconds on the other side, just until warm.
- baking frozen cutlets (breaded and cooked) in the oven: This is a time-saving option. You just have to pop frozen cutlets into an oven preheated to 375°F / 190°C and bake them for about 15 minutes (or longer/shorter, depending on the thickness of the cutlets). It is my least favorite method.
- Calories = 1 cutlet = 1/6 of the recipe. This is only an estimate! I assumed that the cutlets absorbed 4 tablespoons of oil and 2 tablespoons of oil have remained in the pan.
Nutrition
Calories: 266kcal