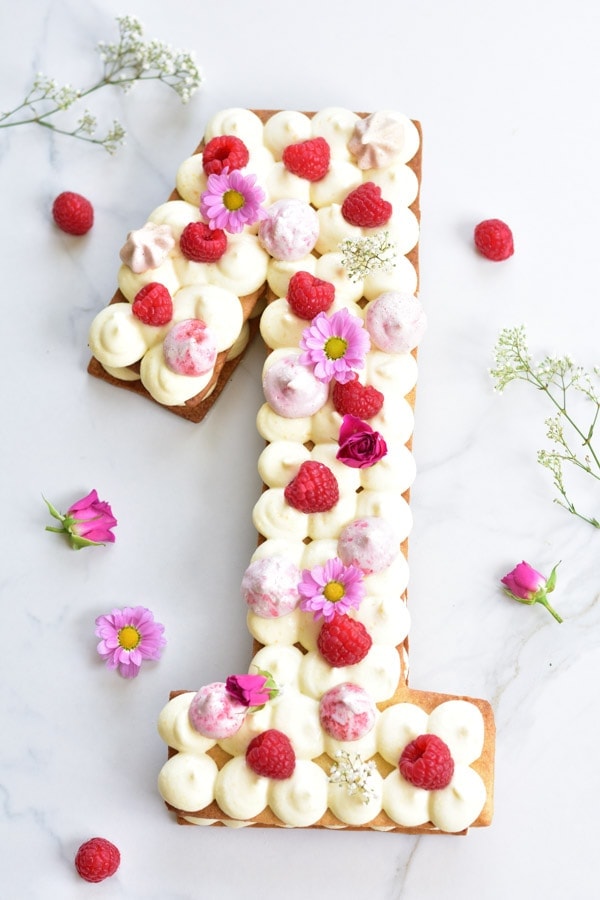
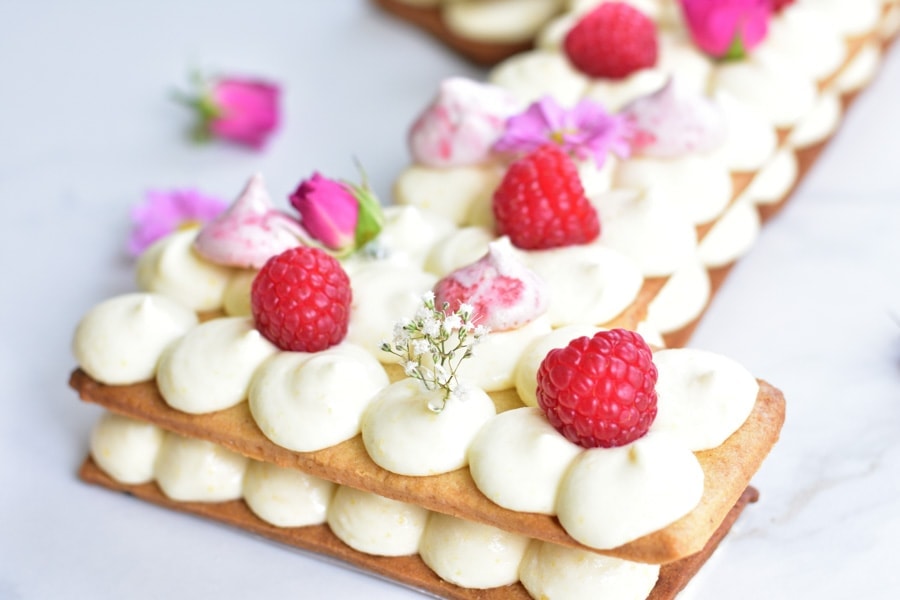
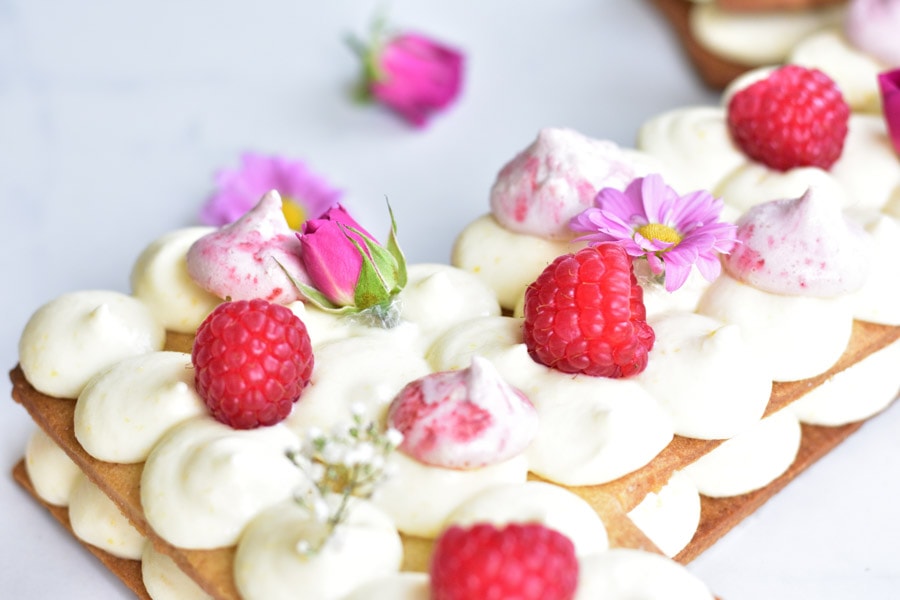
Number cake is a beautiful-looking cake that can have a number, heart, or letter shape. Despite appearances, this is not a difficult or labor-intensive cake. Basically, it’s a lemon cream tart, that thanks to its shape and decoration, looks really special.
I’ve made this cake for my daughter’s first birthday, and then 4 years later for my son’s first birthday so you can see both versions of the cake. I made lemon raspberry flavor for my daughter and decorated the cake with pink flowers and meringue kisses. For my son, I used blueberries and kiwi and decorated the cake with chocolate sprinkles.
Perfect birthday cake
This was our daughter’s and our son’s first birthday cake. Check out our next birthday cakes:
2nd birthday: carrot layer cake with cream cheese frosting
3rd birthday: no-bake Greek yogurt cheesecake with apricot mousse and apricot bees
4th birthday: chocolate chip cookie cake with chocolate frosting
Number cake consists of:
– Shortcrust pastry: this is a regular shortcrust pastry recipe that can be used for any tart. Roll out the dough, cut out any shape you like, and bake (you can print out a template from a text editor or just draw it on a piece of parchment paper with a pencil then cut it out).
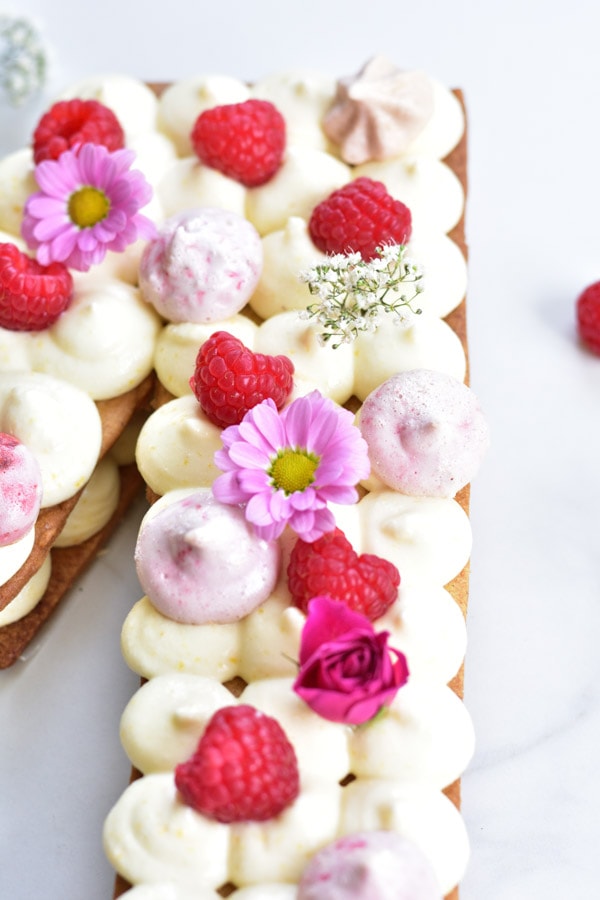
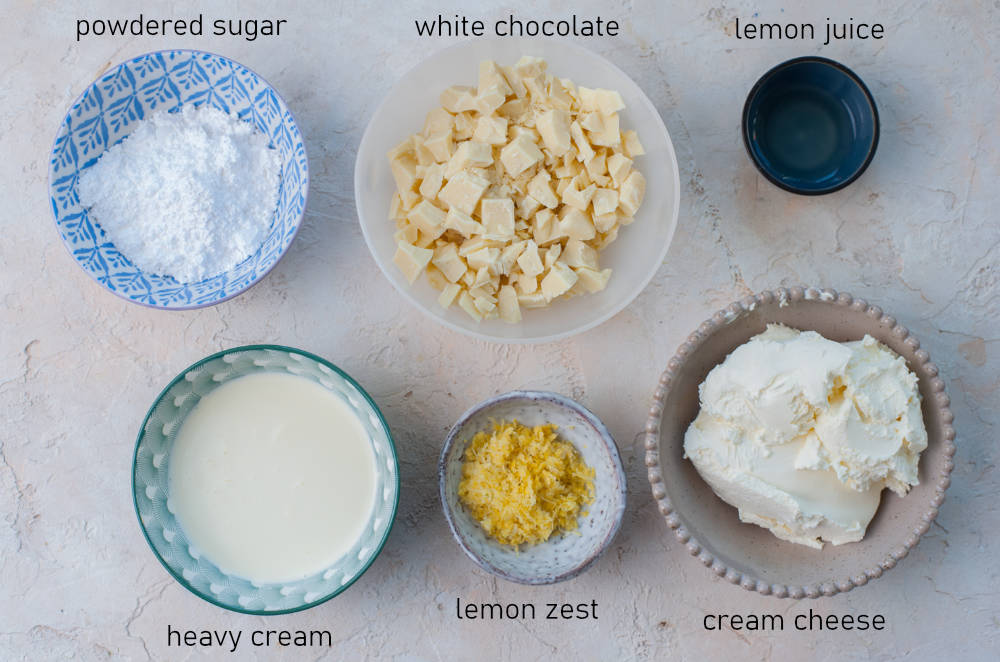
– Cream: any cream that holds its shape will do. I used a lemon cream made with white chocolate, heavy cream, and cream cheese. This cream is really simple and quick to make. It also tastes wonderful, it‘s light, not overly sweet, and intensely lemony.
– Decoration: so much choice! any fresh fruit, small meringue kisses, cookies, macarons, fresh flowers, colorful sprinkles will look beautiful. I used fresh raspberries, raspberry meringue kisses (mine were homemade, but you can of course use store-bought ones), and pink fresh flowers for a girl’s version and blueberries, kiwi, and chocolate sprinkles for a boy’s cake.
Ingredients
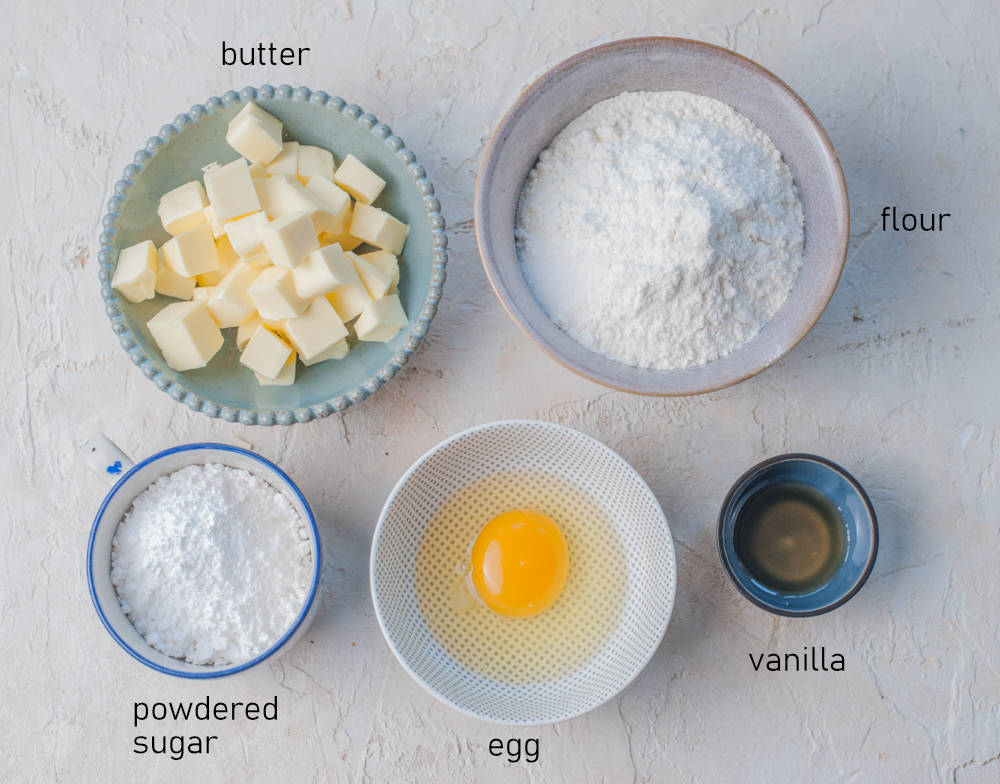
Here’s what you need to make a shortcrust pastry: butter, flour, powdered sugar, vanilla (extract or vanilla sugar), egg, and salt. This is a pretty standard shortcrust pastry recipe.
For the lemon frosting, you will need: white chocolate (chopped white chocolate bar), powdered sugar, cream cheese (must be full-fat), lemon juice (freshly squeezed, not bottled), lemon zest (a lot!), heavy cream (30-36%).
Step by step instructions
Make the lemon frosting:
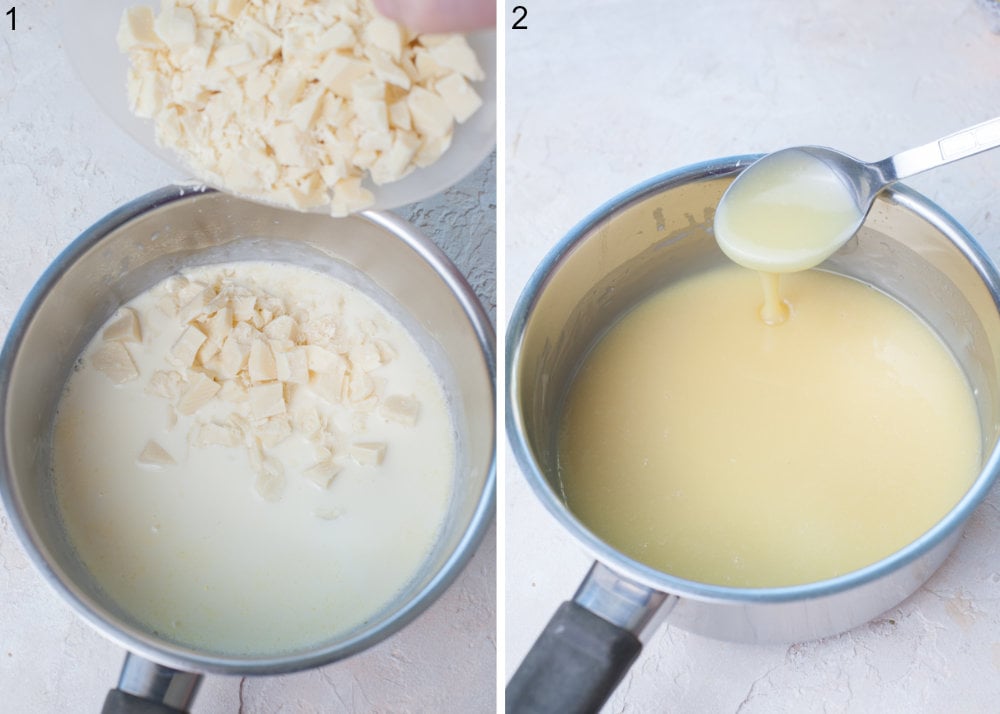
STEP 1: Remove the cream cheese from the fridge early enough, to let it warm up to room temperature. In a small pot, heat the cream until hot (but not boiling), remove from the heat, add the chocolate (broken into small pieces).
STEP 2: Wait for 1 minute, then stir until the chocolate is melted, let cool to room temperature.

STEP 3: Finely grate the lemons. If the lemons are finely grated (grated on a microplane and not on the small holes of a box grater) – add the lemon zest, cream cheese, and sugar into a bowl.
STEP 4: Mix with a mixer for a few minutes (with a whisk attachment when using a stand mixer) until fluffy and smooth (it should have no lumps).
If the lemons are not very finely grated (this depends on the grater) – the zest pieces will be noticeable in the cream. Blitz the cream cheese, lemon zest and sugar in the food processor until smooth (the lemon zest lumps should be as small as possible). Alternatively, you can chop the lemon zest very finely with a knife.
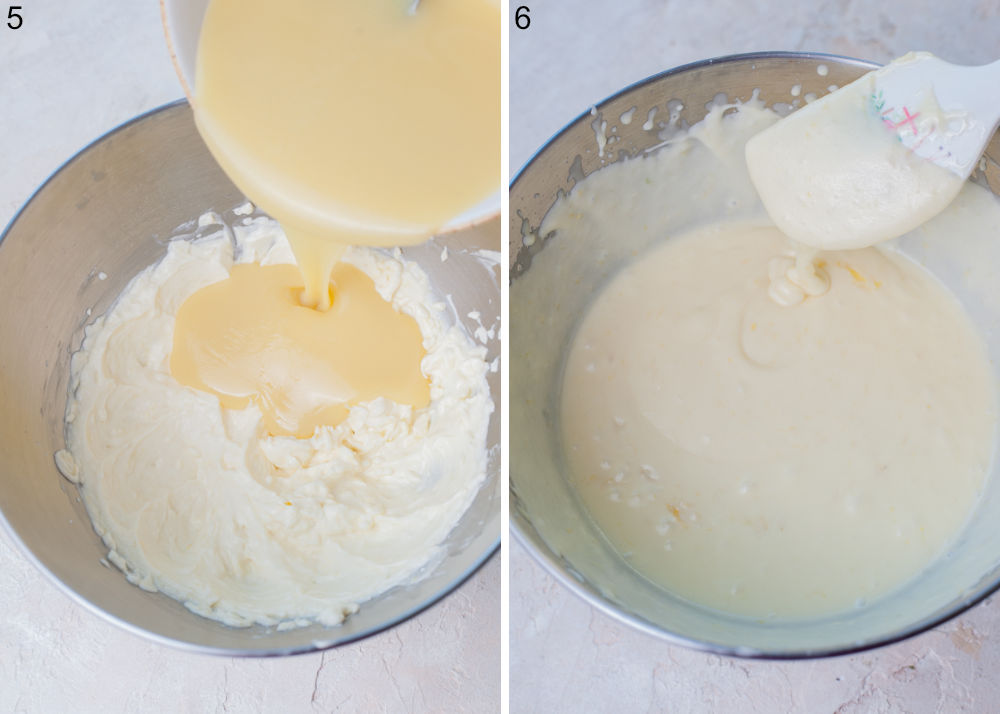
STEP 5: Add the melted and cooled chocolate-heavy cream mixture to the cream cheese mixture. Whip at the highest speed of the mixer for a few minutes (about 4-5 minutes, using a whisk attachment) until smooth. It should slightly increase its volume (but not much). Be careful not to overmix the cream, otherwise, you will make butter. You can also whip the lemon cream in the food processor.
STEP 6: Whisk in the lemon juice, cover the bowl with plastic foil, and put it in the fridge for a couple of hours or overnight.
The plastic foil should touch the surface of the cream. The cream must be well chilled (!).
Make the pastry dough (steps 7+8+9+10):
Making the dough by hand:
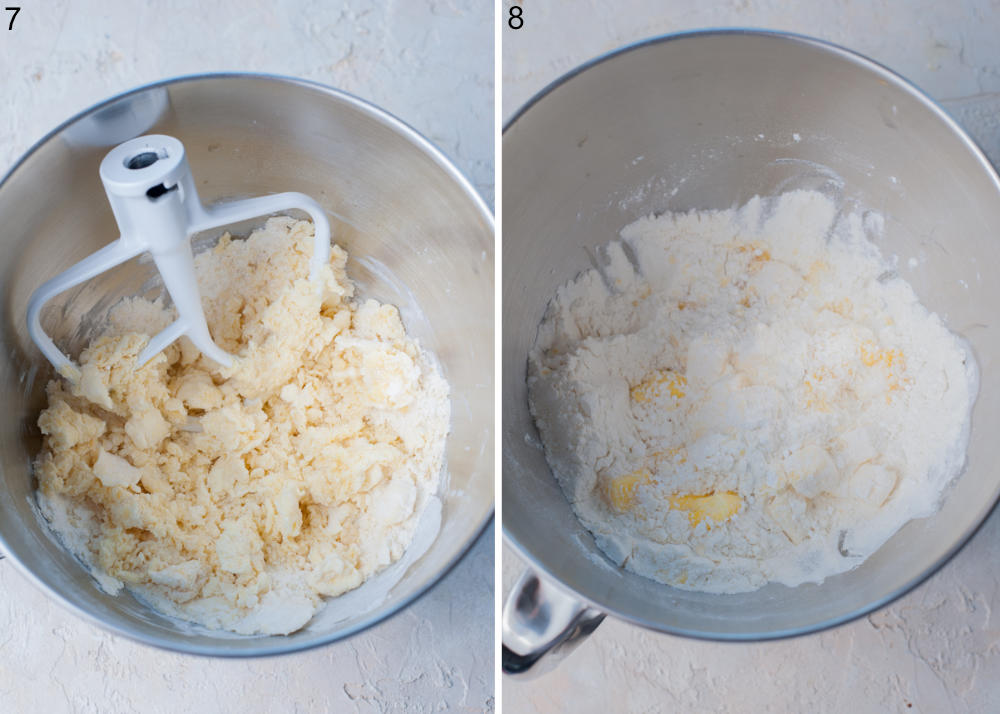
stir the flour with powdered sugar, vanilla sugar, and salt together. Add cold diced butter, rub the butter into the flour mixture with your fingertips until it resembles a pea-sized crumble, add the cold egg, knead quickly until dough forms a smooth ball (be careful not to over mix it).
If you‘re using a stand mixer (my favorite way):
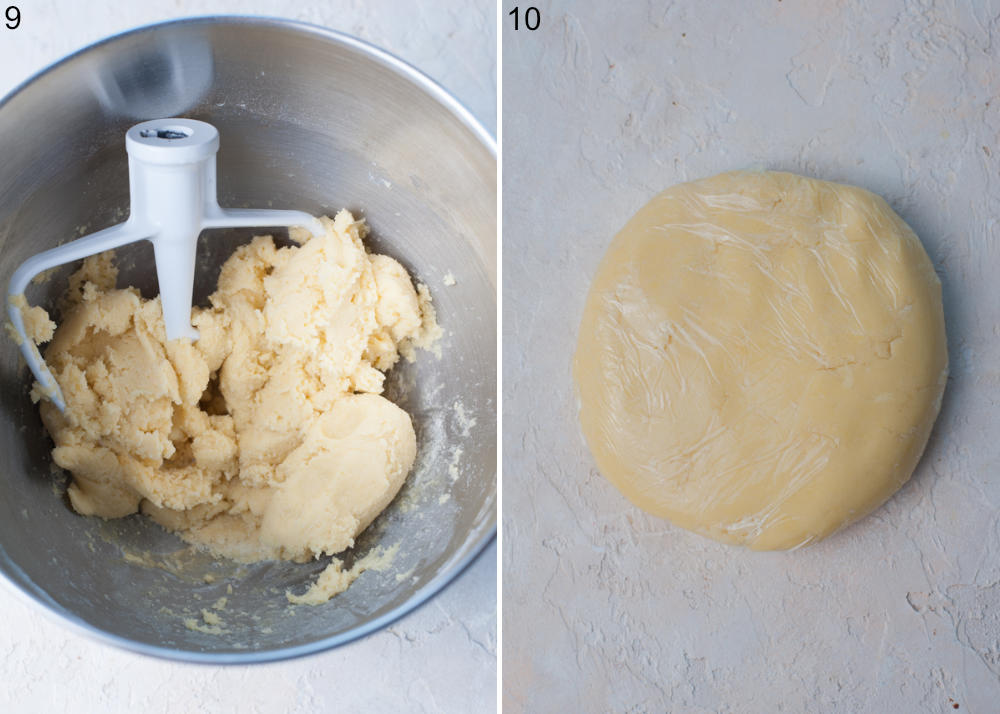
Add all the ingredients (without the egg) to the mixing bowl. Mix at the lowest speed using a paddle-shaped attachment, until large lumps are formed (they can be of different sizes, 0.5-1.5 cm / 1/4-1/2 inch). Add the cold lightly beaten egg and mix until a smooth dough is formed (be careful not to overmix it).
In a food processor:
Add all the ingredients (without the egg) to the food processor bowl (with the regular blade attached). Pulse 2-3 times until the butter pieces are the size of large peas (they can be of different sizes). Add the cold lightly beaten egg and pulse until the dough begins to come together (be careful not to overmix it). Transfer the dough pieces onto a work surface, and gather them with your hands, forming a dough ball.
All methods: flatten the dough, wrap in plastic foil, and put in the fridge for 1 hour.
Bake the tart:
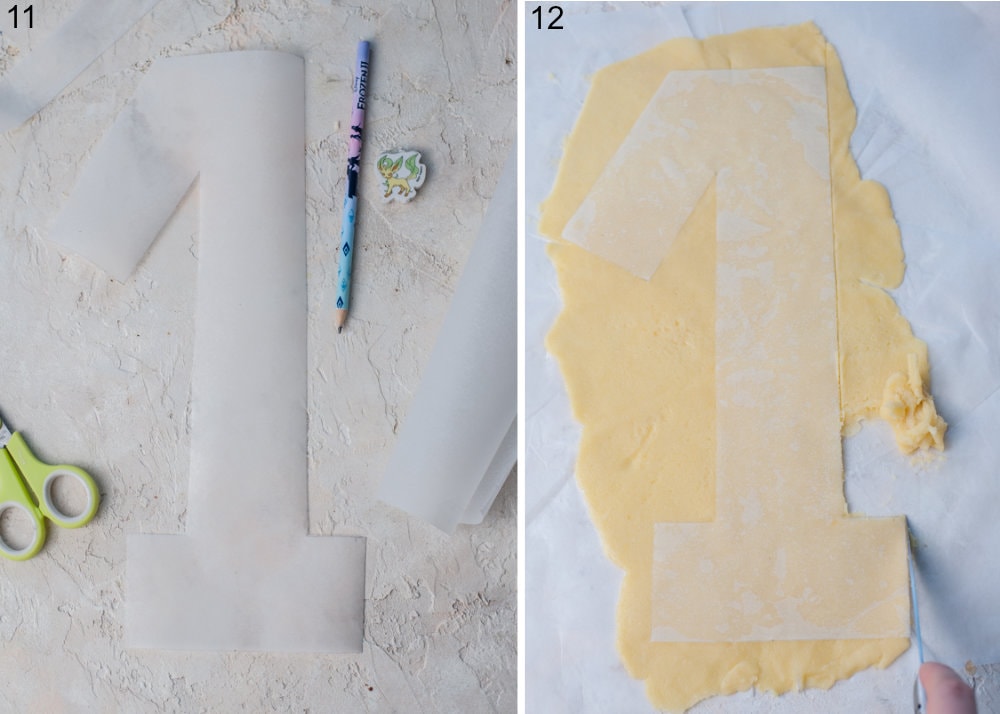
STEP 11+12: After this time, take the dough from the fridge, divide it in half, roll out each part between two pieces of baking paper to a thickness of approx. 3-4 mm. Make the template (a number, letter, or shape) – you can either print it out from a text editor or just draw it with a pencil on a piece of parchment paper, then cut it out. Place the template on top of the dough and cut out the pattern with a knife (roll out and cut the numbers directly on the parchment paper, otherwise it would be difficult to transfer the dough to the baking paper!). It’s also important to roll out the dough evenly to ensure it browns evenly (especially the sides shouldn‘t be thinner than the center of the dough). Try also not to roll it out too thinly – it will be more prone to break (but you can also cover it with cream so don’t worry about that).
STEP 13: Preheat the oven to 180 °C / 350 °F / Gas Mark 4. Place the rolled-out dough in the fridge while the oven is warming up.
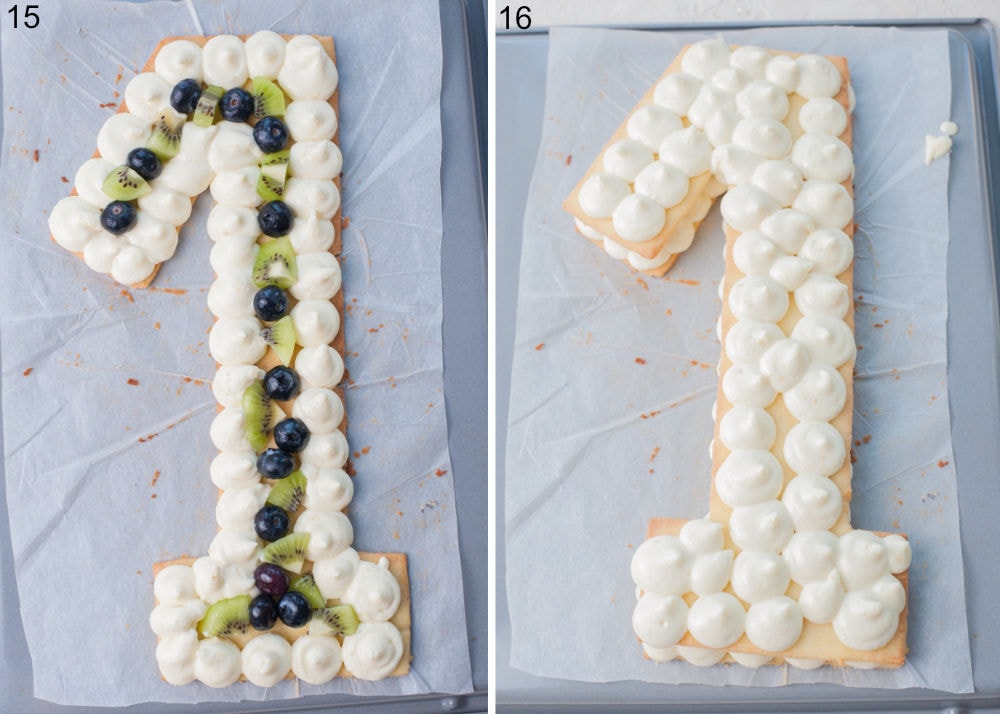
Bake the dough for about 12-15 minutes or until golden. After 10 minutes keep an eye on it! The tart dough can quickly brown too much. Take out of the oven and remove from the baking sheet. Allow to cool completely.
Assembling and Decorating:
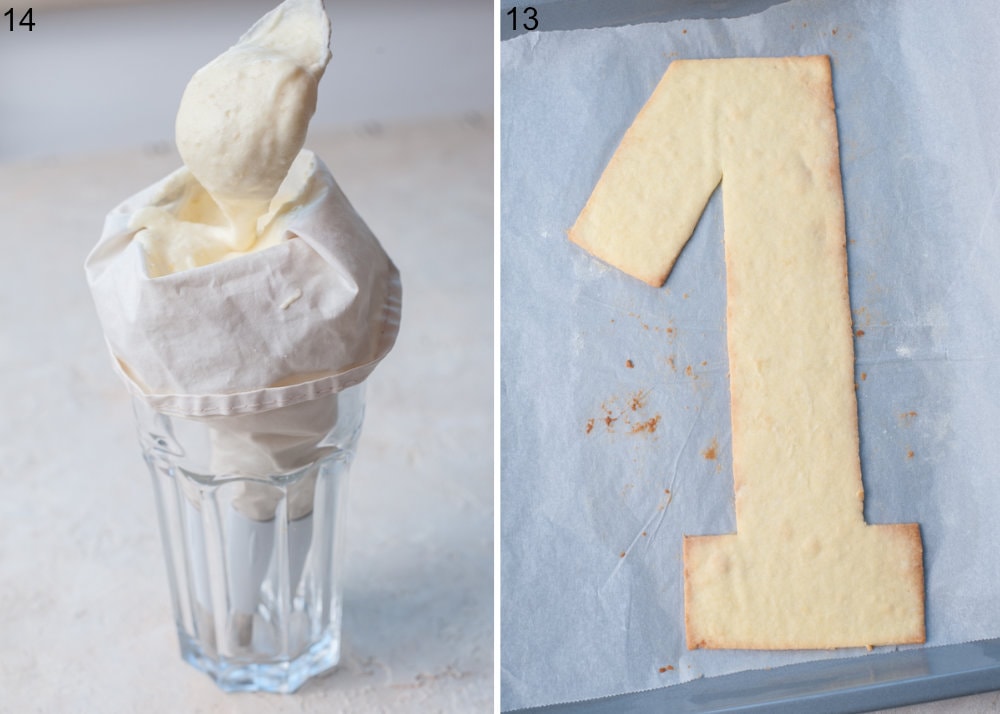
STEP 14: Fit a piping bag with a round tip (I used a round 11 mm / 0.43 inch tip) and fill it with lemon cream. The cream should be well chilled, otherwise, it won‘t hold its shape for too long.
STEP 15: Prepare a tray on which the tart will lie. Apply a little cream at the bottom of the first pastry crust so that it doesn’t move while piping the cream.
Place the first floor of the cake on the tray. You should now create three rows: cream, raspberries, and cream. Arrange the raspberries or kiwi and blueberries (in the middle row) and then pipe two rows of cream. Piped cream should have a similar height as the raspberries and should surround the raspberries from all sides.
STEP 16: Place the second floor of the tart on top of the cream and raspberries (carefully, it’s really fragile!), it’s best to carefully slide it off the baking sheet.
Pipe two or three rows of cream on the second floor of the tart.
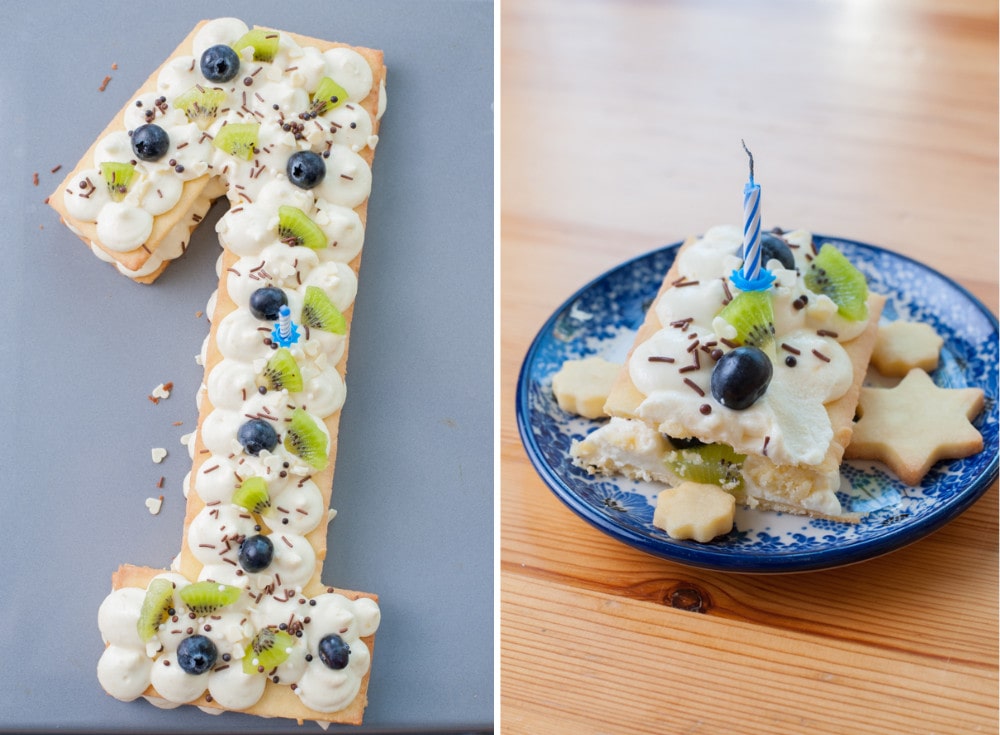
Decorate as desired – I had fresh raspberries (raspberries should be washed and thoroughly dried), raspberry meringue kisses, fresh flowers (their stems should be wrapped in plastic foil so that they don’t have contact with the cream) for the girl’s version, and kiwi, blueberries and chocolate sprinkles for the boy’s version.
Place the decorated tart in the fridge – it should rest there for at least 3-4 hours. The time needed to soften the shortcrust pastry will depend on the thickness of the dough. It would be best to roll out the dough to a thickness of 3-4 mm / 0.11-0.15 inch and leave for 5 hours in the fridge. The pastry crust should still be crisp but also soft enough to be easily cut into portions.
Enjoy!
How many servings a number cake yields?
The recipe below yields an amount of dough that is enough for 1 number cake = 2 pieces number 1-shaped pastry dough (about 35 cm/14-inch long, 14 cm/6-inch wide at the bottom, 17 cm/7-inch wide at the widest point). You‘ll have a little dough left – you can sprinkle it with cinnamon sugar and bake as cookies.
If this is not enough for the number of guests you intend to invite, you can double the recipe. Bake a tart in the shape of a number, that reflects the age of the birthday girl/boy. From the rest of the dough, you can bake small heart-shaped individual cream tarts. Ready templates can be found on the internet or you can print them from a text editor.
Can cream tart be made ahead?
The dough and cream need to be made in advance. The cream must be chilled in the fridge for a few hours (it will thicken). Baked pastry dough with the chilled lemon cream also need to be chilled for a few hours in the fridge. The tart will soften and be easy to cut into servings.
If you also love the lemon raspberry flavor combination check out this recipe for lemon and ricotta pancakes with raspberries!
Did you make this recipe? Let me know how you liked it and give it a star rating in the comments below! You can also add a photo of your creation!
Number cake – lemon cream tart with raspberries

Ingredients
lemon cream:
- 7 oz (200g) white chocolate
- 3 ½ oz (100g) heavy cream 30-36% fat
- 7 oz (200g) cream cheese at room temperature!
- 6 tablespoons powdered sugar 50g
- zest from 3 large lemons preferably organic
- 2 teaspoons lemon juice
pastry dough:
- 2 cups (250g) all-purpose flour spooned and leveled
- 1 stick + 1 tablespoon (130g) butter cold, cut into pieces (about 2 cm / 1 inch)
- 6 tablespoons (50g) powdered sugar
- 1 tablespoon vanilla sugar or granulated sugar + 1 teaspoon vanilla extract
- pinch of salt
- 1 large egg cold, from the fridge
additionally:
- 5 oz (150g) fresh raspberries
- edible decoration: small meringue kisses macarons, small cookies, sprinkles
- fresh flowers only for decoration
Would you like to save this?
Instructions
Make the lemon cream:
- Remove the cream cheese from the fridge early enough, to let it warm up to room temperature.
- In a small pot, heat the cream until hot (but not boiling), remove from the heat, add the chocolate (broken into small pieces), wait 1 minute, then stir until the chocolate is melted, let cool to room temperature.
- Finely grate the lemons.
- If the lemons are finely grated (grated on a microplane and not on the small holes of a box grater) – add the lemon zest, cream cheese, and sugar into a bowl, mix with a mixer for a few minutes (with a whisk attachment when using a stand mixer) until fluffy and smooth (it should have no lumps).
- If the lemons are not very finely grated (this depends on the grater) – the zest pieces will be noticeable in the cream. Blitz the cream cheese, lemon zest, and sugar in the food processor until smooth (the lemon zest lumps should be as small as possible). Alternatively, you can chop the lemon zest very finely with a knife.
- Add the melted and cooled chocolate-heavy cream mixture to the cream cheese mixture. Whip at the highest speed of the mixer for a few minutes (about 4-5 minutes, using a whisk attachment) until smooth. It should slightly increase its volume (but not much). Be careful not to overmix the cream, otherwise, you will make butter. You can also whip the lemon cream in the food processor.
- Whisk in the lemon juice, cover the bowl with plastic foil, and put it in the fridge for a couple of hours or overnight. The plastic foil should touch the surface of the cream. The cream must be well chilled (!).
Make the pastry dough:
- Making the dough by hand: stir the flour with powdered sugar, vanilla sugar, and salt together. Add cold diced butter, rub the butter into the flour mixture with your fingertips until it resembles a pea-sized crumble, add the cold egg, knead quickly until dough forms a smooth ball (be careful not to over mix it).
- If you‘re using a stand mixer (my favorite way): Add all the ingredients (without the egg) to the mixing bowl. Mix at the lowest speed using a paddle-shaped attachment, until large lumps are formed (they can be of different sizes, 0.5-1.5 cm / 1/4-1/2 inch). Add the cold lightly beaten egg and mix until a smooth dough is formed (be careful not to overmix it).
- In a food processor: Add all the ingredients (without the egg) to the food processor bowl (with the regular blade attached). Pulse 2-3 times until the butter pieces are the size of large peas (they can be of different sizes). Add the cold lightly beaten egg and pulse until the dough begins to come together (be careful not to overmix it). Transfer the dough pieces onto a work surface, and gather them with your hands, forming a dough ball.
- All methods: flatten the dough, wrap in plastic foil, and put in the fridge for 1 hour.
Bake the tart:
- After this time, take the dough from the fridge, divide it in half, roll out each part between two pieces of baking paper to a thickness of approx. 3-4 mm. Make the template (a number, letter, or shape) – you can either print it out from a text editor or just draw it with a pencil on a piece of parchment paper, then cut it out. Place the template on top of the dough and cut out the pattern with a knife (roll out and cut the numbers directly on the parchment paper, otherwise it would be difficult to transfer the dough to the baking paper!). It’s also important to roll out the dough evenly to ensure it browns evenly (especially the sides shouldn‘t be thinner than the center of the dough). Try also not to roll it out too thinly – it will be more prone to break (but you can also cover it with cream so don't worry about that).
- Preheat the oven to 180 °C / 350 °F / Gas Mark 4. Place the rolled-out dough in the fridge while the oven is warming up.
- Bake the dough for about 12-15 minutes or until golden. After 10 minutes keep an eye on it! The tart dough can quickly brown too much. Take out of the oven and remove from the baking sheet. Allow to cool completely.
Assembling and Decorating:
- Fit a piping bag with a round tip (I used a round 11 mm / 0.43 inch tip) and fill it with lemon cream. The cream should be well chilled, otherwise, it won‘t hold its shape for too long.
- Prepare a tray on which the tart will lie. Apply a little cream at the bottom of the first pastry crust so that it doesn’t move while piping the cream.
- Place the first floor of the cake on the tray. You should now create three rows: cream, raspberries, and cream. Arrange the raspberries (in the middle row) and then pipe two rows of cream. Piped cream should have a similar height as the raspberries and should surround the raspberries from all sides.
- Place the second floor of the tart on top of the cream and raspberries (carefully, it’s really fragile!), it's best to carefully slide it off the baking sheet.
- Pipe two or three rows of cream on the second floor of the tart.
- Decorate as desired – I had fresh raspberries (raspberries should be washed and thoroughly dried), raspberry meringue kisses, fresh flowers (their stems should be wrapped in plastic foil so that they don’t have contact with the cream).
- Place the decorated tart in the fridge – it should rest there for at least 3-4 hours. The time needed to soften the shortcrust pastry will depend on the thickness of the dough. It would be best to roll out the dough to a thickness of 3-4 mm / 0.11-0.15 inch and leave for 5 hours in the fridge. The pastry crust should still be crisp but also soft enough to be easily cut into portions.
- Enjoy!

16 Comments
Amy
15 October 2024 at 12:55Hi I can’t wait to make this! I see your recommendation says 6 servings. So does that mean that generally each 14” number will yield roughly 6 servings? I’m looking to serve 25 guests with a 40 a trying to decide how to proceed. Supplement with smaller tarts or can I go larger on the bakes safely? Any other tips? Thank you!!
Mel
6 June 2023 at 18:25My cream just didn’t hold its shape at all. I even left it in the fridge overnight before piping. What do you think I may have done wrong?
Aleksandra
6 June 2023 at 19:08possible reasons: cream cheese not at room temp, cream with chocolate too hot, not whipping the cream long enough
Heather
16 May 2023 at 01:44Do you know how long the dough is safe to keep refrigerated before baking it? Thank you!
Aleksandra
16 May 2023 at 14:09It should be good for sure for 1-2 days in the fridge.
Megan
3 January 2021 at 12:34Can’t wait to make this! How long will it keep? And should I keep it in the fridge, it in an airtight container? Thank you.
Aleksandra
3 January 2021 at 13:10You should definitely keep it in the fridge, an airtight container would be best, but for a couple of hours, you can also store it uncovered (that’s what I did, I didn’t have such a big container). I’m not sure how long it will keep, we ate all of it straight away! This tart is perfect after it has been in the fridge for 5 hours (I’ve written more about this in the instructions) – the cream will soften the pastry so it will be easy to cut into servings. I’m guessing if you keep it longer in the fridge the pastry will soften even more, I think it should keep a minimum of 24h in the fridge but I haven’t tried this myself! Please let me know how the recipe worked out for you!
Janet
3 July 2020 at 02:59I’ve made your number tart recipe three times and it’s gotten raves each time. Your directions are clear and it works so well.
Janet
3 July 2020 at 03:00Oh no typo in my comment!! Tart!
Aleksandra
3 July 2020 at 05:16that was one good typo! 🙂 (I corrected it). Thank you Janet for letting me know!
Chrystal
11 August 2019 at 09:55Thank you for this recipe. I made it for my mum for her birthday and she loved it. A lot easier than I expected! Tasted amazing and the biscuit didn’t go soft and soggy like I thought it might of. Looking forward to making this again.
Aleksandra
11 August 2019 at 09:56Your cake looks beautiful, thank you Chrystal for letting me know!
Helen at the Lazy Gastronome
29 May 2018 at 14:27What a deliciously fun idea! I’d love to have you share this at our What’s for Dinner Blog Party!
http://www.lazygastronome.com/whats-for-dinner-sunday-link-up-150/
Aleksandra
29 May 2018 at 18:26Thank you, I’m glad you like it 🙂
Sheryl
26 May 2018 at 13:40This is such a beautiful tart! Love how sweet and elegant it looks. I’ll love to try this someday 🙂
Aleksandra
26 May 2018 at 14:32Thank you so much 🙂 Give it a try, you will be delighted, I promise! 🙂