
Pierogi ruskie are one of the most popular Polish dishes. The filling is very simple, it’s made with only 3 ingredients, but I can assure you – it’s packed with flavor. It’s the comfort food of every Pole! If you’re looking for the best and authentic recipe for Polish pierogi – this is it!
Where does the name come from?
Potato and cheese pierogi are called in Poland pierogi ruskie. They’re sometimes mistranslated as Russian pierogi. The word ‘ruskie’ means Ruthenian, which is the name of the historical region in Ukraine, which once belonged to Poland. In Ukraine, you can find similar dumplings, but those with cheese and potato filling are not as popular as they are in Poland.
Also, a quick clarification on the word pierogi. The singular form of this word is pieróg and the plural is pierogi. Pierogies, perogies, perogi are not Polish words and no one in Poland calls them this way. These names are rather used in English-speaking countries.
Ingredients
Below you will find information about the ingredients and how to prepare the recipe. For the measurements and detailed instructions scroll down to the printable recipe card.
Here’s what you need to make pierogi dough
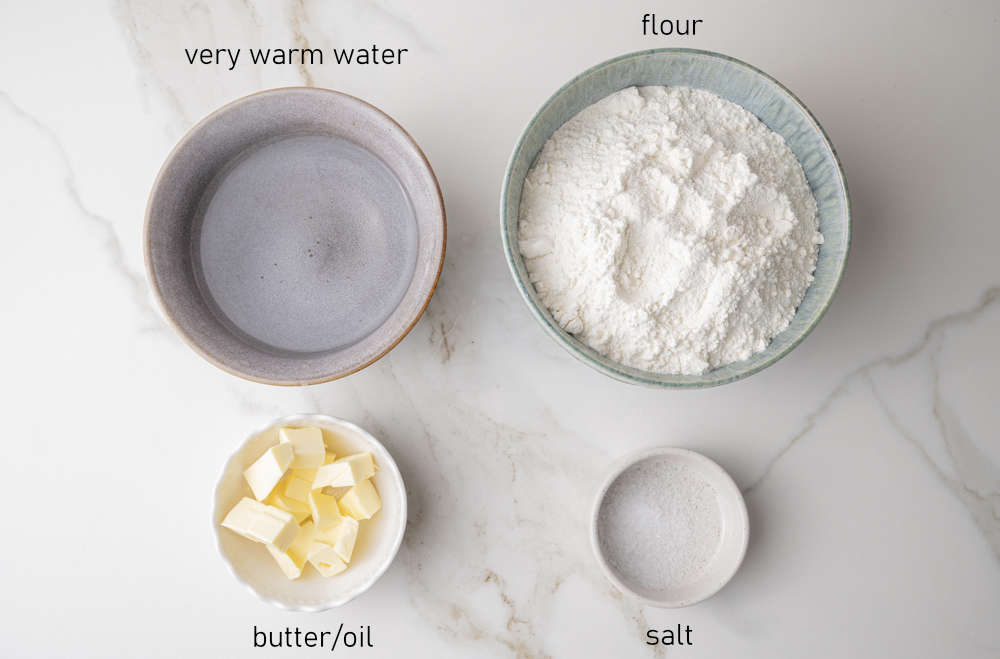
- All-purpose flour. I get a lot of questions about what kind of flour is best for pierogi. In Poland, you can buy a special type of flour that is labeled pierogi flour but you will probably not find it outside of Poland and there is also no real counterpart in the US because 1. wheat is different, 2. flours are categorized differently. In Poland, types of flour are categorized by the ash count (a percentage of ash that remains after burning a sample of flour), and in the US – by the percentage of gluten. I tried many different types of flour when making pierogi and the difference is barely noticeable. The most important is a good and simple recipe. No weird ingredients – sour cream, cream cheese, egg yolks – they are not used in Polish pierogi recipes! I also don’t like to use eggs in my dough, although many people in Poland are adding them to the dough (I find that it makes the dough harder). This recipe is made with my very popular pierogi dough recipe – it has hundreds of raving reviews and it works well for thousands of people all over the world. I personally always use all-purpose flour to make it.
- Very warm water – not boiling and not slightly warm or cold – it makes the dough very soft.
- Salt.
- Melted butter or vegetable oil – make the dough soft, pliable, and easy to work with. Readers also reported that the recipe works with vegan butter. I prefer to add butter because it has a better flavor than oil.
This pierogi dough recipe can be used for any type of pierogi, sweet or savory.
Pierogi ruskie filling ingredients
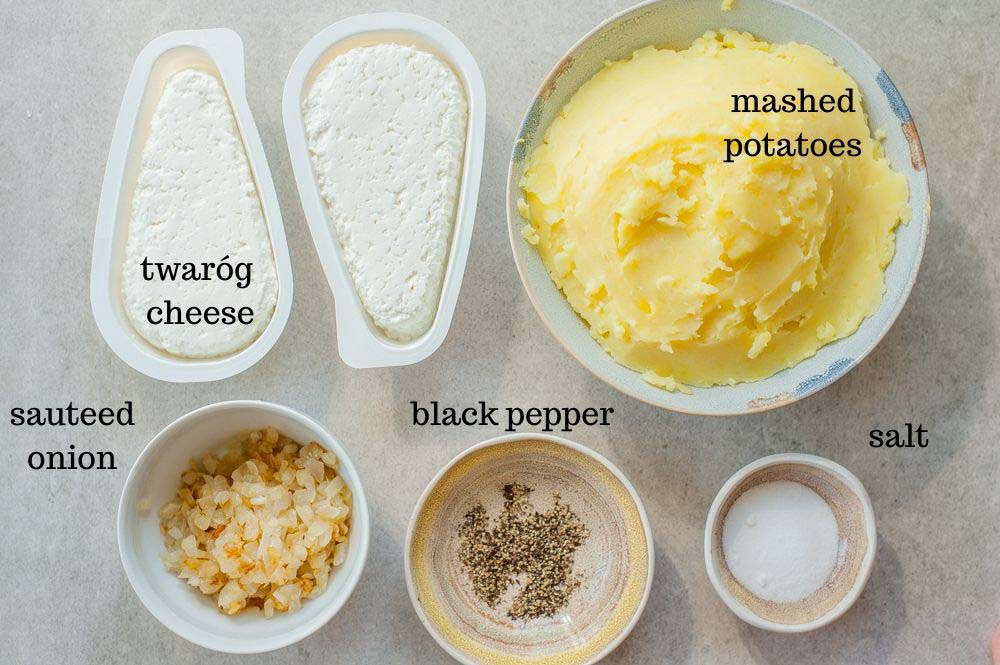
The most important thing here is the potatoes-to-cheese ratio. This is my absolute favorite ratio, but feel free to experiment with what works best for you.
- Potatoes – it’s best to use mealy/starchy potatoes, such as Russets, that can easily be mashed into a puree.
- Cheese – this recipe requires full-fat Polish twaróg cheese. Farmer’s cheese can be used as a substitute (you’ll find more on this below). Do not substitute cheddar cheese – I really don’t understand how some recipes call for this cheese as a substitution – this is a completely different cheese and it tastes so different from twarog cheese. If you can’t find twarog cheese or farmer’s cheese where you live, you can use cheddar, these pierogi with cheddar are also really delicious, but just taste very differently than this recipe. I have a separate recipe for potato and cheese pierogi with cheddar.
- Sauteed onions – lightly caramelized sweet onions add a ton of flavor to the filling. You can’t add too little!
- Salt and black pepper – season to taste but don’t spare on the pepper. Lots of pepper is necessary.
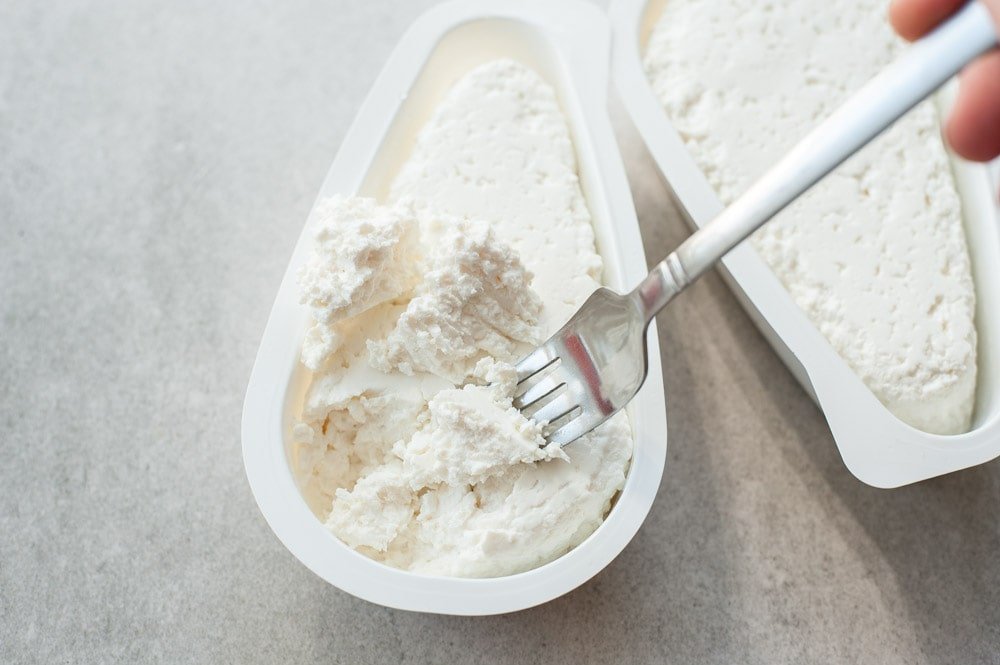
What is twaróg cheese?
Twaróg cheese is a very popular Polish curd cheese, it’s our most important, national cheese. It’s really delicious, fresh, and slightly sour. Twaróg cheese is also sometimes called white cheese in Poland. When you say to someone: ‘buy white cheese’ they will know that you mean twaróg cheese. It is made from soured milk, that is warmed up, then cooled and strained.
It’s hard to find a similar cheese. You can substitute it for farmer’s cheese – it tastes almost the same (it’s just a little less sour and drier in my opinion). Similar white cheeses like cottage cheese, Italian ricotta, German Quark, and Austrian Topfen have different textures and flavors.
You can find twaróg in any Polish supermarket (as well as in Russian or Ukrainian supermarkets). It should be labeled ‚Twaróg tłusty‘ / full-fat (my favorite kind for this recipe) or ‘Twaróg półtłusty’ / reduced-fat or ‘Twaróg chudy’ / low-fat cheese. Twaróg cheese is also used to make Polish cheesecake (sernik).
In my childhood, I often ate it on toast, with butter and honey – it tastes heavenly! Also, the Polish version of ‘mac and cheese’ from my kindergarten – macaroni pasta with twaróg cheese, sprinkled with sugar on top. Yum!
When you google potato and cheese pierogi you’ll find many recipes that call for cheddar cheese. They’re really delicious, but they‘re just not potato and cheese = pierogi ruskie anymore. The taste of cheddar cheese is very different from Twaróg cheese and a couple of years ago it was not so easy to get in Poland (both of my grandmothers still don’t know that such cheese exists).
Can twaróg cheese / farmer’s cheese be frozen?
Yes, you can freeze twaróg cheese / farmer’s cheese. Its texture will be a little different, far more dry and crumbly, so I wouldn’t like to eat it on bread but it can be used for pierogi with no problems.
How to make the pierogi step-by-step
Make pierogi dough
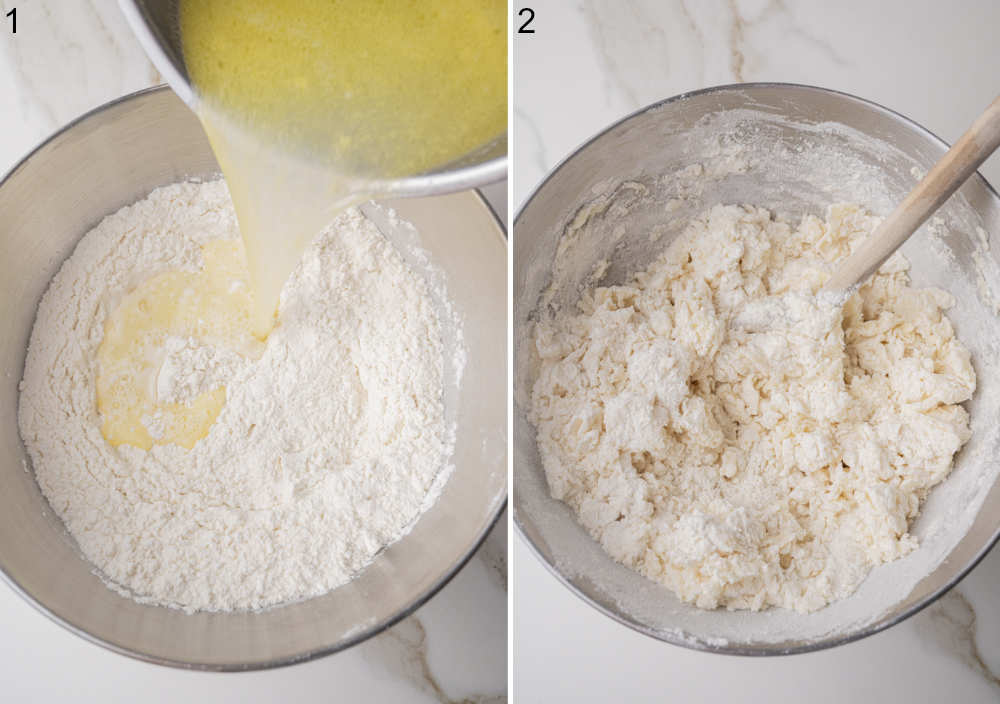
STEP 1: Add the flour and salt into a large bowl, and stir together.
In a small saucepan, warm the water with butter until they are very hot, but not boiling (temperature should be around 80-85 °C / 176-185 °F, that is when the water starts to move and steam).
Pour hot water with butter into the bowl with flour.
STEP 2: Stir with a wooden spoon until roughly combined.
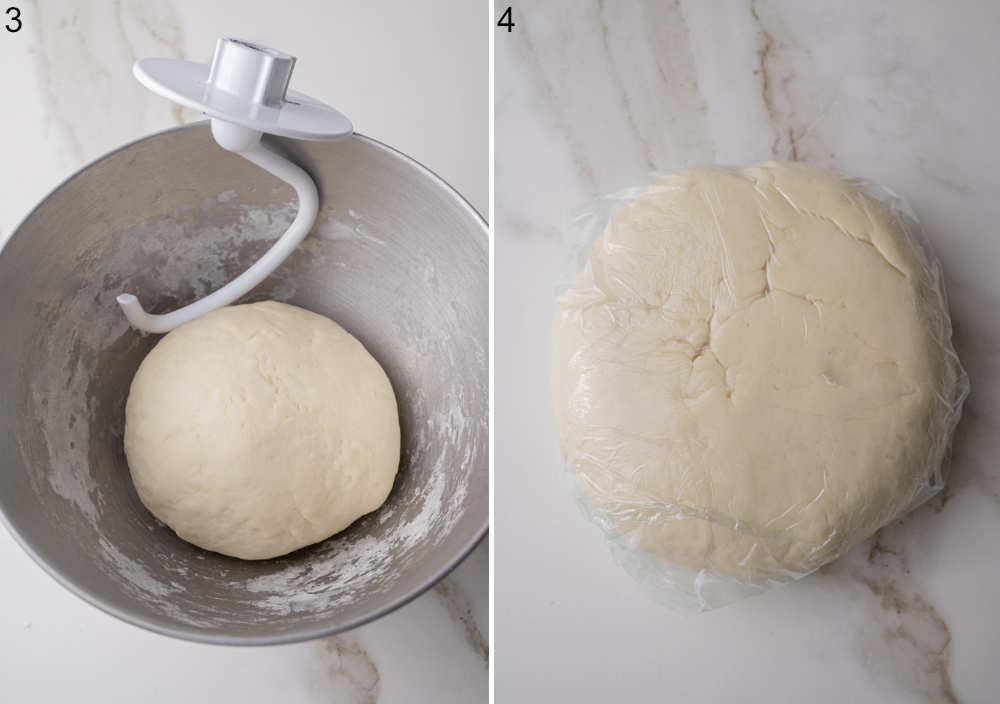
STEP 3: Knead the dough using your hands or with a stand mixer fitted with a hook attachment, for about 5 minutes. A food processor can also be used (fitted with the dough blade). The dough should be smooth, soft, and elastic, it shouldn’t stick to your hands. When you follow the recipe (especially if you weigh the ingredients, instead of using measuring cups), the dough should be perfect, but if for some reason it’s not, add some water if it’s too dry, or a little bit of flour if it’s too wet. If the dough already forms a ball, is relatively smooth, but still tough, it means that it’s not ready, it must be further kneaded until soft and elastic (after resting time it will be even softer).
STEP 4: Wrap the kneaded dough in plastic foil (so it doesn’t dry out), and leave to rest for about 30 minutes (it will be easy to roll out).
Make the potato and cheese filling
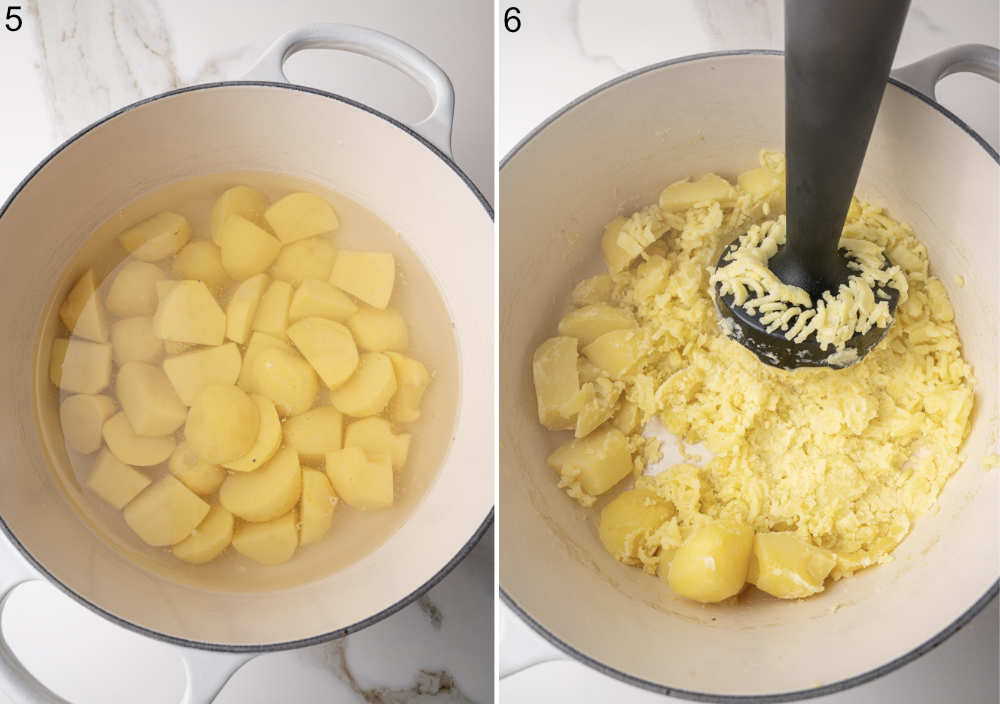
STEP 5: Boil the potatoes in a pot of salted water until soft enough to mash.
STEP 6: Drain and mash the potatoes, transfer to a large bowl, and set aside to cool.

STEP 7: Dice the onion. Heat the oil in a large frying pan, and cook the onions over medium-low heat for about 10 minutes until translucent.
STEP 8+9: Combine the potatoes with cheese and onions, season with salt and pepper to taste.

You can do it with your hands or with a stand mixer (fitted with a flat beater attachment) or with a potato press (I have a blender with a potato masher attachment, it‘s great here).
STEP 10: Optional step: You can form the filling into balls – making the pierogi goes faster this way. This method is not great for every pierogi filling, but in this case, it’s perfect. I scoop the filling with an ice cream scoop, then divide it in half and form a ball, each about 1 1/2 inches (3.5 cm) in diameter, about 0.7 oz (20g) in weight. You can, of course, scoop the filling with a teaspoon – about 1 teaspoon for 1 pieróg. If the filling is not easy to form you can put it in the fridge for 30 mins.
Shape and cook pierogi
STEP 11: Divide the dough into 4 parts.
On a lightly floured surface, thinly roll out the first piece of the dough, to a thickness of approx. 1/16 inch (2 mm). If the dough is hard to roll out, set it aside for about 5-10 minutes to rest.
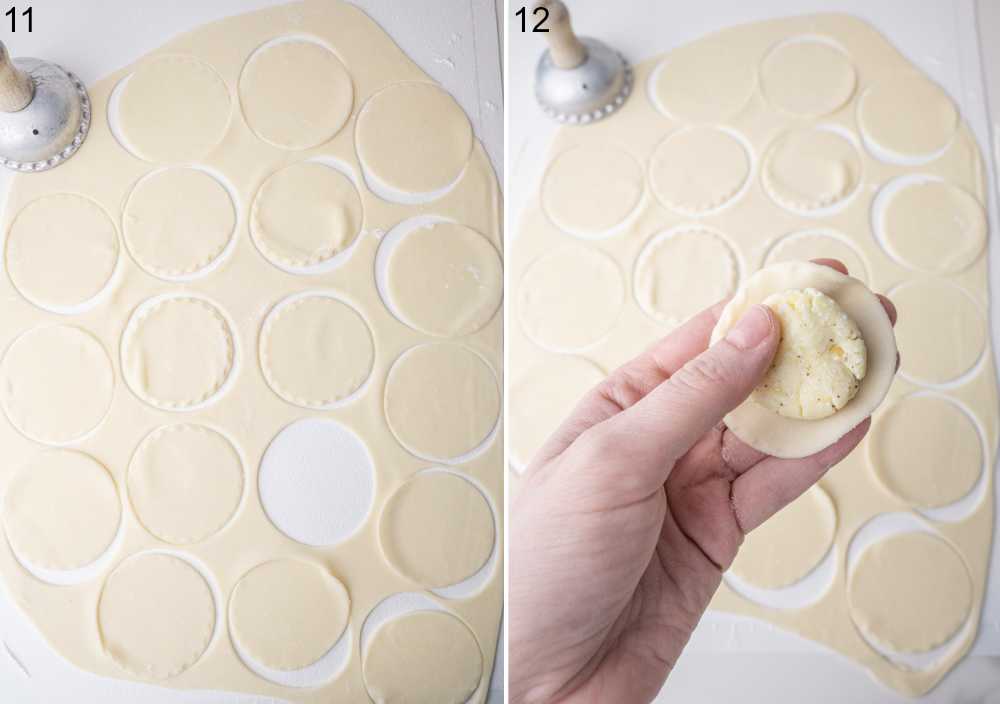
Use a cup or a pierogi/pastry cutter to cut out rounds.
(I also get a lot of questions about this pierogi cutter, it’s very old and 2 3/4 inches (7cm) in diameter!)
Gather the scraps, cover them with plastic wrap, and set aside.
STEP 12: Place one ball of filling (about 1 heaped teaspoon) on each round.

STEP 13+14: Fold the dough over the filling to create a half-moon shape. Press edges together, sealing and crimping with your fingers. Do not leave any gaps or pierogi may open during cooking.
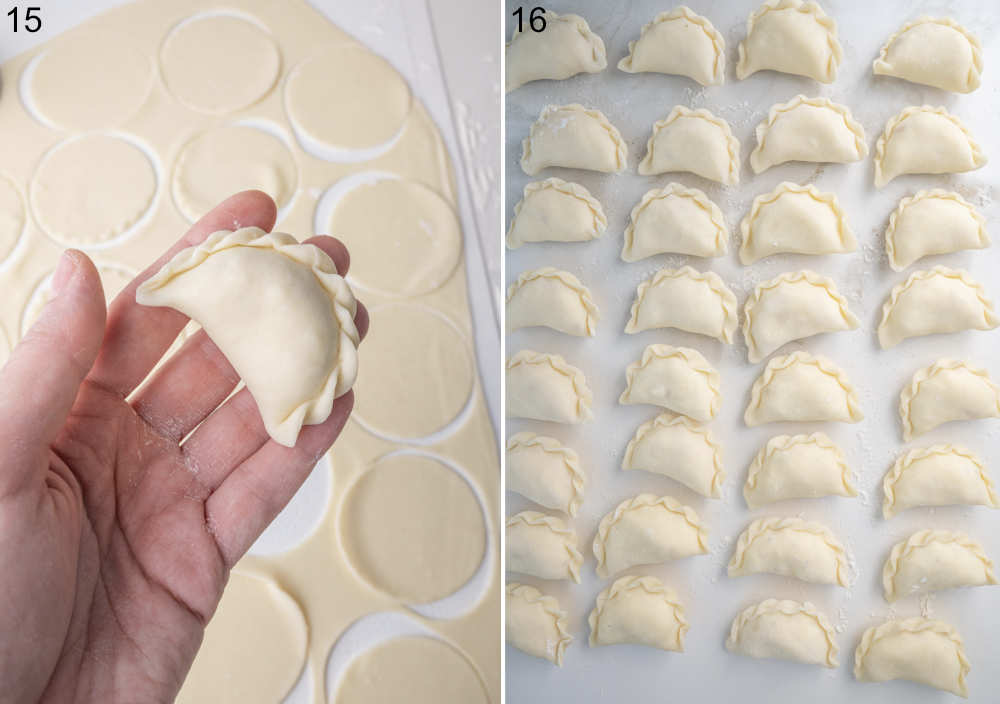
STEP 15: Optional: You can make a decorative edge – it’s shown in the video.
STEP 16: Place the pierogi apart on a floured surface and cover them loosely with a kitchen cloth so they don‘t dry out.
Repeat with the remaining dough.
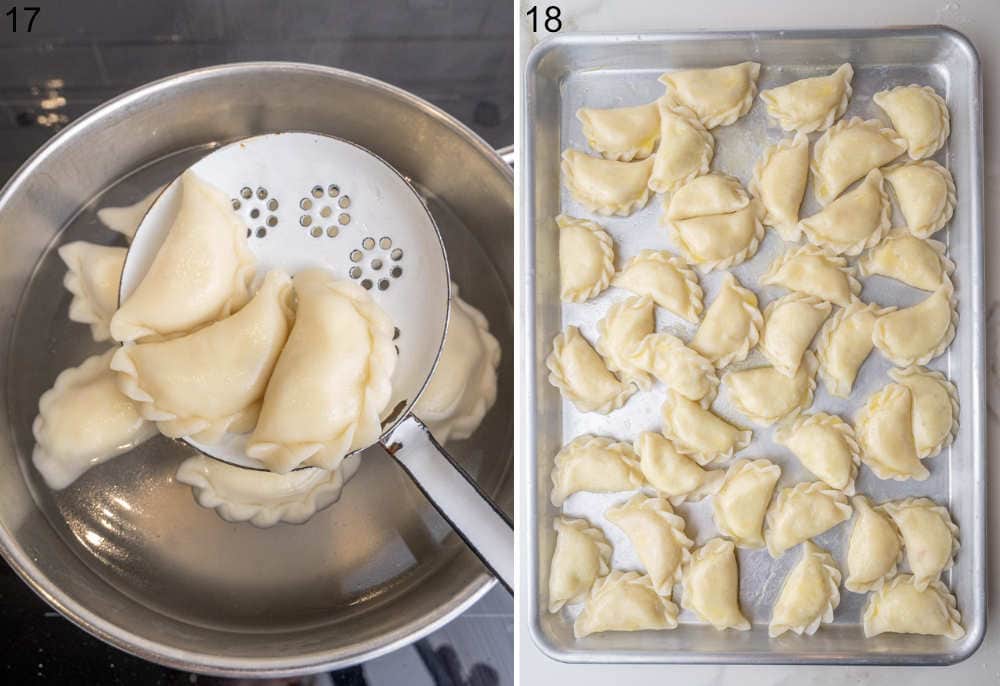
STEP 17: Cook pierogi: Bring a large pot of salted water to a boil.
Cook the pierogi in batches (for a 21 cm /8-inch pot I cook about 10-12 dumplings at a time). When they float to the water surface cook them for 1-2 minutes, then remove from the water with a slotted spoon. The cooking time will depend on the thickness of the dough.
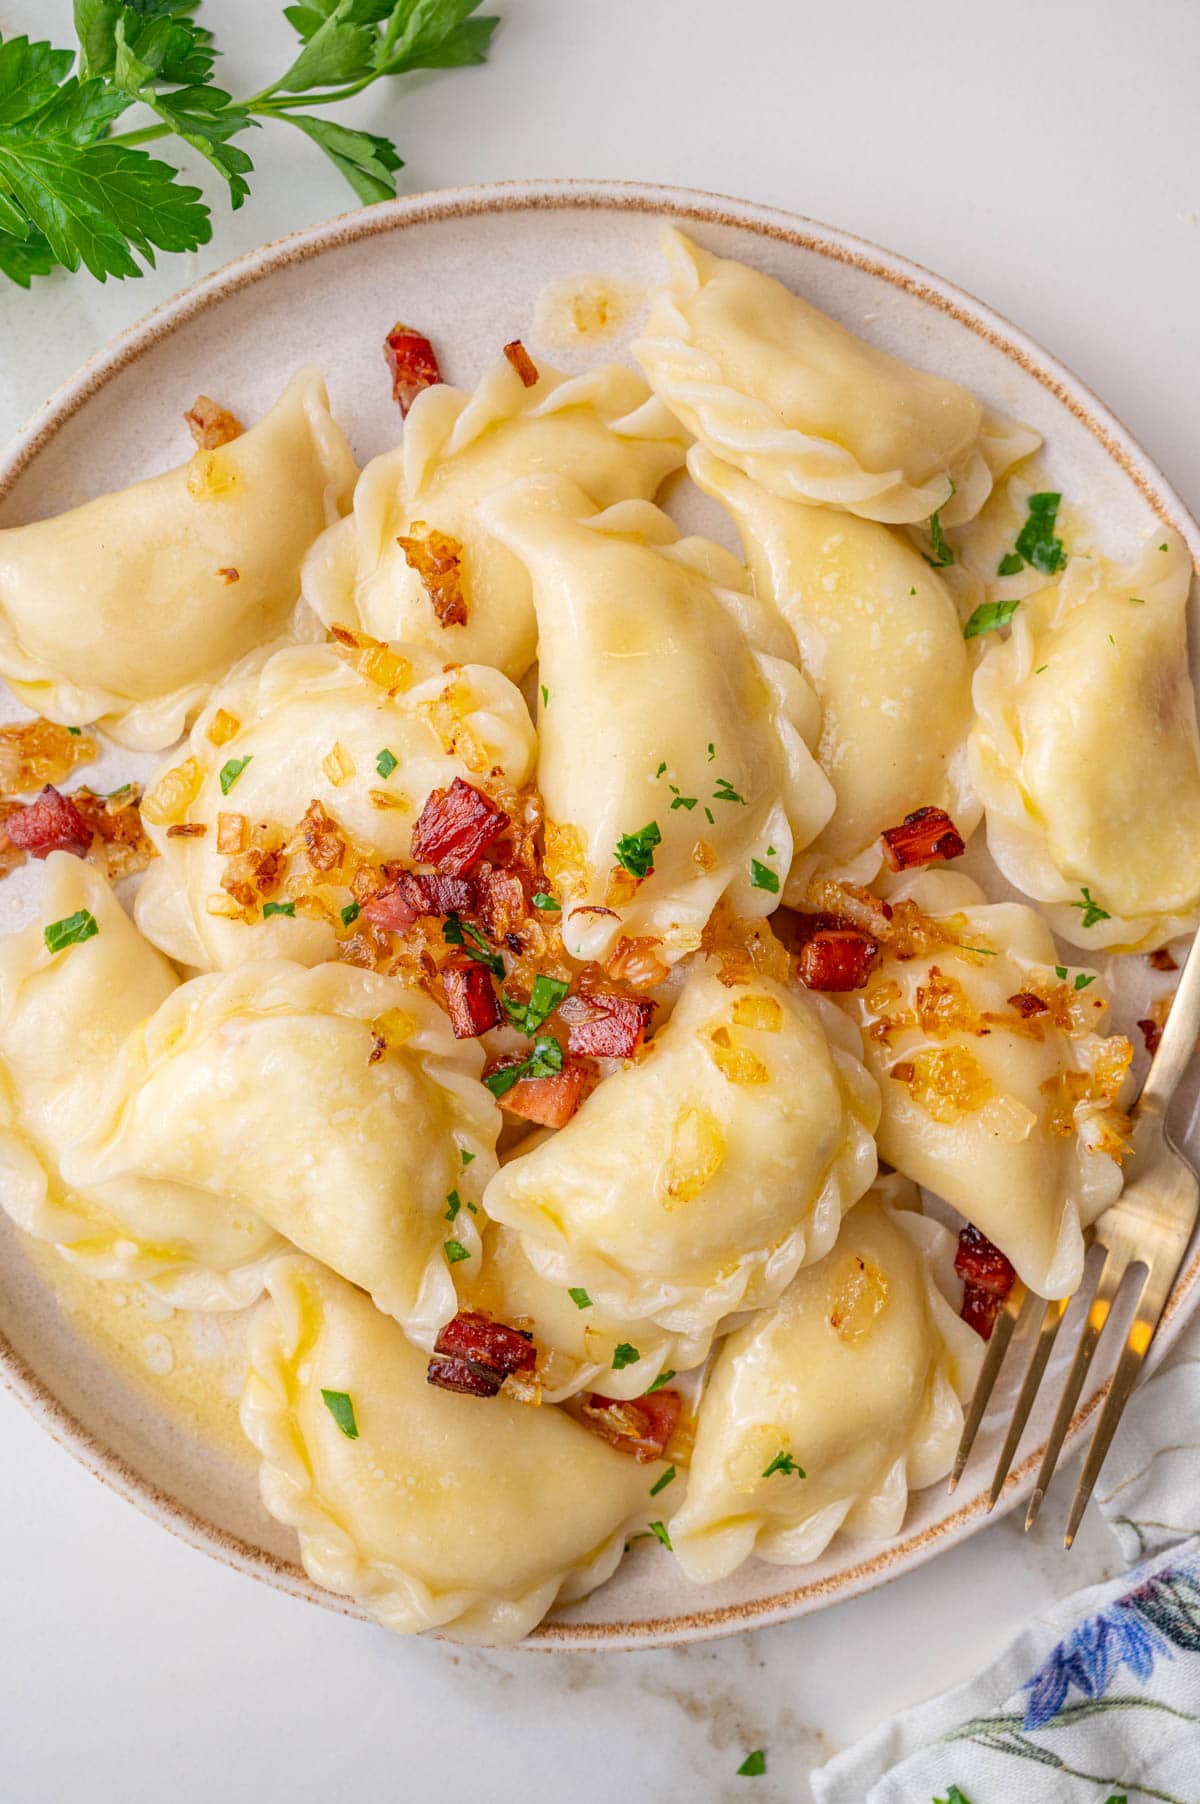
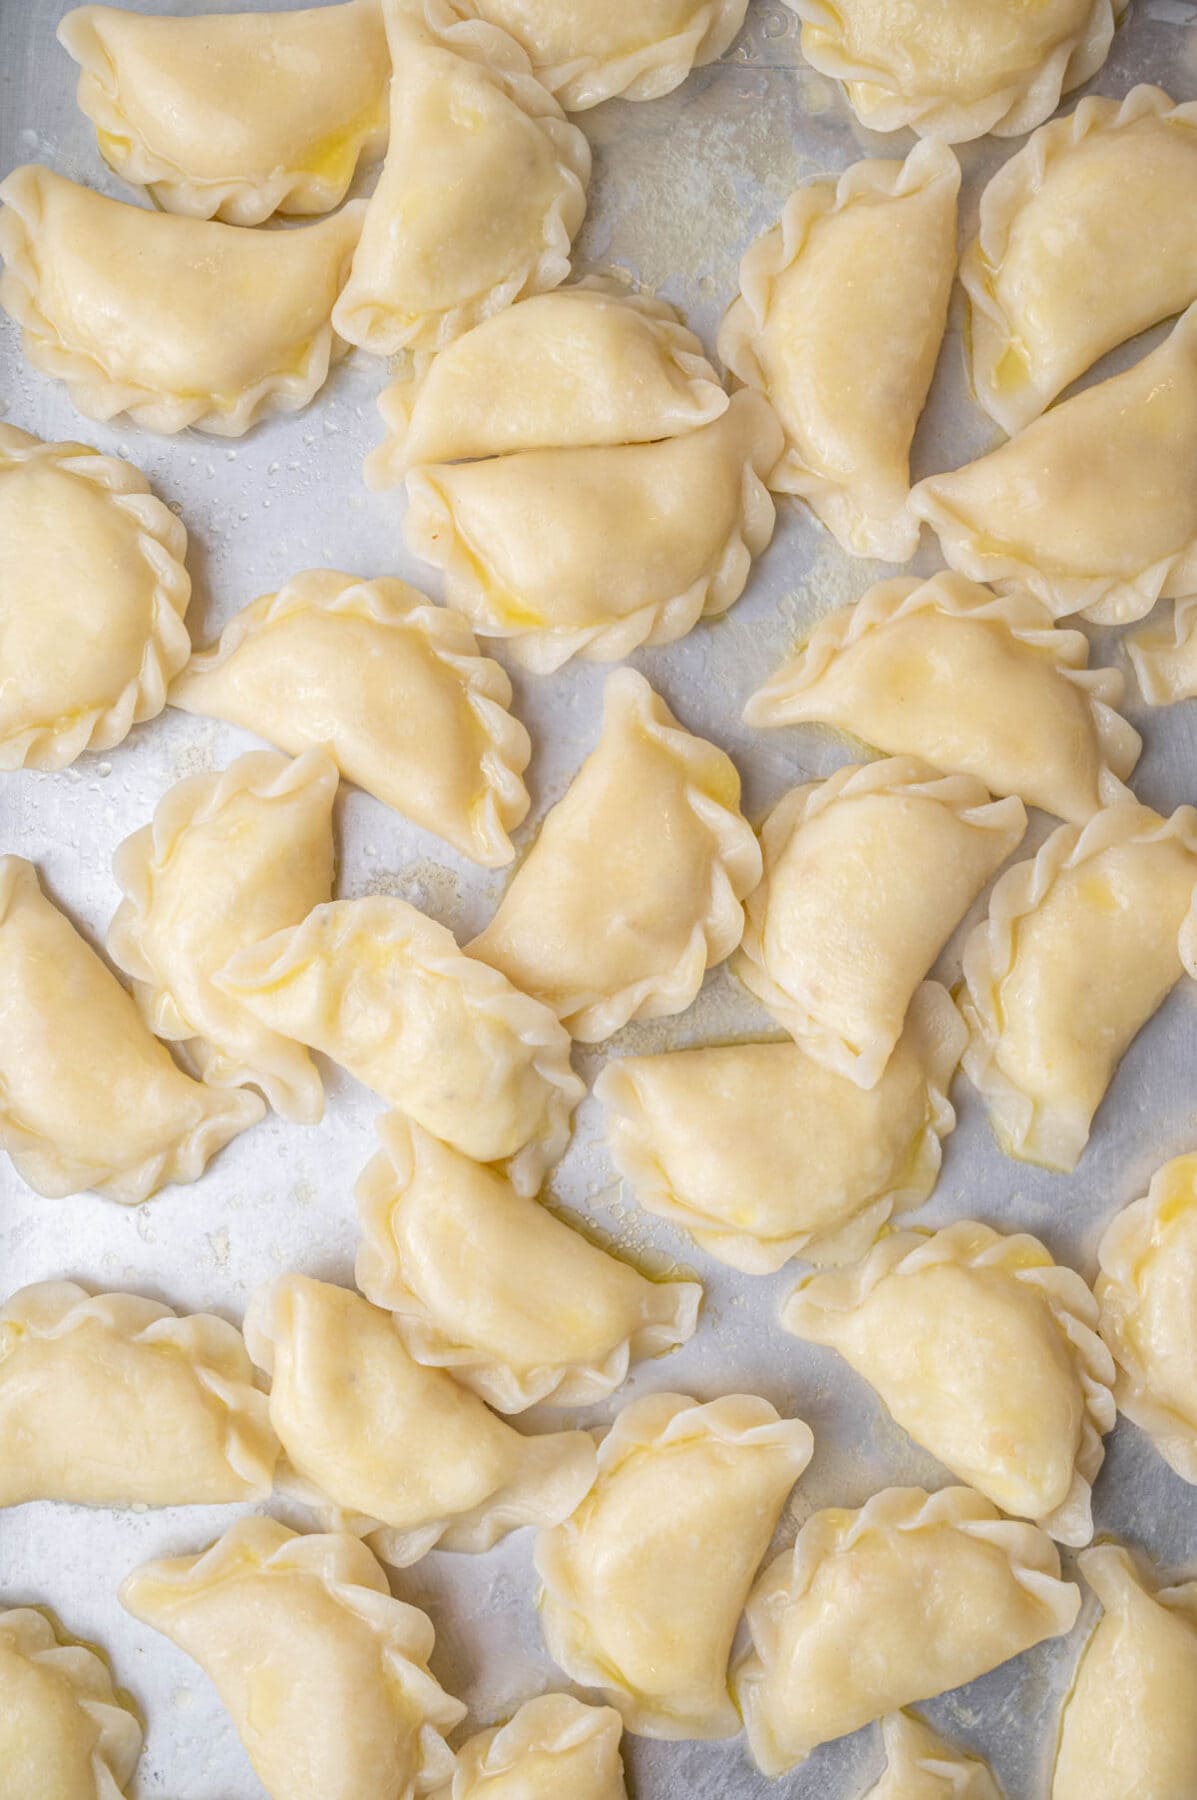
Drain well and transfer to a plate or baking sheet. Pour melted butter over pierogi so they don’t stick to each other.
Enjoy!
Storing and freezing
How to store pierogi:
- To ensure that the cooked pierogi don‘t stick to each other, brush them with melted butter or oil.
- Store in a tightly closed container in the fridge for about 2-3 days.
- On the next day, it‘s best to pan-fry them with butter until golden (see last photo). We usually eat boiled pierogi on the day of making them and pan-fry them in a pan all the next days.
- How to store pierogi dough: wrap the dough tightly in plastic foil and put it in the fridge. Keep for up to 3 days. After removing the dough from the fridge, it is good to slightly warm it up (leave it for about 15-30 minutes on the counter), it will be more elastic and easier to roll out. The next day the dough will be a little gray in color, but we don‘t mind that.
- How to store potato and cheese filling: tightly wrap in plastic foil and put in the fridge. Keep for up to 3 days.
How to freeze pierogi:
- Cooked pierogi: Place the pierogi apart on a tray that is sprinkled well with flour. Freeze until solid. Transfer to containers on plastic bags. Cook like fresh pierogi but take them out once they float to the water surface.
- Uncooked pierogi: Note that not boiled raw pierogi are more likely to crack in a freezer than cooked pierogi. I most often freeze raw pierogi though. Place the pierogi on a tray / wooden board sprinkled well with flour (important, they can easily stick to the tray and tear). They should not touch each other. When frozen, transfer them into containers or plastic bags.
- How to cook frozen pierogi: I cook frozen dumplings just like fresh ones, with the difference that you can cook a smaller amount of them at a time, I cook max. 7-8 frozen pierogi at once (and about 10-12 fresh). When you drop too many frozen pierogi at once it will lower the temperature of the water too much and they can burst.
More pierogi recipes
I have a separate post, where I talk about all the traditional and modern pierogi filling ideas.
Here are some of my other pierogi recipes:
- sauerkraut and mushroom pierogi
- potato and cheese pierogi the American way (cheddar pierogi)
- pink pierogi with spinach and feta filling
- vegan pierogi, with spicy lentil and sun-dried tomato filling
- uszka – porcini filled mini pierogi
Serving suggestions
I like these most with pan-fried thick-cut bacon and sauteed onions. Sour cream is also a good choice. In Poland, these pierogi are most often served with just melted butter, pan-fried smoked bacon (or pan-fried pork fat), and sauteed onions.
Here you’ll find all my pierogi sauces and toppings ideas.
Notes and tips
- Dough to filling ratio: it’s very important but it’s also a matter of taste. I like my pierogi dough not too thin but also not very thick. Experiment what works best for you.
- What to do with leftover dough: Cut it into thick strips and use it as pasta eg with soup. You can also fill the leftover dough with fruit with sugar.
- The amount of pierogi: based on the feedback that I got from readers, the amount of pierogi you’ll get from this recipe can vary greatly! My pierogi are rather small and I like to pack them with a lot of filling, that’s why I got 100 pierogi from this recipe. This may be different for you, and you can get only half of this amount.
- Rolling out with pasta machine: I have a Kitchen Aid pasta roller attachment. I roll out the dough on setting 4. According to the manufacturer’s instructions you need to roll out the dough on each setting until you get to setting 4. I’m not doing this, I roll it out on the setting 4 right away. To make it possible, the dough must be well sprinkled with flour, at room temperature, slightly rolled out with a rolling pin (to a thickness of approx. ¾ cm / ½ inch), and smooth (otherwise it will tear). I personally prefer to roll out the dough by hand – for me it’s quicker but many readers prefer using the pasta machine.
- My pierogi are of different shapes, despite using the same pierogi cutter. Why? Your dough was probably not evenly rolled out. Thicker pierogi will be a bit bigger and maybe you have also filled them with more filling. If the dough is of the same thickness you can cook the small and big pierogi the same way.
- Why is my pierogi dough tough? It’s probably not well-kneaded, not rested or you’ve used cold water. It’s also possible that you’ve added too much flour – add more water until the dough is smooth and soft.
How to measure flour
In the recipe card below, I provided all possible measurements for the pierogi dough – by volume and by weight. I’m always using a kitchen scale to make my pierogi (and generally to develop the recipes on my website). If you’re weighing your ingredients on a scale your results will be very consistent and the same as mine. It’s really easier, quicker, and a kitchen scale is super cheap!
If you’re measuring the flour with measuring cups there is a possibility that you will add more or less flour than I did. You need to check the consistency of the dough and add more flour if it’s too wet and more water if it’s too dry and too tough.
Measuring the flour with measuring cups is unfortunately very inaccurate. 1 US cup of flour can weigh from 120g-140g, depending on how you fill the cup. 20g is a little over 2 tablespoons of flour, so when this recipe calls for 4 cups of flour, you could have added 8 tablespoons more flour which is 1/2 cup! For measuring flour I’m spooning the flour into the measuring cup with a tablespoon and not scooping it with the cup. Level the flour with the back of the knife and don’t tap the cup or press down the flour.

Did you make this recipe? RATE THE RECIPE or tell me in the COMMENTS how you liked it! You can also add a photo of your dish. It would make me very happy and will help other readers. Thank you!!
Pierogi Ruskie (Authentic Potato and Cheese Pierogi) + video

Ingredients
for the dough:
- 4 cups (500g) all-purpose flour (17.5oz)
- 1 cup + 2.5 Tbsp (280g) water (280ml / 10-oz (to weight on a scale))
- 3 tablespoons (40g) butter (1.4 oz), or vegetable oil
- 1 teaspoon salt
for the filling:
- 2.2 lbs potatoes (1kg) mealy/starchy variety, cooked potato weight = 1.8 lbs / 800g
- 8 ½ oz onion (240g) 1 very large and 1 small onion
- 2 tablespoons frying oil
- 17.5 oz full-fat (tłusty) Polish twaróg cheese (500g) or farmer’s cheese
- salt and black pepper to your taste, I added 4 teaspoons salt and 1.5 teaspoons freshly ground pepper
Would you like to save this?
Instructions
Make the dough:
- Add the flour and salt into a large bowl, and stir together.
- In a small saucepan, warm the water with butter until they are very hot, but not boiling (temperature should be around 80-90 °C / 176-194 °F, that is when the water starts to move and steam).
- Pour hot water with butter into the bowl with flour. Stir with a wooden spoon until roughly combined.
- Knead the dough using your hands or with a stand mixer fitted with a hook attachment, for about 5 minutes. A food processor can also be used (fitted with the dough blade). The dough should be smooth, soft, and elastic, it shouldn’t stick to your hands. When you follow the recipe (especially if you weigh the ingredients, instead of using measuring cups), the dough should be perfect, but if for some reason it’s not, add some water if it’s too dry, or a little bit of flour if it’s too wet. If the dough already forms a ball, is relatively smooth, but still tough, it means that it’s not ready, it must be further kneaded until soft and elastic (after resting time it will be even softer).
- Wrap the kneaded dough in plastic foil (so it doesn’t dry out), and leave to rest for about 30 minutes (it will be easy to roll out).
Make the filling:
- Boil the potatoes in a pot of salted water until soft enough to mash. Drain and mash the potatoes, transfer to a large bowl, and set aside to cool.
- Dice the onions. Heat the oil in a large frying pan, and cook the onions over medium-low heat for about 10 minutes until translucent.
- Combine the potatoes with cheese and onions, and season with salt and pepper to taste. You can do it with your hands or with a stand mixer (fitted with a flat beater attachment) or with a potato press (I have a blender with a potato masher attachment, it‘s great here).
- Optional step: You can form the filling into balls – making the pierogi goes faster this way. This method is not great for every pierogi filling, but in this case, it’s perfect. I scoop the filling with an ice cream scoop, then divide it in half and form a ball, each about 1 1/2 inches (3.5 cm) in diameter, about 0.7 oz (20g) in weight. You can, of course, scoop the filling with a teaspoon – about 1 teaspoon for 1 pieróg. If the filling is not easy to form you can put it in the fridge for 30 mins.
Rolling out, stuffing and shaping:
- Divide the dough into 4 parts.
- On a lightly floured surface, thinly roll out the first piece of the dough, to a thickness of approx. 1/16 inch (2 mm). If the dough is hard to roll out, set it aside for about 5-10 minutes to rest.
- Use a cup or a pierogi/pastry cutter to cut out rounds. (I also get a lot of questions about the pierogi cutter that is shown on the photos, it’s very old and 2 3/4 inches (7cm) in diameter!). Gather the scraps, cover them with plastic wrap, and set aside.
- Place one ball of filling (about 1 heaped teaspoon) on each round.
- Fold the dough over the filling to create a half-moon shape. Press edges together, sealing and crimping with your fingers. Do not leave any gaps or pierogi may open during cooking. Optional: You can make a decorative edge – it’s shown in the video.
- Place the pierogi apart on a floured surface and cover them loosely with a kitchen cloth so they don‘t dry out.
- Repeat with the remainig dough.
Cook the pierogi:
- Bring a large pot of salted water to a boil.
- Cook the pierogi in batches (for a 21 cm /8-inch pot I cook about 10-12 dumplings at a time). When they float to the water surface cook them for 1-2 minutes, then remove from the water with a slotted spoon. The cooking time will depend on the thickness of the dough.
- Drain well and transfer to a plate or baking sheet. Pour melted butter over pierogi so they don’t stick to each other.
- Enjoy!
Notes
- The next day I like to pan-fry pierogi in butter until browned and crispy on all sides.
- Cooking time: will depend on the thickness of the dough. Cut one pieróg in half to see if the dough is cooked through. Cook the pierogi to the desired consistency. Some like them chewier and some very tender, like melting-in-your-mouth tender.
-
The amount of pierogi: based on the feedback that I got from readers, the amount of pierogi you’ll get from this recipe can vary greatly! My pierogi are rather small and I like to pack them with a lot of filling, that’s why I got 100 pierogi from this recipe. This may be different for you and you can get only half of this amount.
- Calories = 1/6 of the recipe (1 serving). This is only an estimate.


36 Comments
Kris
13 February 2026 at 00:53This is the best pierogi recipe that I’ve found! Rather labor intensive, but so worth it. I added chopped fresh spinach to half the filling and sauted onion to the other half. Both versions were delicious. I especially liked that the recipe makes a lot of pierogies, as my intention was to freeze most of them after boiling. I got a total of 50 using 18 grams of dough and a tablespoon of filling per pierogi.
Leianna Dolce
25 January 2026 at 23:21Great recipe! How long could I freeze the chill filling for? I ended up with a lot of extra
Aleksandra
26 January 2026 at 08:58I would store it in the fridge for up to 3-4 days and freeze for about 3-4 months. I’m glad you liked the recipe!
Andy Martens
17 December 2025 at 12:49Amazing recipe Aleksandra! My mother is gone, the taste of these pierogi are close to the ones I remember her making. I have also made your mushroom/saurkraut pierogi, fantastic. This takes me back to when the family had dinner.
Thank you for brining back wonderful memories.
Aleksandra
17 December 2025 at 20:50you’re welcome 🙂 thank you for such a nice comment, I appreciate it
Janelle
21 July 2025 at 00:16We made both the dough and the filling exactly as you described. Just as delicious as the best restaurants in Poland. (We just returned from our first trip to Poland three days ago.) We wanted to try them at home and your recipe is perfect. We will make them many times more. Thank you for this perfect recipe.
Aleksandra
21 July 2025 at 05:59you’re welcome! thank you so much for your comment!
COLLEEN M COSTELLO
23 February 2025 at 17:12I am here reviewing the steps again and I LOVE your recipe. I made these at Christmas and my daughter in law said “You have really upped your pierogi game!” My Grandmas are all gone now and no one properly taught me, and your recipe is closest to what I remember. (They made the sauerkraut ones too). Your dough recipe is the best I have tried. Thank you so much.
Aleksandra
23 February 2025 at 19:37you’re welcome! thank you for the comment and photo!
John
24 December 2024 at 00:17My family loved this!
Donna C.
29 January 2024 at 15:51I made these yesterday and the dough was perfect! I don’t have a scale so I was careful with my flour measurement. I had to sub the cheese as I couldn’t find farmers cheese but other than that, made it per recipe. I boiled the dumplings first and then sautéed with kielbasa and caramelized onions. They all held together and were so tender. Absolutely delicious!
Aleksandra
29 January 2024 at 16:53I’m so glad you enjoyed them, thank you for leaving the comment!
Deb
6 December 2023 at 20:10Hi,
So I followed your pierogi dough recipe to the T. I froze mine for about two weeks,defrosted for a day, when I pan fried them on a low-Med heat, melted butter in pan they all stuck to pan, every dozen. What could I have done wrong??
Thanks Deb
Aleksandra
6 December 2023 at 20:47Hi, I’m sorry to hear that. This has something to do with your frying technique, not with pierogi themselfs. Make sure that the butter is not only melted but hot, add your pierogi to the pan and wait a little, don’t try to stir them immediately. If you try to turn them over immediately, they will stick to the pan. When they develop crust (= browning), then they will get unstuck. As you’re frying your pierogi, try to turn each one carefully with a fork, if you feel resistence, just wait a little longer until they don’t stick to the pan anymore. The same goes for frying breaded fish. When a good browned crusts develops, it’s ready to turn over. It takes practice and if it’s really difficult for you, try a non-stick pan. Thawed pierogi can be a little bit sticky. Let me know if you have any more questions.
Ivana
14 January 2022 at 22:14YES, THE RECIPE WORKS AND IT IS DE LI CI OUS! Thank you so much! Measurements are accurate and oh man, what a treat! My family loved it!!!!
Aleksandra
15 January 2022 at 10:00So glad you liked it, thank you for the review!
Wendy
23 February 2023 at 16:46Hi Aleksandra, can these be frozen for use at a later date?
Aleksandra
23 February 2023 at 21:12Yes, sure, they freeze really well! you can freeze them uncooked and then cook like fresh ones or cook them then freeze and add to boiling water just until they float to the surface. I will copy paste this information for your from another post: “Cooked pierogi: Place the pierogi apart on a tray, sprinkled well with flour. Freeze until solid. Transfer to containers on plastic bags. Cook like fresh pierogi but take them out once they float on the water surface.
Uncooked pierogi: Note that not boiled raw pierogi are more likely to crack in a freezer than cooked pierogi. I most often freeze raw pierogi though. Place the pierogi on a tray / wooden board sprinkled well with flour (important, dumplings can easily stick to the tray and tear). Arrange the dumplings so that they do not touch each other. When frozen, transfer them into containers or plastic bags. I cook frozen dumplings just like fresh ones, with the difference that you can cook a smaller amount of them at a time, I cook max. 7-8 frozen pierogi at once (and about 10-12 fresh). When you drop too many frozen pierogi at once it will lower the temperature of the water too much and they will burst.”
Leah
11 May 2021 at 03:41How did you pinch them to such a nice pattern?
I made pirogi today using your recipe it was the first time they did not disintegrate in the simmering water and their content was intact. Was deliciously soft and tasty.
My husband fried a few in a small amount of oil and these were excellent too
Thank you.
Aleksandra
11 May 2021 at 08:56Hi Leah! I’m glad you liked the recipe. You can see how I pinched my pierogi in a video in the post. It’s located in the ingredients section if you’re on desktop or above the recipe card if you’re on mobile. I hope this helps!
Mavis
6 February 2021 at 19:07I’m so happy I found your recipe. I really appreciate how you took the time to explain everything. Your recipe was so good, I made 3 batches in one day..
Aleksandra
6 February 2021 at 19:17I’m glad to hear that, Mavis. Thank you for taking the time to comment!
Jess
12 January 2021 at 20:10I made this today, i am not polish but my husband is and his mother passed away 4 years ago. As her anniversary is coming, i thought It would be lovely to have some homemsde pierogis. This recipe was amazing thank you so much. I followed it exactly and precisely. The dough came out perfect the only thing i did was use too much salt for the cheese and potato filling. I have more filling left over so will make more dough, and enjoy these once more. Thank you
Aleksandra
12 January 2021 at 21:01What a lovely idea to honor your mother-in-law’s memory. Thank you for trying out my recipe
Krystyna
9 December 2020 at 21:47I love your story! I will try your recipe for sure. I thought I was the only one that would eat noodles with butter farmer cheese and sprinkle with sugar. So good!!!
Aleksandra
10 December 2020 at 07:43Thank you! Let me know how you liked it. Noodles with farmer’s cheese definitely bring some good memories 🙂
monika
8 February 2019 at 19:40Also – ruskie aren’t the most popular pierogi – sauerkraut + mushroom are…I am Polish. I would know.
Aleksandra
8 February 2019 at 21:21I’m also Polish. I’ve lived in Poland 25 years (now I’m in Vienna, Austria) and this is the most popular pierogi filling among my family and friends. Maybe it’s different in the region, from which you come from. For me, sauerkraut and mushroom pierogi are the second popular. I don’t think it’s very important though, both are delicious! Best regards Monika 🙂
Michele Jez
16 July 2020 at 18:28I use sour cream and no water for the dough. I love both sauerkraut and potato pierogi. I am 100% Polish and have loved them since I can remember
monika
8 February 2019 at 19:39Water isn’t typically measured in GRAMS…
280 g / 9.88 oz water – do you mean 280 mL?
Aleksandra
8 February 2019 at 21:16Yes, I meant 280 ml. 280g water is 280ml. I’ve written it in grams, because when I’m making pierogi dough I’m always using a digital scale. It’s easier to measure water this way than using measuring cups/spoons. I will notice it in the recipe, thank you.
Erin | white plate blank slate
28 August 2018 at 12:42Making pierogies is on my must-do list. Like Krista, my family always served them with kielbasa and either sauerkraut or braised red cabbage. Yours look delicious – I’ll have to find time to give it a try!
Aleksandra
29 August 2018 at 18:08I’m happy to hear that. I hope you’ll enjoy it!
Carolyn
16 November 2025 at 18:23I followed your recipe yesterday and made these.
They were absolutely delicious amd your recipe is easy to follow.
Krista
13 August 2018 at 21:51Your pierogies look amazing! My grandma always made pierogies and kielbasa (both wiejska and kiełbasa biała, I believe) at Easter brunch with hot cross buns, sausage, bacon, eggs, and the rest of her Easter spread. My husband and I don’t eat meat or dairy now, but I found a shop that sells it without cheese and the pierogies, even without cheese, are just as good as I remember! I’ll have to try your recipe!! 🙂
Aleksandra
23 August 2018 at 18:52That’s interesting, I have never eaten pierogi with kiełbasa, but I’m sure that your grandmothers pierogis were delicious 🙂 If you don’t eat meat or dairy try fruit pierogi – just stuff them with any fruit you like (I like the most blueberries, cherries and strawberries) and serve them with fruit compote. I hope you’ll enjoy them! 🙂