
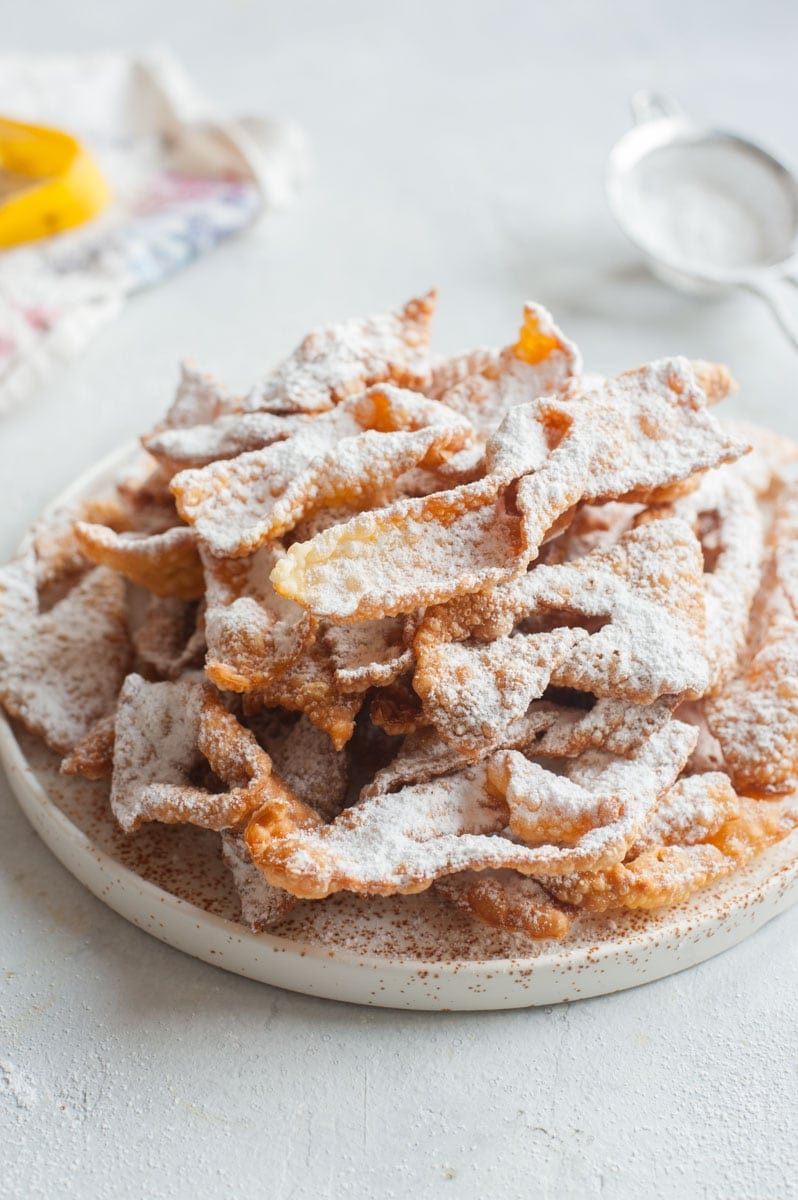
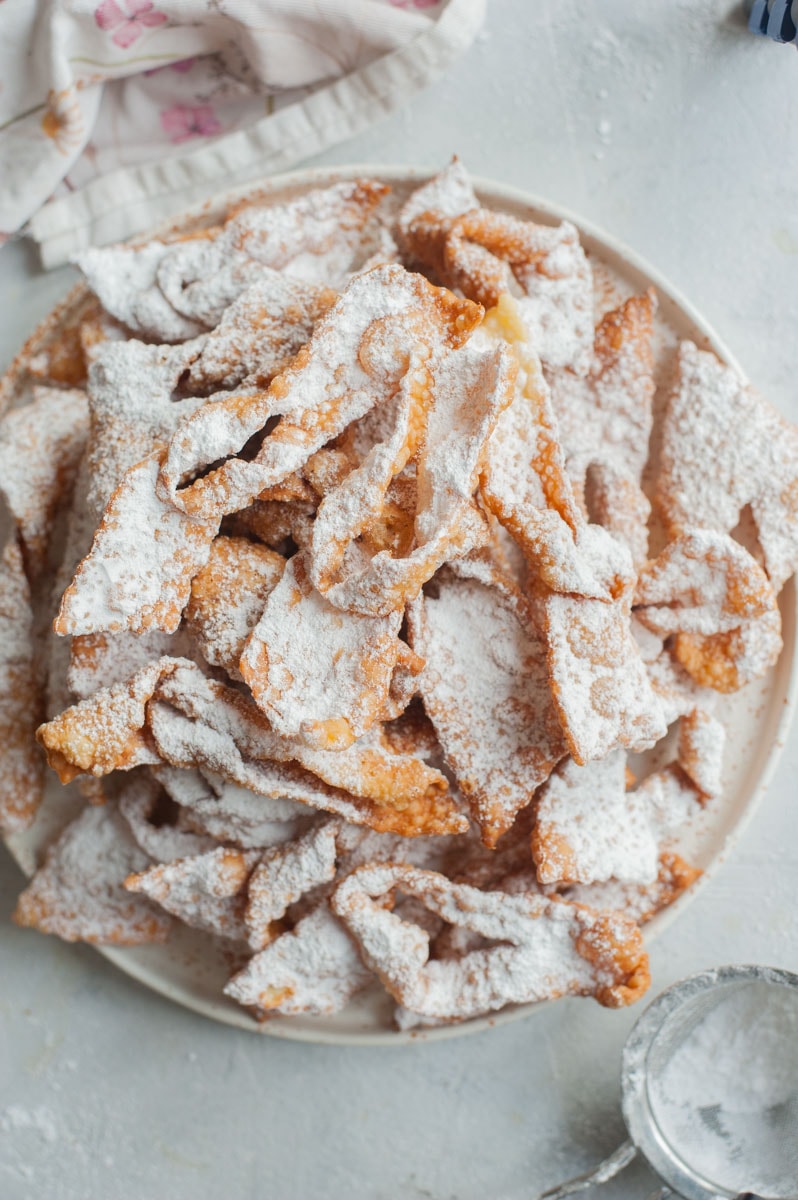
Chrusciki / Chruściki are delicious little treats that are served for Polish Fat Thursday and also thorough the year. They are also called faworki or chrust. Faworki are crispy, melt-in-your-mouth pieces of dough that are deep-fried and sprinkled with powdered sugar. These delicious crispy pastry twists are really worth a try!
Polish faworki
I really love these sweet and crunchy pastry ribbons but I need to admit, they require a little bit of time, patience, and strength (yes!). So I called my grandma to ask her for a recipe – this is what I got: mix some flour with some egg yolks and again *some* sour cream. Beat the dough for 10 minutes with a rolling pin, roll out, then fry in oil, dust with sugar. So please, here you go, there’s the recipe! Jokes aside, I need to admit I was quite intimidated by these tasty treats but as it turned out they are really pretty easy to make!
Perfect faworki should be very thin, crispy, with many air bubbles on the surface (they should not be puffy like doughnuts), and sprinkled generously with powdered sugar (they should be almost white).
The meaning of the name:
According to Wikipedia (I didn’t know that), the Polish word faworki was the name reserved for colorful ribbons attached to either female or male clothing, especially ribbons given to medieval knights by their ladies. This word came to Poland from the French word faveur, meaning ‘grace’ or ‘favor’. Singular is one faworek, plural is faworki.
The Polish word chrust means ‘dry branches broken off trees’ or ‘brushwood’. Chruścik (plural chruściki) is a diminutive of chrust.
Faworki/Chrusciki are traditionally eaten for Polish Fat Thursday (yes, Thursday, not Tuesday like in the USA) along pączki (Polish donuts) and oponki (cheese donuts).
Ingredients
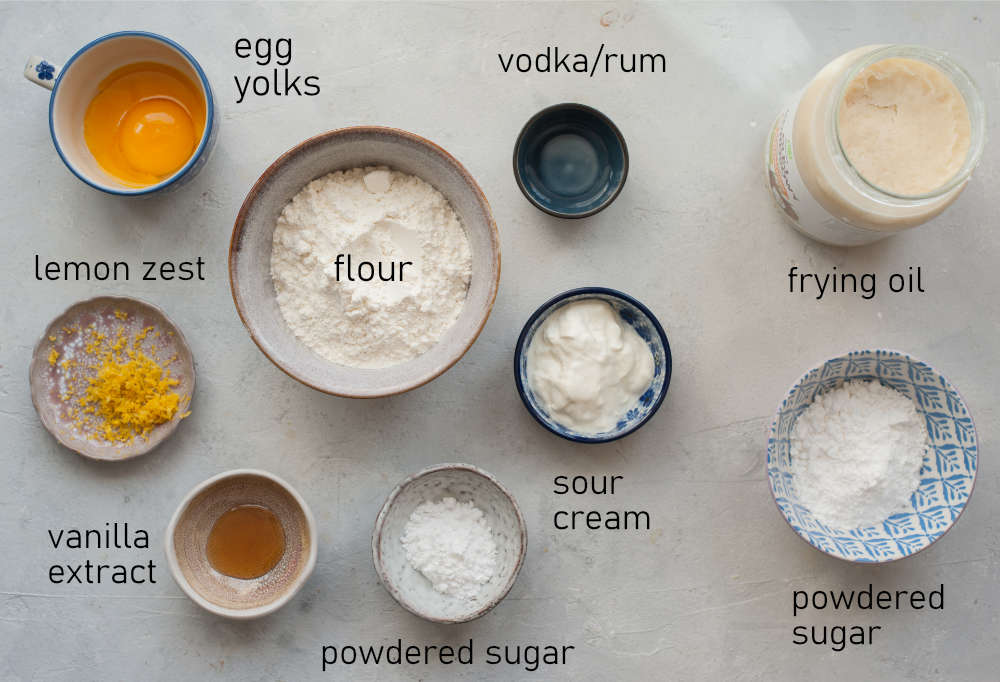
Here’s what you need to make the dough:
- flour – all-purpose flour
- egg yolks – they make the dough crispy and tasty
- sour cream – adds a nice tang to the dough
- powdered sugar – very little, faworki are really very lightly sweetened, most of the sweetness comes from dusting them with sugar after frying, my grandma was using vanilla sugar but I used powdered sugar and vanilla extract since they are easier to get in some countries
- vanilla extract – adds flavor
- lemon zest – this is not a traditional ingredient but it really makes the dough taste so much better, it brightens it up but it won’t taste lemony
- vodka/rum – is added to keep the dough from absorbing the oil while frying, vodka is better than rum because it has almost no flavor but both will work, if you don’t want to add alcohol I’ve read you can add vinegar but I haven’t tried that myself
additionally:
- frying oil – traditionally lard is used but you can use any high smoke point vegetable oil (any oil that can be heated to a high temperature, such as canola or sunflower oil), I used refined coconut oil
- powdered sugar – fried faworki need to be GENEROUSLY dusted with powdered sugar
Some other ways to make it:
- some people add baking powder to the dough to make the faworki more puffy
- faworki made with beer instead of sour cream are also popular
How to measure flour
How to measure flour: if you use a kitchen scale to measure out all the ingredients, it all goes easy breezy! But if you’re using measuring cups, remember that 1 cup of flour can weigh 120-150g, depending on how you’re filling your cup. Don’t scoop the flour directly into the measuring cup, which can compact it! 1 cup of flour in my recipes weighs 125g. To correctly measure the flour, you need to:
- Fluff the flour by stirring it in the bag/flour container with a spoon.
- Spoon the flour and sprinkle it into your measuring cup.
- Sweep off the excess flour with the back of a knife.
How to make it step by step
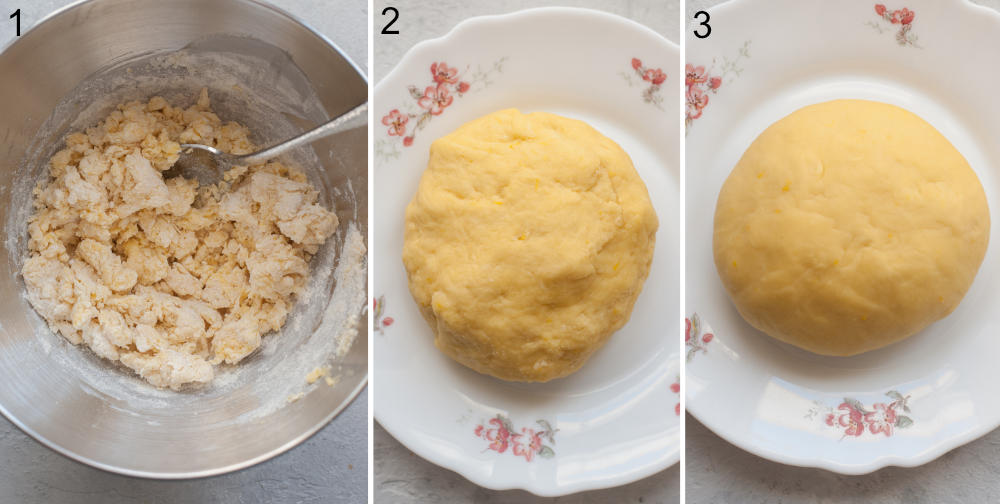
STEP 1: Make the dough (photos 1,2,3): Whisk the egg yolks with vanilla and sour cream, then add all the other ingredients, and knead a smooth dough. I usually stir all the ingredients first with a spoon until roughly combined (photo 1), then knead the dough with a mixer. It will take about 7 minutes with a stand mixer (fitted with a dough hook attachment) or about 12 minutes by hand. The dough should be very smooth (see how it looks in photo 2 – the ingredients are combined but the dough is not very smooth yet, it should look like on photo nr 3).
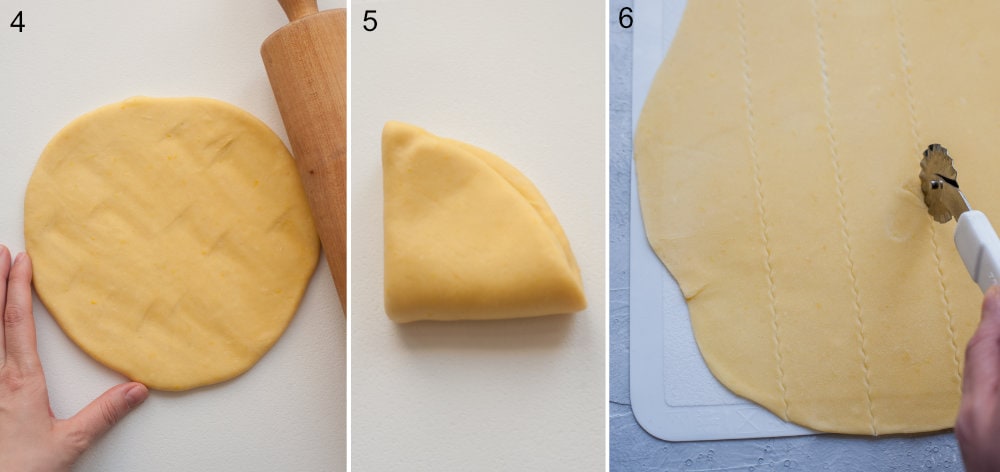
STEP 2: ‘Beat’ the dough: (photos 4 and 5). Roll out the dough slightly (into roughly 8-inch/20cm round/square), fold in half, then fold in half again. Repeat it 4 times or more (the more the better). Beat the dough with the rolling pin while you try to roll it out – this will make these crunchy air bubbles on the faworki. You can roll it out with a pasta machine, but I usually don’t do that – you should beat it with a rolling pin as much as you can (just think about all those things that had happened in 2020 and take it out on the dough!).
Note: beating the dough is not completely necessary but it will result in a very crispy, delicate dough.
STEP 3: Let the dough rest: Wrap the dough in plastic foil and leave to rest for about 20 minutes or longer (it will be easier to roll out).
STEP 4: Roll out the dough: (photo 6) On a lightly floured surface, roll out the dough as thinly as you can (you should see through the dough). I love to use a silicone rolling mat for rolling out any dough. The dough will be rather tough to roll out.
STEP 5: Cut and shape the faworki:
Cut the dough into 1.5-inch (4cm) wide strips (you can use a ravioli cutter wheel or pizza knife) – photo 6.
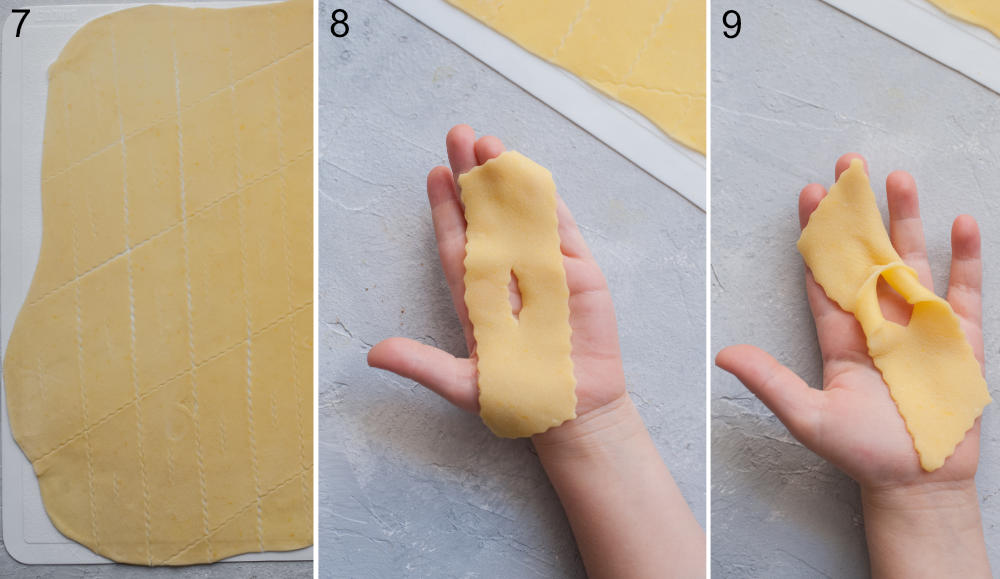
Cut each strip into 5-inch (13cm) long slices (you can cut them parallel to the previous cuts or at an angle, like in photo 7).
Cut a small slit in the middle of each strip (see photo 8, this is a 4yo-child’s hand for a reference).
Twist and pull one end through the slit (photo 9). Cover the dough with a kitchen towel so it won’t dry out.
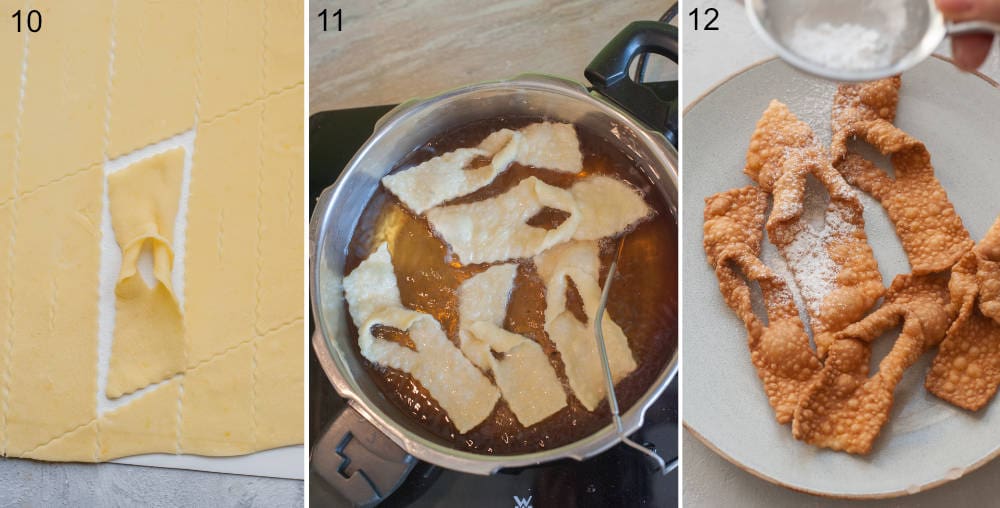
STEP 6: Fry the dough (photo 11): Heat 3-4 cups of frying oil to 355°F (180°C) in a shallow pot or a frying pan. You should have about 2 inches of fat in the pot. Fry the faworki in batches until golden on both sides (using two forks, turn them on the other side). Don’t go away from the pot, they cook fast – about 1-2 minutes per batch. Don’t add too many at once or the temperature of the oil will drop too much and they will soak up the fat. The temperature of the oil should always be between 347°F-365°F(175°C-185°C) – it’s best to check it with a candy/grill thermometer.
STEP 7: Dust with powdered sugar (photo 12): Transfer each batch of faworki to a plate lined with paper towels to drain excess fat. When they are cool enough to handle, transfer them to a second plate and dust them generously with powdered sugar (they should be dusted in sugar while still warm).
Note: the faworki on photo 12 are a little bit too dark, they should be lightly browned / golden brown (I forgot to take another photo!).
Enjoy!
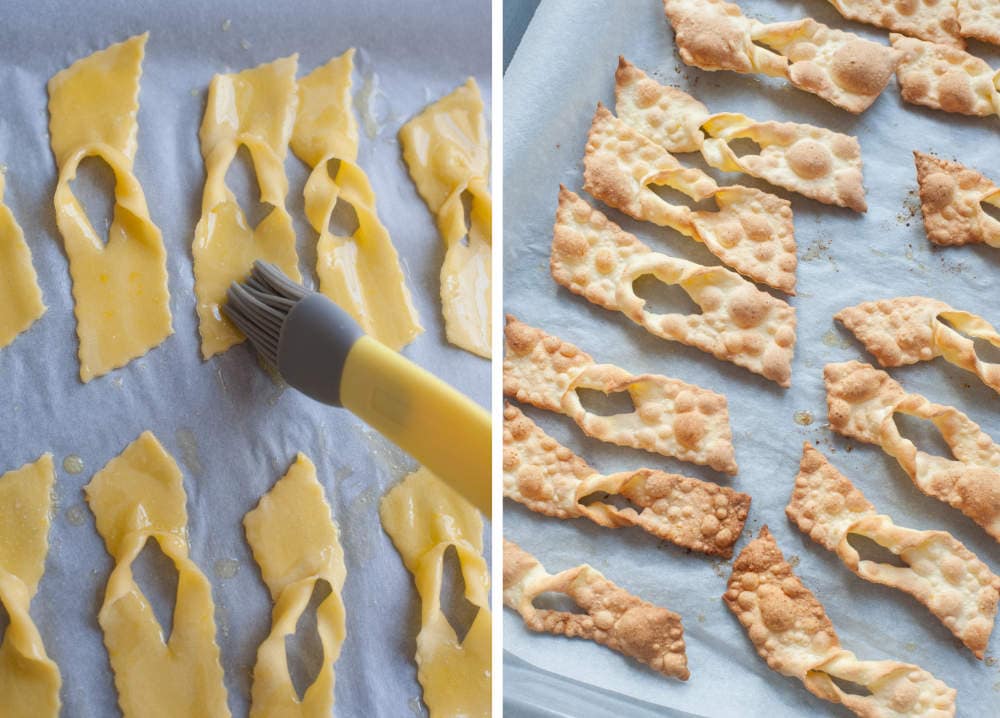
Baked faworki
While testing the recipe I ended up with too much of the dough and I didn’t want to fry it all, so I baked it! The end result was very surprising – baked faworki are also delicious! They are still very crispy and just yum. I also wanted to dip them in chocolate, but they were all eaten before I got to it. Next time!
How to do it: simply place the dough on a baking sheet lined with baking paper, brush it generously with melted butter, then bake for about 8 minutes at 400°F/200°C or until puffy and golden. Dust generously with powdered sugar.
Storage
You can store the dough in the fridge, wrapped tightly in plastic foil for up to 2 days.
You can store faworki in an open container, covered loosely with a paper towel. They are less crunchy the next day but still very tasty (both fried and baked pastries).
More Polish desserts:
- Paczki (Polish doughnuts)
- Apple tart with meringue topping
- Fluffy sweet steamed buns with blueberry sauce
- Nut roll with chocolate (+ video)
- Naleśniki recipe (Polish crepes with cream cheese filling)
- Rogaliki recipe (orange walnut rugelach)
Did you make this recipe? RATE THE RECIPE or tell me in the COMMENTS how you liked it! You can also add a photo of your dish. It would make me very happy and will help other readers. Thank you!!
Chrusciki recipe (Faworki or Polish angel wings) – video

Ingredients
for the faworki:
- 1 1/3 cup (165g) flour
- 2 large egg yolks
- 1/4 cup (60g) sour cream
- 1 tablespoon powdered sugar
- 1 teaspoon vanilla extract
- 2 teaspoons vodka or rum or apple cider vinegar
- 2 teaspoons grated lemon zest or orange zest
- 1/4 teaspoon salt
additionally:
- 3-4 cups frying oil lard or any high smoke point vegetable oil
- powdered sugar: for dusting
Would you like to save this?
Instructions
- Make the dough: Whisk the egg yolks with vanilla and sour cream, add all the other ingredients, and knead a smooth dough. It will take about 7 minutes with a stand mixer (fitted with a dough hook attachment) or about 12 minutes by hand. The dough should be very smooth.
- 'Beat' the dough: Roll out the dough slightly (into roughly 8-inch/20cm round/square), fold in half, then fold in half again. Repeat it 4 times or more (the more the better). Beat the dough with the rolling pin while you try to roll it out – this will make these crunchy air bubbles on the faworki. You can roll it out with a pasta machine, I usually don't do that – you should beat it with a rolling pin as much as you can. Note: beating the dough is not completely necessary but it will result in a very crispy, delicate dough.
- Let it rest: Wrap the dough in plastic foil and leave to rest for 20 minutes (it will be easier to roll out).
- Roll out the dough: On a lightly floured surface, roll out the dough as thinly as you can (you should see through the dough). I love to use a silicone rolling mat for rolling out any dough. The dough will be rather tough to roll out.
- Cut and shape the faworki: Cut the dough into 1.5-inch (4cm) wide strips (you can use a ravioli cutter wheel or pizza knife). Cut each strip into 5-inch (13cm) long slices (you can cut them parallel to the previous cuts or at an angle, like on the photos). Cut a small slit in the middle of each strip. Twist and pull one end through the slit. Cover the dough with a kitchen towel so it won't dry out.
- Fry the dough: Heat 3-4 cups of frying oil to 355°F (180°C) in a shallow pot or a frying pan. You should have about 2 inches of fat in the pot. Fry the faworki in batches until golden on both sides (using two forks, turn them on the other side). Don't go away from the pot, they cook fast – about 1-2 minutes per batch. Don't add too many at once or the temperature of the oil will drop too much and they will soak up the fat. The temperature of the oil should always be between 347°F-365°F(175°C-185°C) – it's best to check it with a candy/grill thermometer.
- Dust with powdered sugar: Transfer each batch of faworki to a plate lined with paper towels to drain excess fat. When they are cool enough to handle, transfer them to a second plate and dust them generously with powdered sugar (they should be dusted in sugar while still warm).
- Enjoy!
Notes
- You can also bake faworki! Brush the dough with melted butter, place on a baking sheet lined with baking paper, and bake for 8 minutes at 400F/200C. They are crunchy and quite good!
- You can freeze egg whites and use them for other desserts that require egg whites.
- Storage: You can store the dough in the fridge, wrapped tightly in plastic foil for up to 2 days. You can store faworki in an open container, covered loosely with a paper towel. They are less crunchy the next day but still very tasty (both fried and baked pastries).
- How to measure flour (if not using a scale): Fluff the flour by stirring it in the bag/flour container with a spoon. Spoon the flour and sprinkle it into your measuring cup. Sweep off the excess flour with the back of a knife.
- Calories = 1 faworek (1/30) of the recipe. This is only an estimate!

11 Comments
Diane Brady
3 May 2025 at 18:55Chrusciki aremy favorite cookies. You directions are superb !
Aleksandra
3 May 2025 at 20:02I’m glad to hear that, thank you for leaving the comment!
Marjorie
18 April 2025 at 17:53Can you substitute light or heavy cream for the sour cream? If so, how much?
Aleksandra
18 April 2025 at 20:04I think so. I would use the same amount and then just a tiny bit more flour, since sour cream is thicker than heavy cream.
elizabeth a Simurdiak
30 December 2024 at 15:39Fabulous recipe with helpful instructions and tips! I have tried many different recipes for this cookie and this is by far the most informative. Who knew you should beat the dough, could substitute with beer and even bake chrusciki? I will try that next!
Aleksandra
31 December 2024 at 01:56I’m happy to hear that, thank you for leaving the comment!
Virginija
3 December 2024 at 12:10Receptas LUX
Linda Raser
2 December 2024 at 23:47We really liked the recipe, it worked well!
Aleksandra
3 December 2024 at 18:12I’m so glad to hear that, thank you for letting me know!
Kelly
2 March 2024 at 14:40Thank you for explaining the technique so well. My grandma’s chruściki were always thin and crispy. The supermarkets around here sell thick ones that I don’t really care for. I have my grandma’s handwritten recipe (which says “add rum until you can smell it”) and now I have more confidence that I can make successfully make them.
Aleksandra
2 March 2024 at 15:13I’m glad the instructions were helpful! Make sure to also watch the video before starting with the recipe. Let me know how it went!