
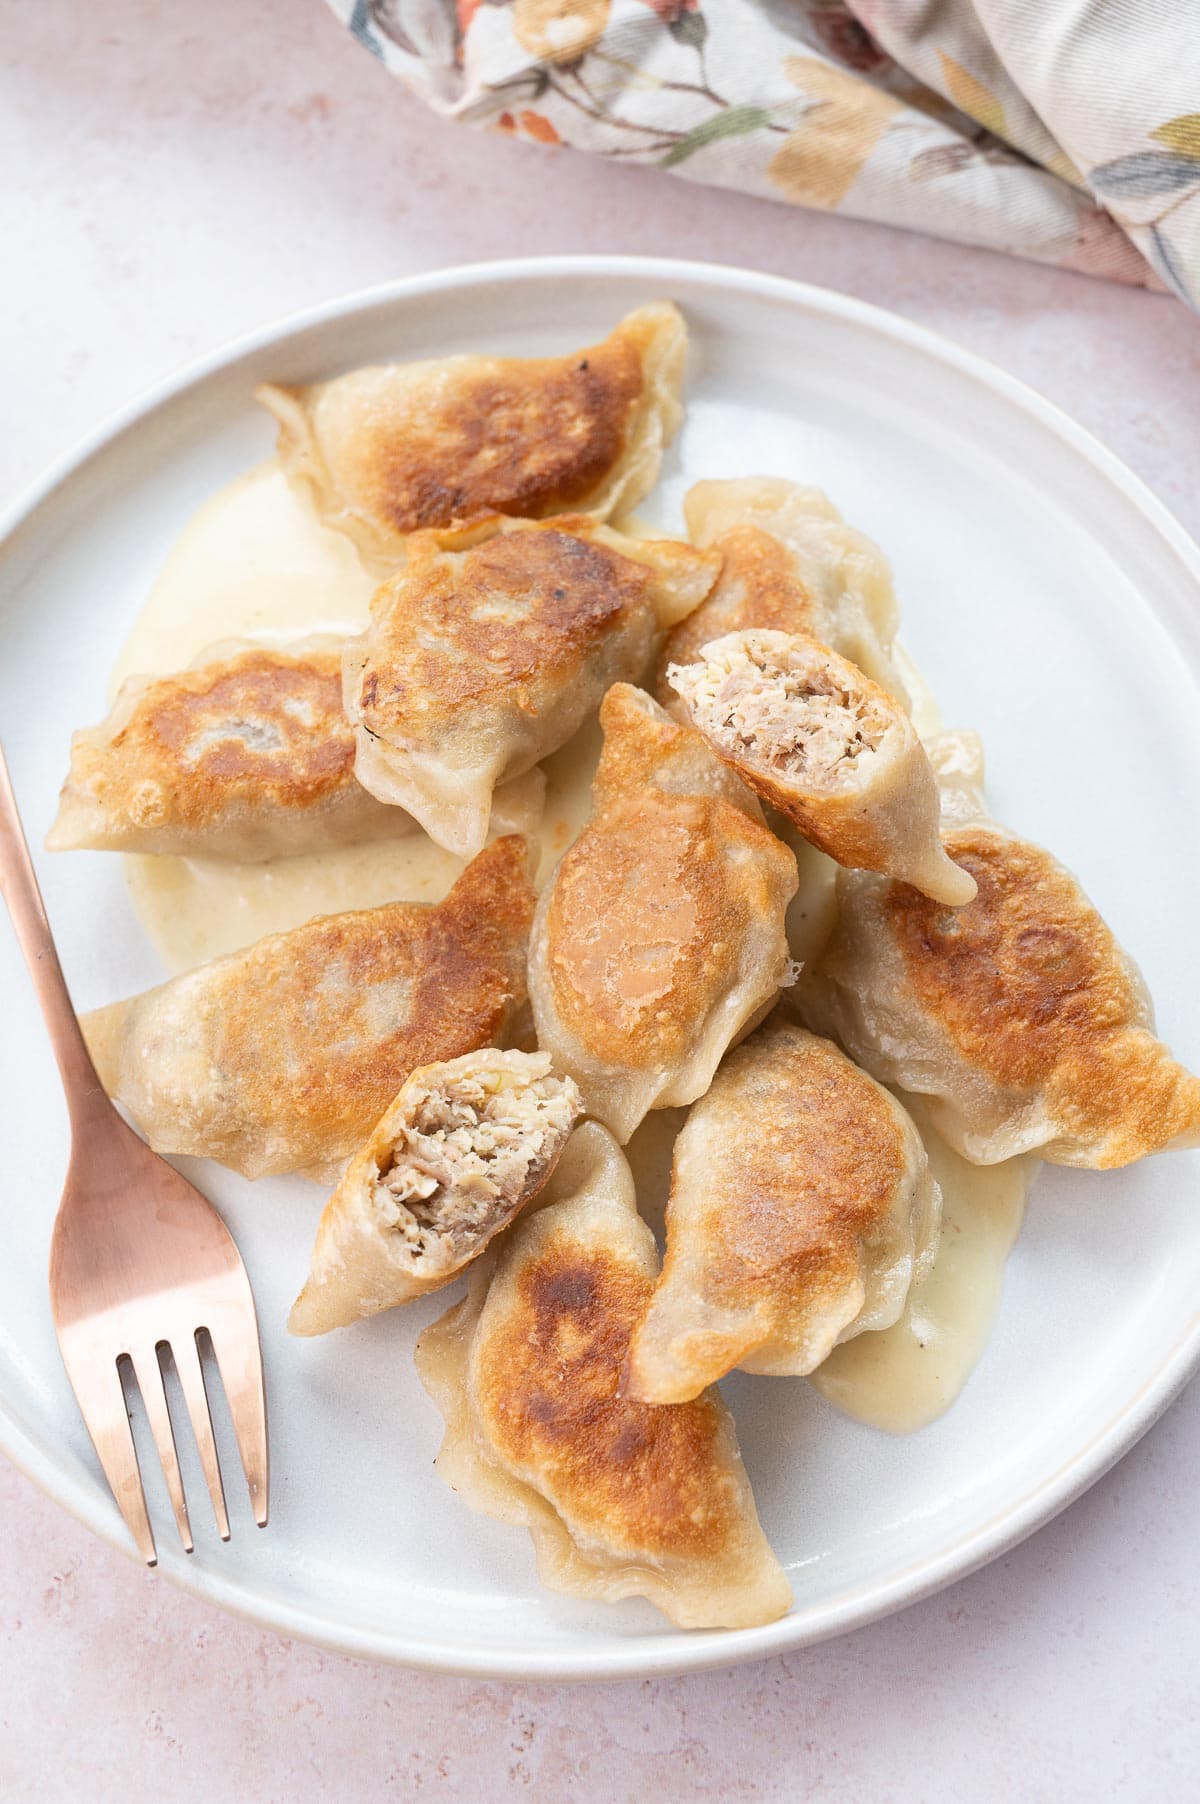
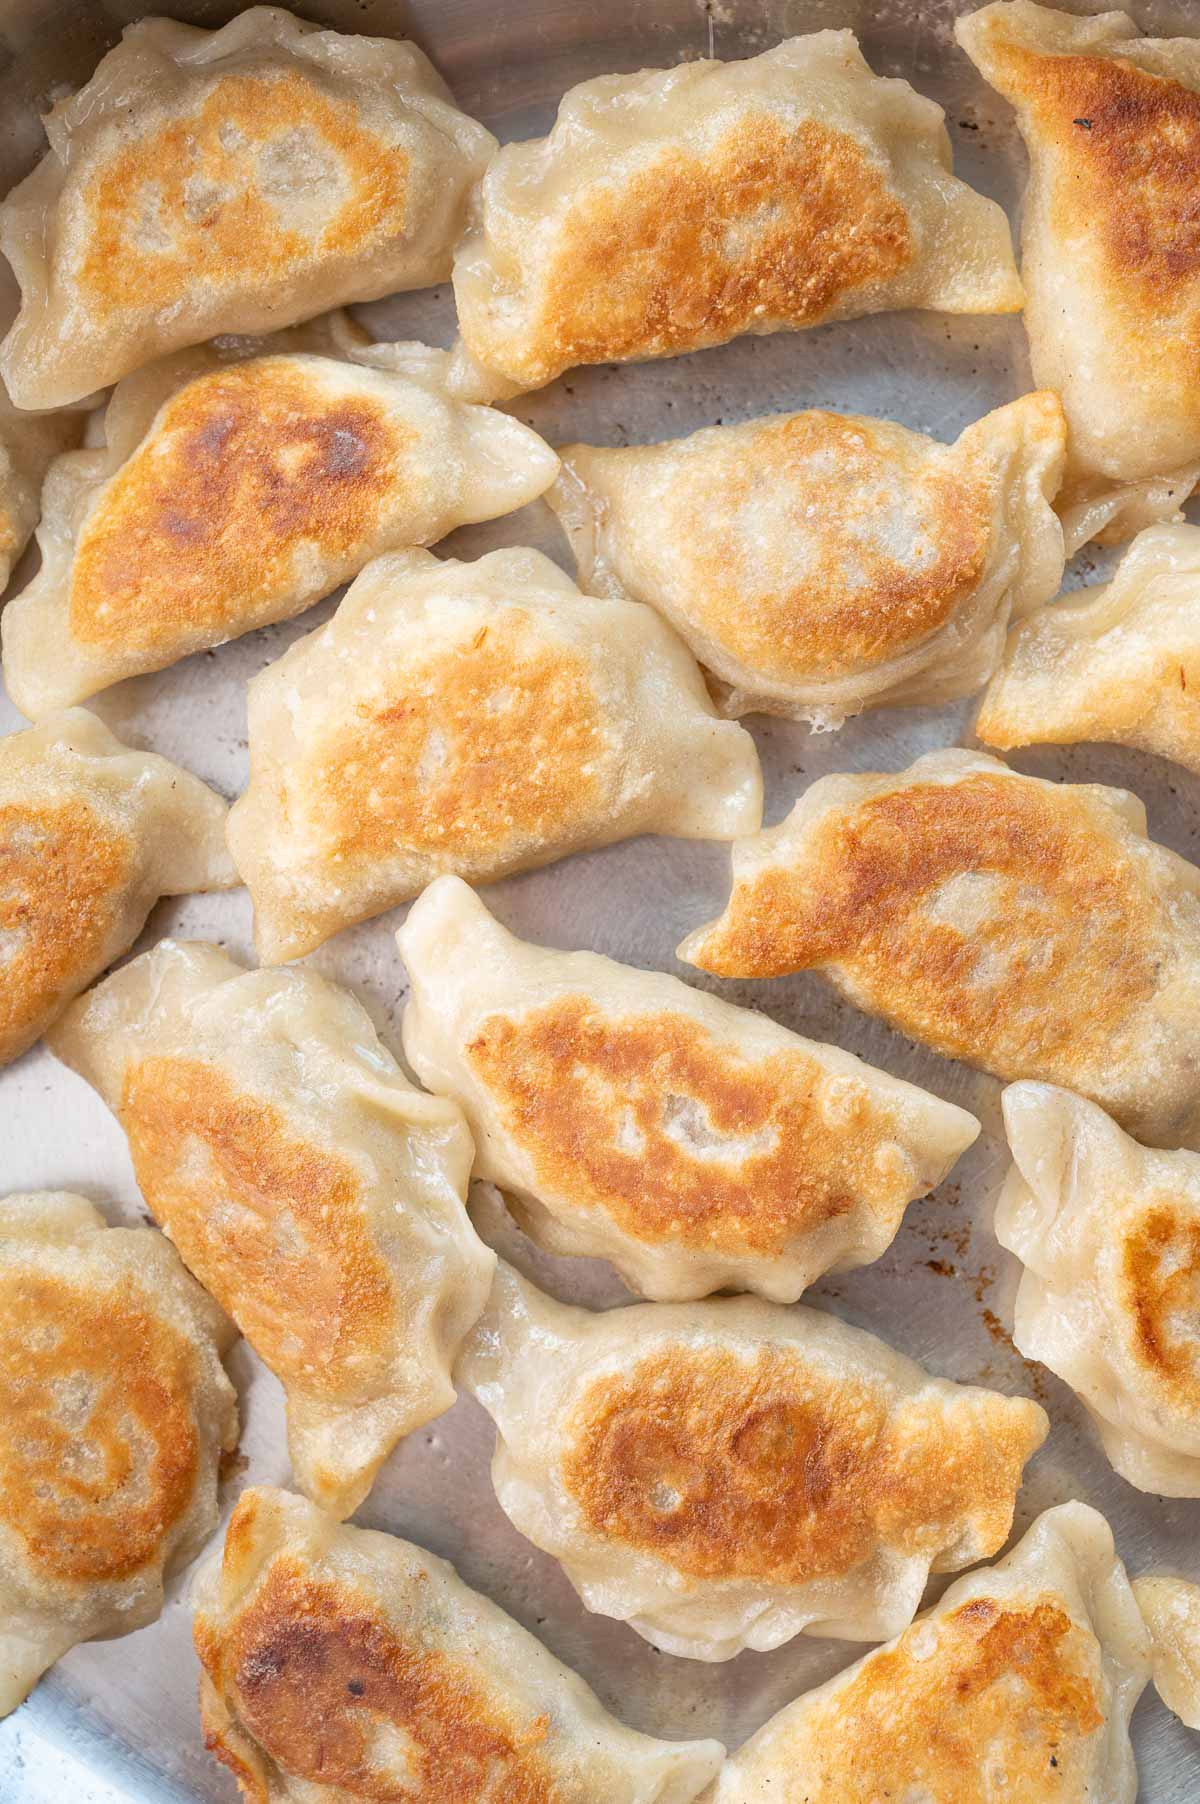
Meat pierogi are one of the most popular Polish dishes. The filling is very simple but flavorful – most people use meat leftover from the rosół soup to make it. The pierogi are boiled and then pan-fried in clarified butter to crispy perfection.
Meat pierogi
Pierogi with meat filling are not that popular abroad but they are surely one of the most popular kinds of pierogi in Poland. The reason is simple – the queen of Polish soups – rosół. In many Polish households, it’s made on a regular basis and sometimes even every Sunday. The downside of this delicious soup is that you’ll have lots of leftover meat that after a long cooking time has not a lot of flavor on its own. Some of it you can add to the soup (I’m actually not a fan of that) and some of it you will need to use up. Meat pierogi come to the rescue! Repurpose the leftover meat into delicious and crispy pierogi!
Surely, these pierogi can also be made with raw ground meat or leftover roast meat (beef or pork) and will be delicious but making them from leftover cooked meat is the most authentic and popular way in Poland. This is also a good way to use up leftover meat if you’re making your own chicken broth or bone broth (beef broth).
Other ways to use up leftover cooked meat is to make pyzy (balls made from potato dough like in this knedle recipe but filled with meat and not fruit), or krokiety.
Ingredients
Here’s what you need to make this recipe:
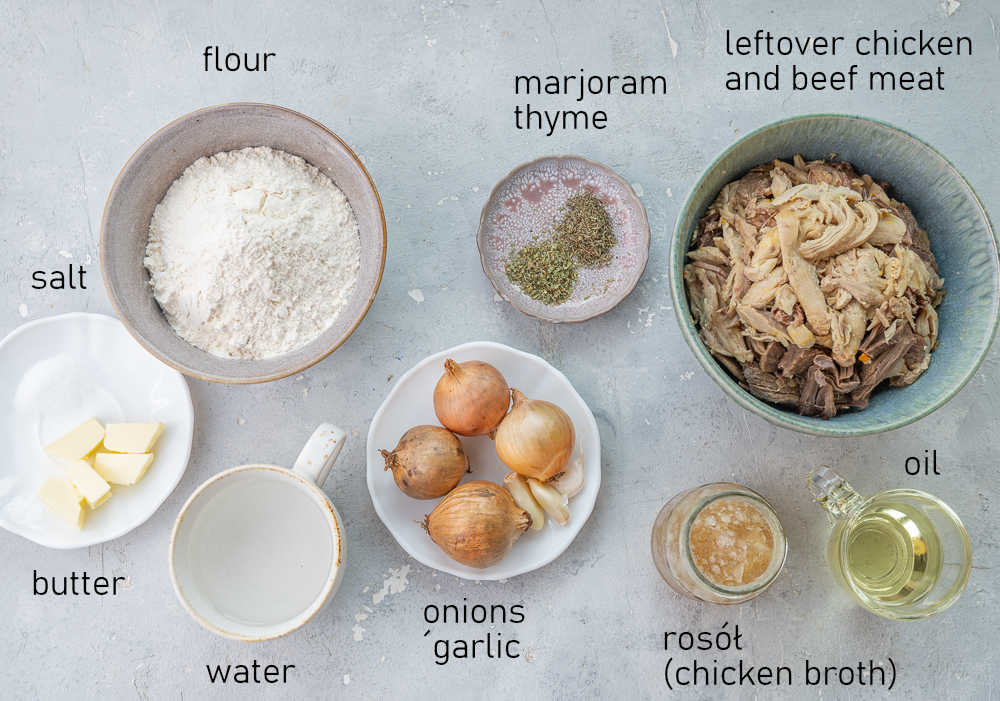
For the pierogi dough, you will need just flour, water, butter (or vegetable oil), and salt. This recipe is a reader’s favorite and has over 100 positive reviews!
For the filling you will need:
- Onions and oil to cook them (don’t skimp on the oil and onions!)
- Fresh garlic
- Spices – I used thyme and marjoram but use whatever you like
- Some of the reserved rosol soup or a really good quality chicken or beef broth – this is an important ingredient – it makes the filling moist and adds flavor that the boiled meat has left in the soup.
- Meat
- I used leftover boiled meat from the rosol soup. It’s important to NOT use just chicken meat. I usually make my rosol soup with chicken and beef and not just chicken. Rosol made just from chicken meat is also good, but not as good as chicken and beef rosol. Don’t use more than 50% of chicken for this pierogi filling. If you have just leftover chicken meat it’s better to use it for another recipe, for example, we like this chicken spread recipe.
- you can also use raw ground meat (beef or beef+pork) that you will cook in a pan
- or leftover roast meat (beef or beef+pork)
- Clarified butter – for pan-frying pierogi – it gives pierogi superior flavor and doesn’t burn as quickly as regular butter. You can also use vegetable oil but the flavor using clarified butter is absolutely the best.
You can also add sauteed mushrooms to the filling, it’s very delicious.
How to make meat pierogi step by step
Make the pierogi dough:
STEP 1: Stir the flour with salt in a medium/large bowl.
Warm the water with butter in a small pot until the butter is melted and the liquid is very warm but not boiling (it’s ready when the water starts to steam).
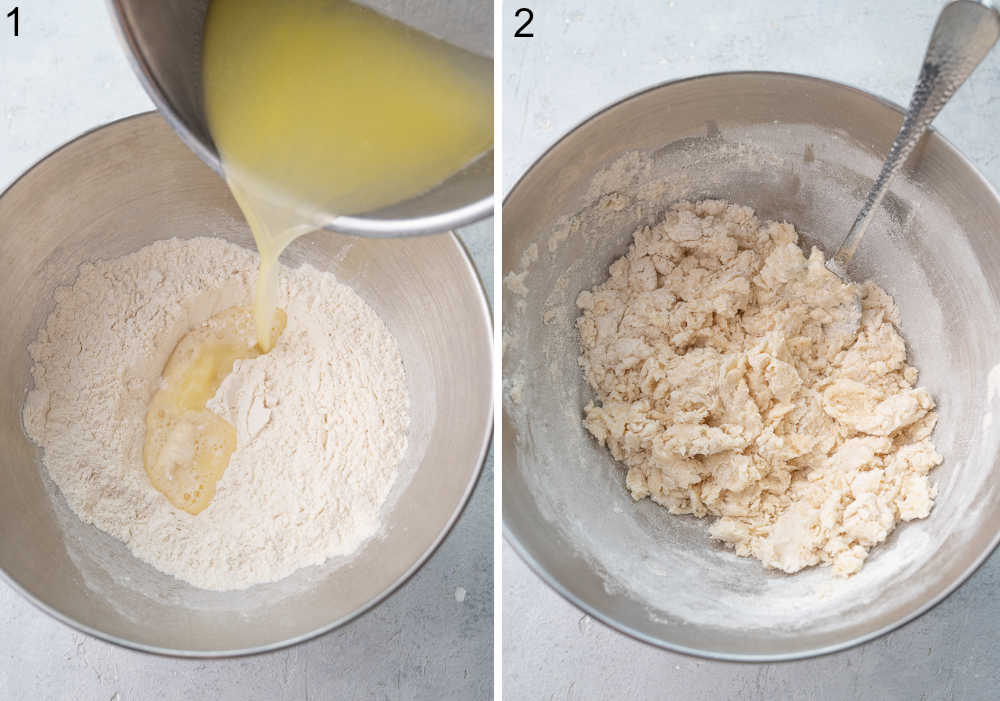
STEP 2: Add the liquid to the bowl. Stir the dough with a spoon until roughly combined.
STEP 3: Knead the dough by hand or with a stand mixer fitted with a hook dough attachment, until it’s soft and smooth (it will take about 5 minutes with the mixer). If you follow the recipe exactly (especially if you weigh the ingredients, instead of using measuring cups), the dough should be perfect, but if for some reason it’s not, add some water if it’s too dry, or a little bit of flour if it’s too wet.
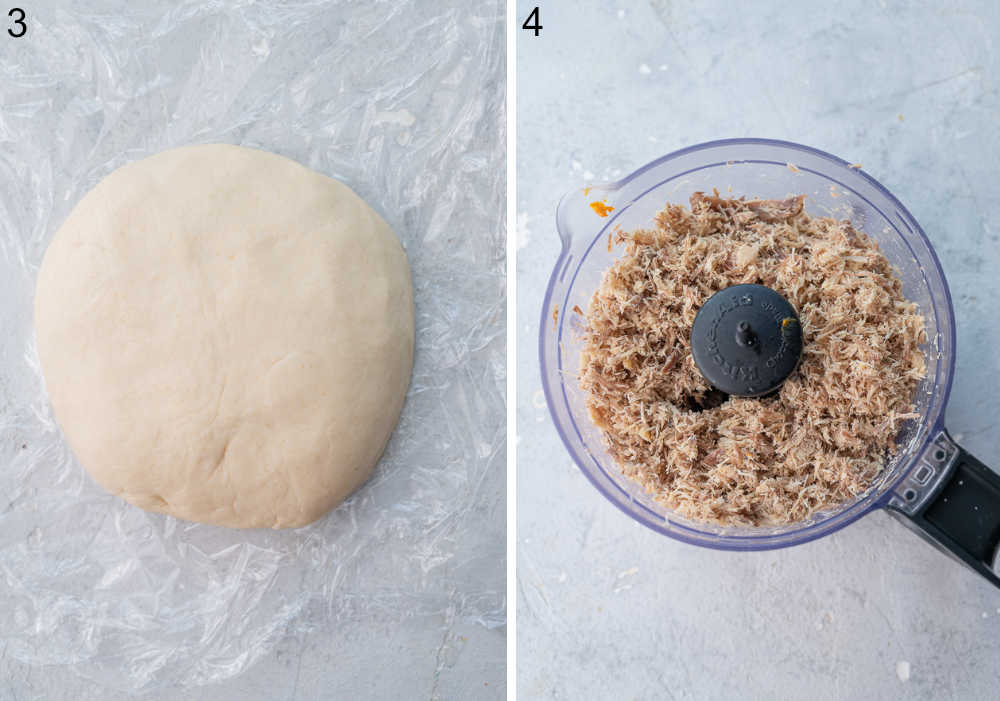
Wrap the dough with plastic foil and leave to rest for 30 minutes.
Make the filling:
STEP 4: Proces the meat in a food processor until finely chopped.
NOTE: Most Polish recipes call for putting the meat through a meat grinder. For me, it makes the filling too soft. The filling made from cooked meat shredded in a food processor may be a little bit too chewy when straight off the pan, but after you have cooked the pierogi it’s perfect. Pierogi with meat ground in a meat grinder have too soft consistency for our taste, but try for yourself what you like best.
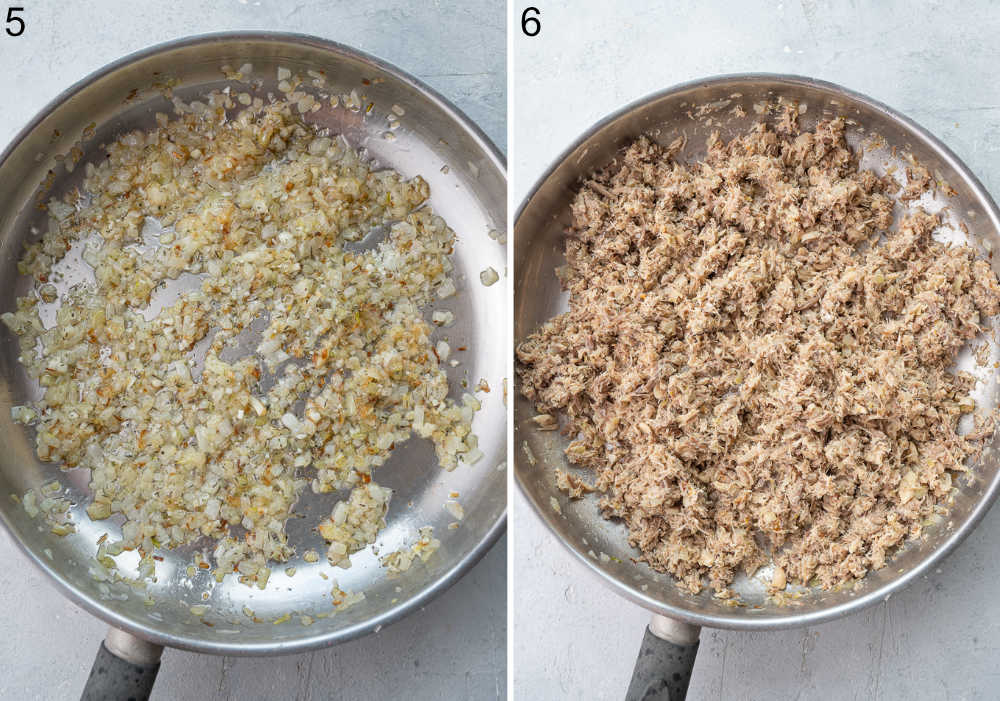
STEP 5: Dice the onion, finely chop the garlic (with a knife and not a garlic press).
Heat the oil in a large frying pan, and the onions, add a pinch of salt and cook for 5-10 minutes until softened.
Add garlic and herbs, cook for 30 seconds.
STEP 6: Add the meat and 1/4 cup of broth. Cook until warmed up. Season with salt and pepper. Add more broth if the mixture is too dry.
Shape and fill pierogi:
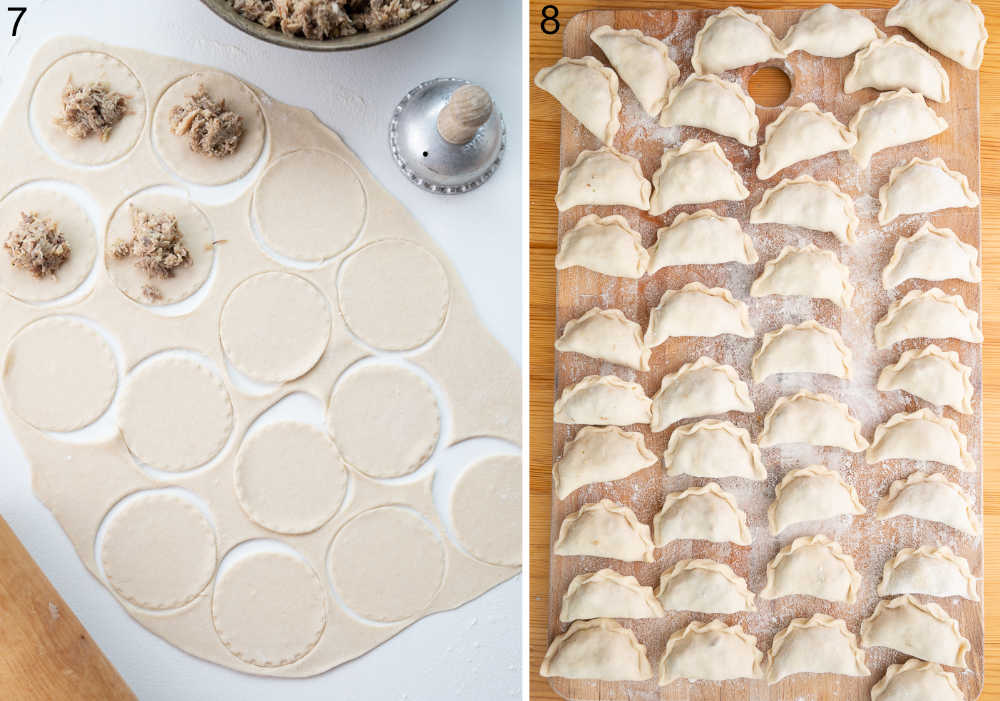
STEP 7: Divide the dough into 2 parts.
Roll out the first part of the dough on a lightly floured surface (I like silicone rolling mats). Cut out rounds with pierogi cutter/biscuit cutter/a glass. The dough should be rolled out thinly. If the dough is hard to roll out, set it aside for about 5-10 minutes to rest.
Gather scraps, cover with plastic wrap and set aside.
Scoop some filling with a teaspoon and pinch it with your fingers so it’s more compact. Place some of the filling on each round.
STEP 8: Fold the dough over the filling to create a half-moon shape. Press edges together, sealing and crimping with your fingers.
Place the pierogi apart on a towel lightly sprinkled with flour, cover loosely with a kitchen cloth so they don‘t dry out.
Repeat with the remaining dough.
Cook pierogi:
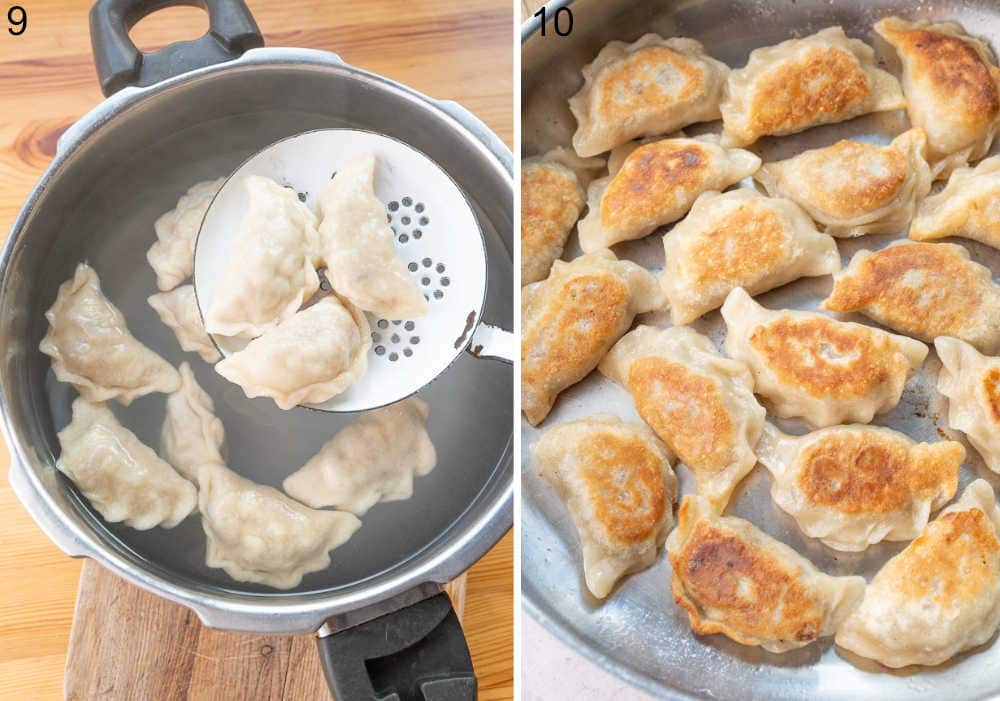
STEP 9: Bring a large pot of salted water to a boil.
Cook the pierogi in batches (for a 8-inch (21 cm) pot I cook about 10-12 dumplings at a time). When they float to the water surface cook them for 1 minute, then remove from the water with a slotted spoon. The cooking time will depend on the thickness of the dough, you may want to try cooking them for 2 minutes for thicker dough.
Drain well and transfer onto a plate.
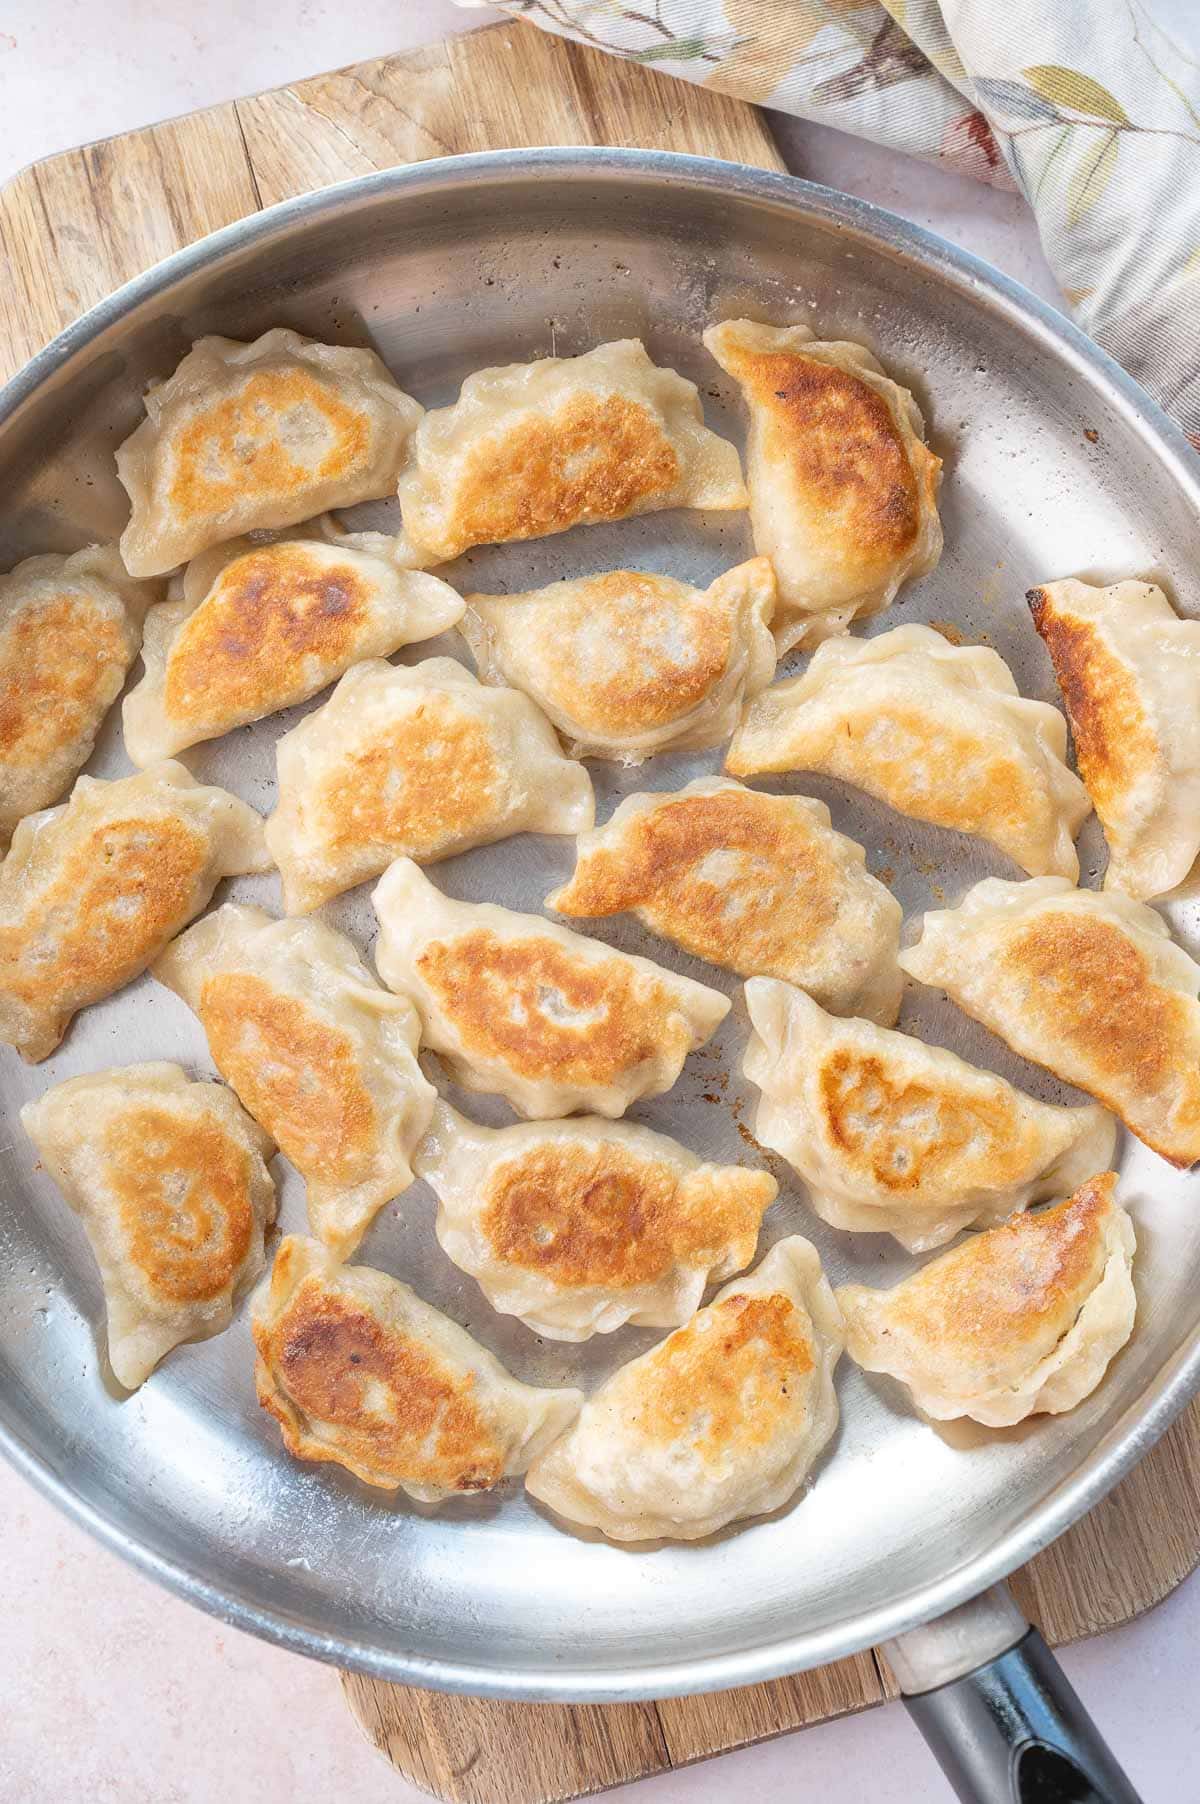
STEP 10: Optional step: pan-frying pierogi. These pierogi taste best pan-fried so after you have boiled them you can add them to hot clarified butter (or oil) in a pan and cook on both sides until golden brown and crispy.
Enjoy!
Serving suggestions
Meat pierogi need some delicious toppings! You can serve them with:
- Sauteed onions, crispy bacon, and sour cream
- OR/AND:
- My favorite cheese sauce! This sauce is completely not traditional but once I ate meat pierogi served with bursztyn cheese sauce (a Polish cheese) in a restaurant in Poland and since then I won’t have them any other way! Since I can’t even dream of finding this Polish cheese where I live, I used parmesan cheese and created a very simple sauce that is really PERFECT with these pierogi. I hope you’ll give it a try!
To make the cheese sauce you will need:
- 2 tablespoons butter
- 2 teaspoons flour
- 1/2 cup milk
- 1/4 cup chicken broth
- 1/2 cup (45g) grated Parmesan cheese
- salt and pepper to taste
How to make it: melt the butter in a pan or medium saucepan. Add flour and whisk until combined, cook for 1 minute at low heat. Add milk and broth, whisk to combine, and bring to a gentle boil. Add parmesan cheese and cook until melted. Season the sauce with salt and pepper.
Here you’ll find all my pierogi sauces and toppings ideas.
Storing and freezing instructions
Storage: To ensure the cooked pierogi don‘t stick to each other, toss them with melted butter. Store in a closed container in the fridge for about 2 days. On the next day, it‘s best to pan-fry them with butter until golden. If your pierogi are already pan-fried, just heat them briefly in a small amount of butter in a non-stick pan to crisp them up.
You can also store pierogi dough in the fridge for up to 2 days. The next day you can make the filling and cook fresh pierogi. Leave the dough on the counter for a minimum of 30 minutes to warm up.
Freezing: you can freeze cooked and raw pierogi. You can cook frozen pierogi straight from the freezer (don’t thaw them).
How to freeze pierogi: Place the pierogi apart on a tray, lightly sprinkled well with flour. Freeze until solid. Transfer to containers or plastic bags.
How to cook cooked frozen pierogi: I cook frozen dumplings just like fresh ones, with the difference that you can cook a smaller amount of them at a time, I cook max. 7-8 frozen pierogi at once (and about 10-12 fresh). When you drop too many frozen pierogi at once into the water it will lower its temperature too much and they will burst.
How to cook uncooked frozen pierogi: Cook like fresh pierogi but take them out once they float to the water surface.
More pierogi recipes
Here you’ll find all my pierogi recipes.
My favorite pierogi recipes include: potato and cheese pierogi (ruskie), sauerkraut and mushroom pierogi, and blueberry pierogi.
Did you make this recipe? RATE THE RECIPE or tell me in the COMMENTS how you liked it! You can also add a photo of your dish. It would make me very happy and will help other readers. Thank you!!
Meat Pierogi

Ingredients
for the dough:
- 2 cups (250g) all-purpose flour
- 1/2 cup + 1 tablespoon (140g) water
- 1 1/2 tablespoons (20g) butter
- 1/2 teaspoon salt
for the filling:
- 12 ounces (340g) leftover cooked chicken and beef meat (see notes for more explanation)
- 3 tablespoons frying oil
- 1 large onion
- 4 cloves garlic
- 1 teaspoon thyme
- 1/2 teaspoon marjoram
- 1/4-1/2 cup good-quality chicken or beef broth
- salt and pepper to taste
- clarified butter or frying oil for pan-frying pierogi optional
Would you like to save this?
Instructions
Make the dough:
- Stir the flour with salt in a medium/large bowl.
- Warm the water with butter in a small pot until the butter is melted and the liquid is very warm but not boiling (it’s ready when the water starts to steam).
- Add the liquid to the bowl. Stir the dough with a spoon until roughly combined.
- Knead the dough by hand or with a stand mixer fitted with a hook dough attachment, until it’s soft and smooth (it will take about 5 minutes with the mixer). If you follow the recipe exactly (especially if you weigh the ingredients, instead of using measuring cups), the dough should be perfect, but if for some reason it’s not, add some water if it’s too dry, or a little bit of flour if it’s too wet.
- Wrap the dough with plastic foil and leave to rest for 30 minutes.
Make the filling:
- Proces the meat in a food processor until finely chopped.
- Dice the onion, finely chop the garlic (with a knife and not a garlic press).
- Heat the oil in a large frying pan, and the onions, add a pinch of salt and cook for 5-10 minutes until softened.
- Add garlic and herbs, cook for 30 seconds.
- Add the meat and 1/4 cup of broth. Cook until warmed up. Season with salt and pepper. Add more broth if the mixture is too dry.
Shape and fill pierogi:
- Divide the dough into 2 parts.
- Roll out the first part of the dough on a lightly floured surface (I like silicone rolling mats). Cut out rounds with pierogi cutter/biscuit cutter/a glass. The dough should be rolled out thinly. If the dough is hard to roll out, set it aside for about 5-10 minutes to rest.
- Gather scraps, cover with plastic wrap and set aside.
- Scoop some filling with a teaspoon and pinch it with your fingers so it’s more compact. Place some of the filling on each round.
- Fold the dough over the filling to create a half-moon shape. Press edges together, sealing and crimping with your fingers.
- Place the pierogi apart on a towel lightly sprinkled with flour, cover loosely with a kitchen cloth so they don‘t dry out.
- Repeat with the remaining dough.
Cook pierogi:
- Bring a large pot of salted water to a boil.
- Cook the pierogi in batches (for a 8-inch (21 cm) pot I cook about 10-12 dumplings at a time). When they float to the water surface cook them for 1 minute, then remove from the water with a slotted spoon. The cooking time will depend on the thickness of the dough, you may want to try cooking them for 2 minutes for thicker dough.
- Drain well and transfer onto a plate.
- Optional step: pan-frying pierogi. These pierogi taste best pan-fried so after you have boiled them you can add them to hot clarified butter (or oil) in a pan and cook on both sides until golden brown and crispy.
- Enjoy!
Notes
- Meat – I used leftover meat from this rosol soup and this is the most traditional way to make meat pierogi and this is what most Polish people are using. Important thing is to NOT use just chicken meat. I never make my rosol soup with just chicken, it just doesn’t have enough flavor for me. I’m always using chicken and beef and this is what I’m using for my meat pierogi filling (half beef and half chicken). Don’t use more than 50% of chicken for this filling.
If you don’t have any leftover meat from a soup, you can use any other leftover meat, for example, leftover beef roast or pork roast meat (both together are also great). Ground pork or beef (preferably both) can also be used – just brown the meat in a pan until cooked through. - If using leftover rosol meat, don’t forget to reserve some of the rosol soup to add to the filling. If you don’t have it, just use any good quality beef or chicken broth (beef would be better if it tastes good).
- You could also add sauteed mushrooms to the filling.
- Serving suggestions:
- a great topping for these pierogi: sauteed onions, crispy bacon, and sour cream
- a great sauce to serve with these pierogi is a simple cheese sauce – completely not traditional but I ate it once served with meat pierogi in a restaurant in Poland and now won’t have them any other way
- what do you need:
2 tablespoons butter
2 teaspoons flour
1/2 cup milk
1/4 cup chicken broth
1/2 cup (45g) grated Parmesan cheese
salt and pepper to taste - how to make it: melt the butter in a pan or medium saucepan. Add flour and whisk until combined, cook for 1 minute at low heat. Add milk and broth, whisk to combine, and bring to a gentle boil. Add parmesan cheese and cook until melted. Season the sauce with salt and pepper.
- The amount of pierogi: based on the feedback that I got from readers, the amount of pierogi you’ll get from this recipe can vary greatly! My pierogi are rather small and I like to pack them with a lot of filling, that’s why I got 40 pierogi from this recipe. This may be different for you and you can get only half of this amount.
- Storage and freezing instructions can be found in the body of the post.
- Calories = 1 serving (1/4 of the recipe). This is only an estimate!

No Comments