
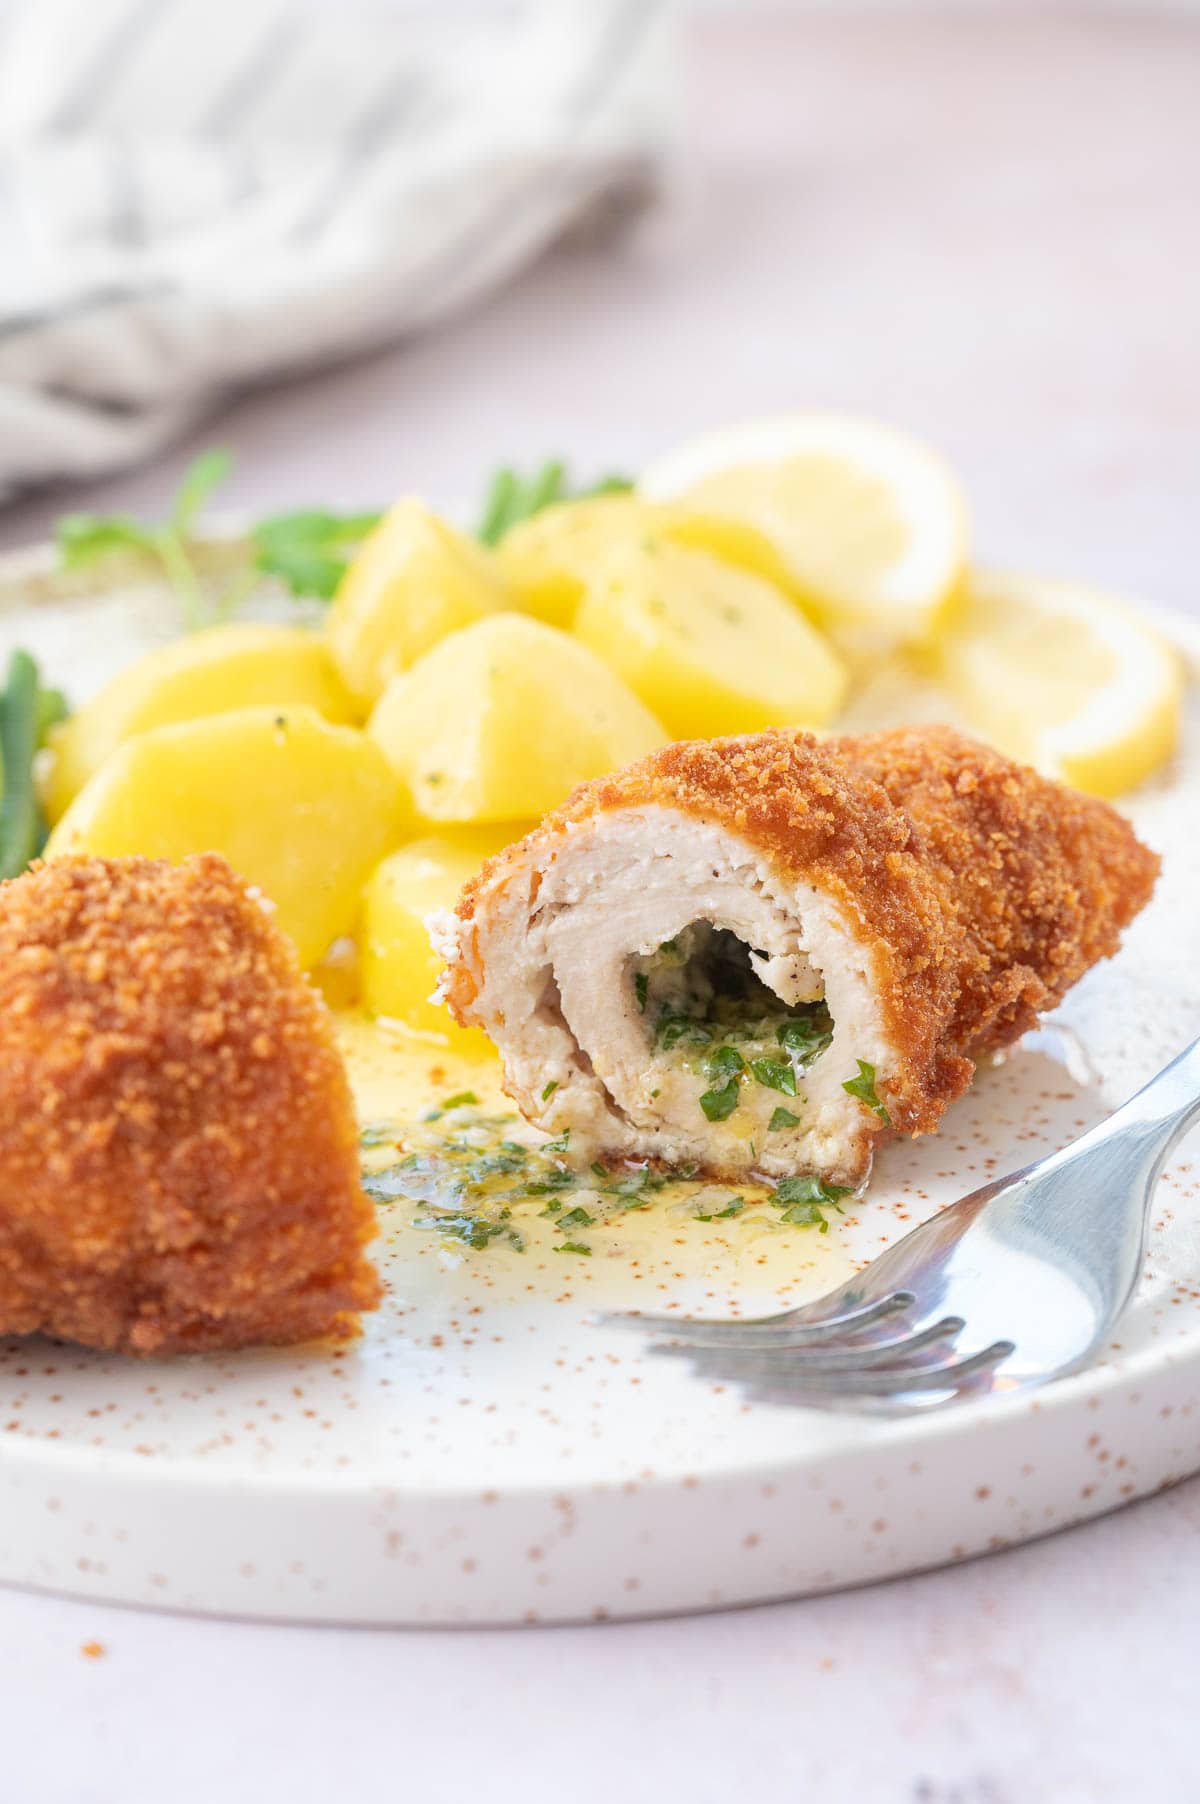
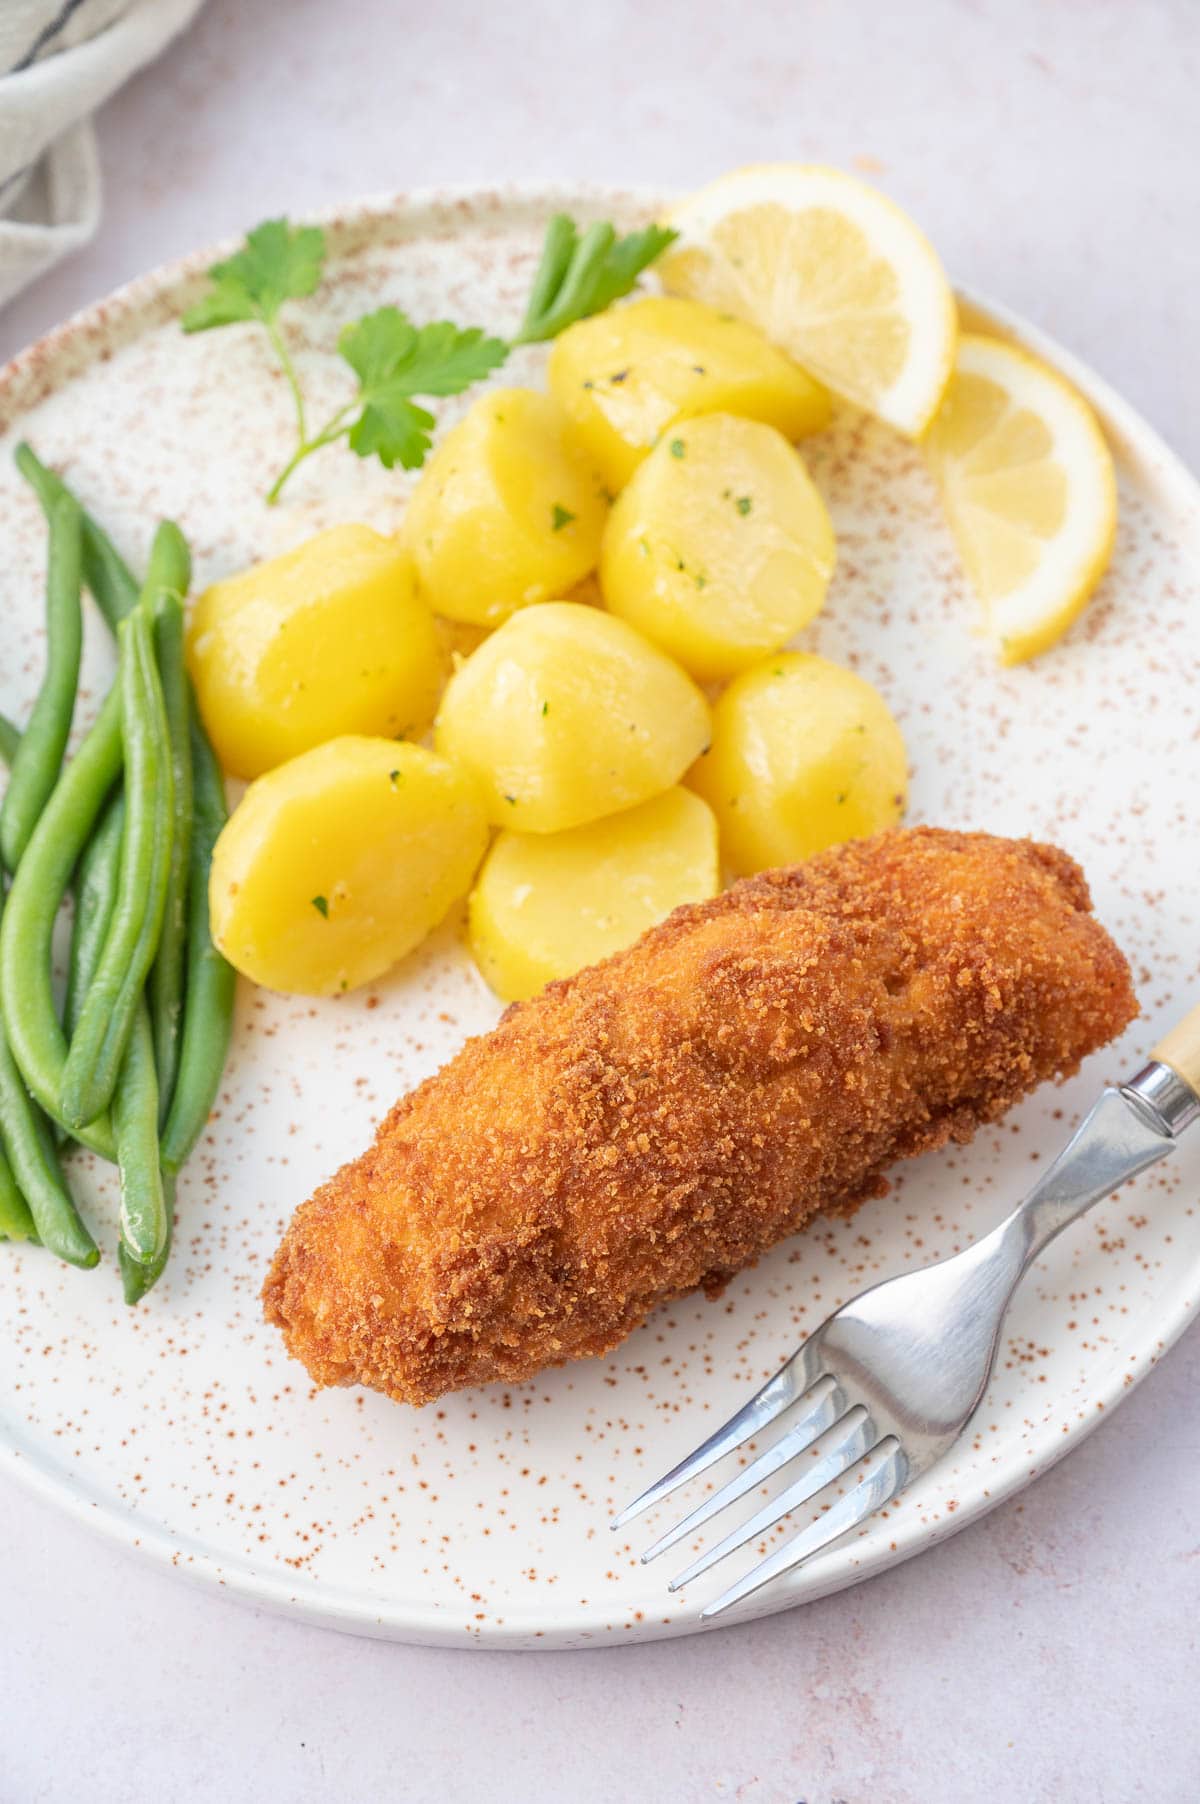
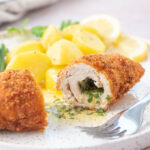
Chicken Kyiv is a very popular in Eastern Europe chicken dish. It’s a chicken fillet stuffed with parsley garlic butter, rolled up, breaded, and fried. Butter melts inside and oozes out to your plate when you cut the chicken, it makes it really moist and very flavorful.
History of the dish
Chicken Kyiv is a well-known dish in Poland, Ukraine, and Russia.
The origins of this dish are mostly unknown, it is believed the preparation technique was developed in France and was later popularized in Russia and Ukraine. One of the theories says that the dish was very popular in the restaurant Continental Hotel in Kyiv in 1918, hence the name.
This dish is mostly known in English-speaking countries as “Chicken Kiev” which is the Russian spelling of the Ukrainian capital Kyiv. The dish should be called Chicken Kyiv not Kiev nowadays, especially in light of recent events. It is understandable, that the Ukrainian people don’t want their city’s name spelled in Russian. Maybe you have already seen online campaigns called #chickenkyivnotkiev and even some major supermarkets started changing the name of the dish.
I grew up eating this dish in South-East Poland. It was extremely popular and was served at almost every wedding reception I attended as a child. This dish is also served without any occasion, as a family meal. It’s called “cutlet de volaille” or “kotlet de volaille” in Polish. I actually never heard the name “chicken Kyiv” until recently.
Although this dish has a French name, it is not known in France! Cutlet de volaille just means “poultry cutlet” in French!
Ingredients
Below you will find information about the ingredients and how to prepare the recipe. For the measurements and detailed instructions scroll down to the printable recipe card.
Here’s what you need to make this dish:
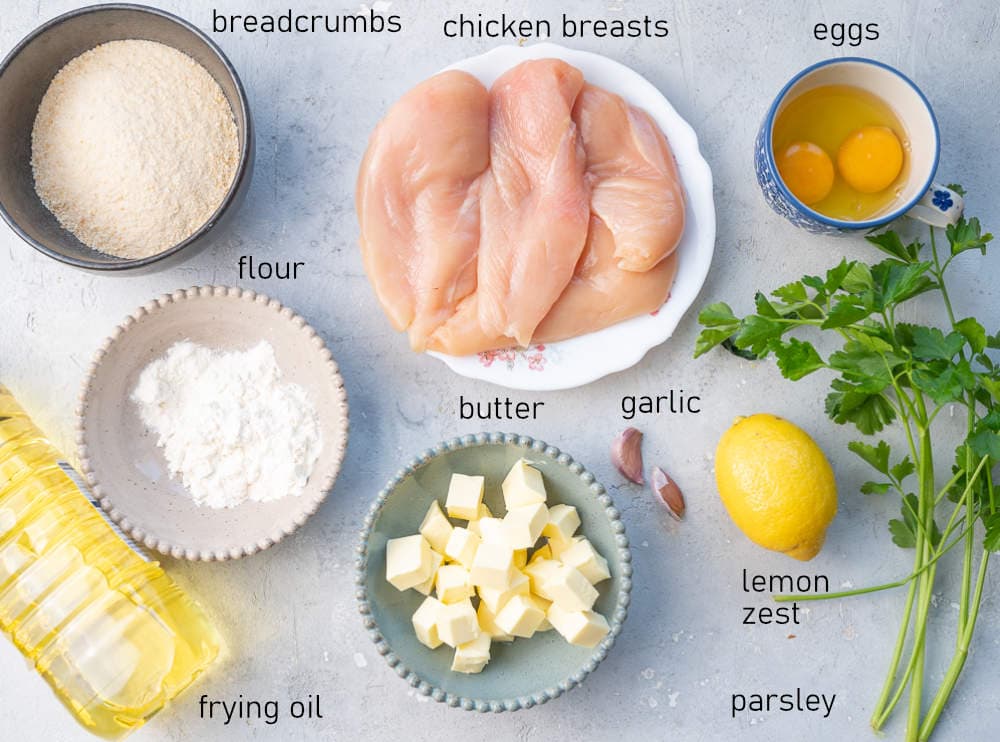
Chicken breasts – I prefer small or medium-sized chicken breasts for this recipe – this makes smaller cutlets that are easier/quicker to cook. You can also use large fillets, just your cutlets will be larger and will cook for a longer period of time.
Compound butter – parsley garlic butter with a hint of lemon. This recipe for flavored butter is really amazing on its own. I sometimes make a larger batch of this butter and then sautee cooked potatoes in it. It’s also great with pan-fried fish, chicken, or steak.
For the breading – these cutlets are breaded the same way as breaded chicken cutlets. You will need flour, eggs, and breadcrumbs for the breading. You can use panko breadcrumbs which are more crunchy but it wouldn’t be very authentic. These breadcrumbs are not really known in Eastern Europe.
Frying oil – vegetable oil for frying such as canola oil.
Different types of filling – the most popular filling for these cutlets in Poland is just butter or butter with garlic and parsley. Other popular ingredients for the filling are cheese, ham, and mushrooms.
How to make it step-by-step
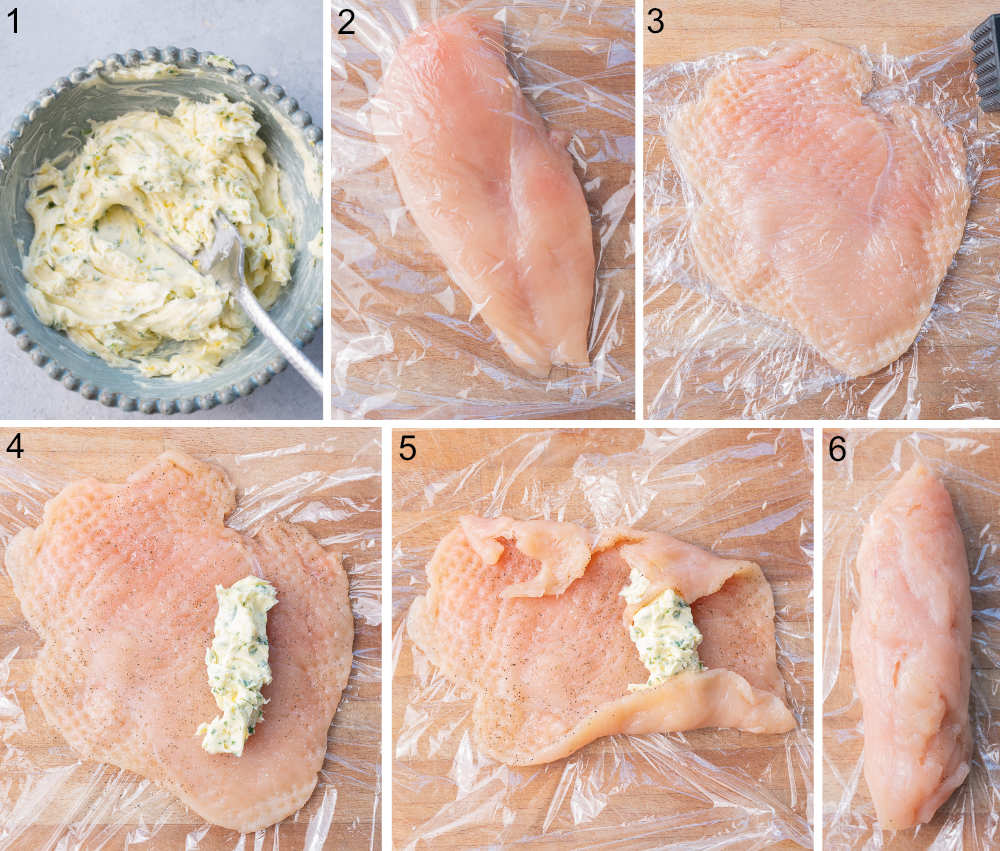
STEP 1: Make the compound butter: Combine the soft butter with chopped parsley, grated lemon zest, finely chopped garlic cloves, and season it with salt and pepper. Place in the fridge.
STEP 2+3: Pound chicken breasts into cutlets: If you have small or medium chicken breasts – place them on a chopping board and cover them with plastic foil. Pound them with a meat mallet into thin cutlets. Try to pound them from the center to the left and right side to create cutlets that are more square-shaped than rectangular-shaped. Be careful not to tear the meat. The borders of the cutlet (about 1/2 inch or 1cm) should be pounded very thinly.
STEP 4+5+6: Wrap the cutlets around butter and shape the cutlets: season the fillets with salt and pepper on both sides and place 1/4 of the chilled butter (shape it roughly into a log) on the right side of each cutlet. Fold the upper and bottom part of the cutlet over the butter, then roll up the cutlet from the right to the left side. Form a spindle-shaped log, tightly pressing the edges of the cutlets, making sure the butter is tightly closed in the middle.
Spindle shape is the most traditional but you could just wrap these cutlets like a burrito or a wrap.
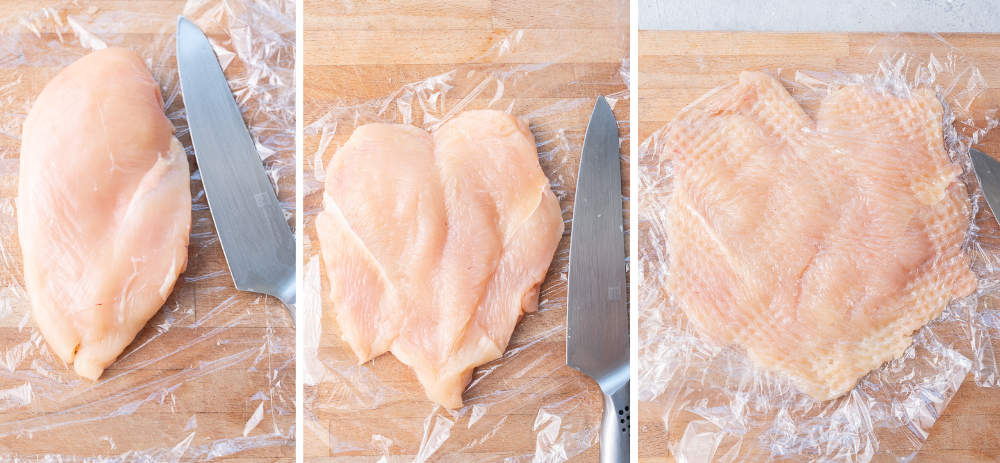
If your chicken breasts are large it’s better to butterfly them: cut the chicken breast horizontally in half but not all the way through, open the breast like a book, and pound it as described above.
Chill cutlets: Place the cutlets for 10 minutes in the fridge (this will help the cutlets to keep their shape and not fall apart while frying, you can leave them longer in the fridge).

STEP 7: Prepare your breading station: Prepare 3 bowls: one with flour, the second with beaten eggs, and the third with breadcrumbs.
STEP 8+9+10: Bread the cutlets: Dredge each cutlet in the flour, then dip in the egg mixture, then coat it in breadcrumbs. Dip the cutlet again in the egg and coat again in breadcrumbs (this is optional but it makes a thicker breading).
STEP 11: Deep-fry the cutlets (see below an alternative preparation method): add 4-6 cups of oil (the amount depends on the size of the pot) into a medium pot and heat to 340°F-350°F (170-180°C). When the oil is hot, fry 2 cutlets at a time, for about 8-9 minutes for smaller cutlets and 10-11 minutes for bigger cutlets.
Transfer to a plate lined with parchment paper, check the temperature in the center of the thickest part of each cutlet – it should be 160°F (71°C) and it should come to the safe temperature for poultry while resting – 165°C (74°C). Repeat with the remaining cutlets.
Alternatively, you can just pan-fry the cutlets in a pan until browned on all sides (you will need about 1/4 cup of oil for that). Transfer the cutlets to an oven-safe baking dish and bake at 325°F (160°C) until done or until the temperature in the thickest part of each cutlet reaches 160°F (71°C) – it should come to the safe temperature for poultry while resting – 165°C (74°C).
Leave to rest for 5 minutes then serve and enjoy!
Deep-frying vs Pan-frying
To be honest I almost always pan-fry these cutlets and finish them in the oven when making them for my family. I deep-fried them mostly so that they look good on the photos.
Deep-fried cutlets are evenly browned and more crunchy. Pan-fried + baked cutlets are also delicious and you don’t have to deal with all this leftover oil. Deep-frying is a traditional preparation method for these cutlets.
Another way to make it
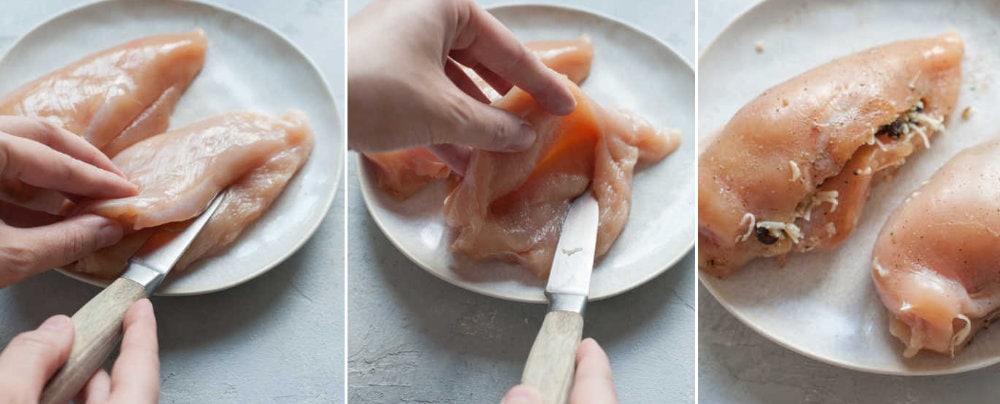
There is also another and simpler preparation method of these cutlets, although it’s not traditional at all. You can simply stuff the breasts with butter without rolling them up.
How to do it: pound the chicken breasts in their thickest part just very slightly, cut a slit horizontally in the chicken breast, creating a pocket (don’t cut the breast all the way through), stuff it with flavored butter, close the pocket with a toothpick, bread the cutlets in flour, egg, breadcrumbs, and cook in a pan until browned on both sides and cooked through.
The photos above come from another recipe for mushroom-stuffed chicken breasts so these chicken breasts are stuffed with mushrooms, onions, and cheese.
Storage
You can store these cutlets for up to 3-4 days in the fridge. Reheat in a 325°F (160°C) oven just until warm.
More Polish dinner recipes
- Łazanki – Polish noodles with cabbage, kiełbasa, and mushrooms
- Barszcz – Polish Beet Soup
- Gołąbki – Polish Stuffed Cabbage Rolls
- Kotlety mielone (Polish meat patties)
- Kopytka recipe (Polish potato dumplings)
- Polish Potato Pancakes (placki ziemniaczane)
- Authentic potato and cheese pierogi
Recipe FAQ’s
Chicken Kyiv is stuffed with flavored butter while chicken cordon bleu is stuffed with ham and cheese.
When the internal temperature in the thickest part of the cutlet reaches 165°C (74°C).
Make sure to press the edges of the cutlet tightly while shaping the cutlet. The edges of the cutlet should be pounded very thinly. Make sure the meat has no tears. Pound the chicken breast so that it resembles almost a square – it will be easier to wrap it around butter than when it’s pounded into a thin rectangle.
Chicken Kyiv is traditionally stuffed with flavored butter although you could also stuff it with mushrooms or ham and cheese.
Did you make this recipe? RATE THE RECIPE or tell me in the COMMENTS how you liked it! You can also add a photo of your dish. It would make me very happy and will help other readers. Thank you!!
Chicken Kyiv
Ingredients
- 4 small/medium chicken breasts about 1 1/2 lbs or 700g
- 6 tablespoons soft butter 85g
- 1 tablespoon chopped parsley
- zest grated from 1/2 lemon
- 2 cloves garlic
- 3 tablespoons flour
- 2 large eggs
- 3/4 cup breadcrumbs 90g
- salt and pepper
- vegetable oil for frying about 4 cups when deep-frying OR 1/4 cup when pan-frying
Would you like to save this?
Instructions
- Make the compound butter: Combine the soft butter with chopped parsley, grated lemon zest, finely chopped garlic cloves, and season it with salt and pepper. Place in the fridge.
- Pound chicken breasts into cutlets: If you have small or medium chicken breasts – place them on a chopping board and cover with plastic foil. Pound them with a meat mallet into thin cutlets. Try to pound them from the center to the left and right side to create cutlets that are more square-shaped than rectangular-shaped. Be careful not to tear the meat. The borders of the cutlet (about 1/2 inch or 1cm) should be pounded very thinly. See photos in the post for a reference.
- If your chicken breasts are large it’s better to butterfly them: cut the chicken breast horizontally in half but not all the way through, open the breast like a book and pound it as described above.
- Wrap the cutlets around butter and shape the cutlets: season the fillets with salt and pepper on both sides, place 1/4 of the chilled butter (shape it roughly into a log) on the right side of each cutlet. Fold the upper and bottom part of the cutlet over the butter, then roll up the cutlet from the right to the left side (see photos in the post for a reference). Form a spindle-shaped log, tightly pressing the edges of the cutlets, making sure the butter is tighly closed in the middle. Spindle shape is the most traditional but you could just wrap these cutlets like a burrito or a wrap.
- Chill cutlets: Place the cutlets for 10 minutes in the fridge (this will help the cutlets to keep their shape and not fall apart while frying, you can leave them longer in the fridge).
- Prepare your breading station: prepare 3 bowls: one with flour, second with beaten eggs, and third with breadcrumbs.
- Bread the cutlets: Dredge each cutlet in the flour, then dip in the egg mixture, then coat it in breadcrumbs. Dip the cutlet again in the egg and coat again in breadcrumbs (this is optional but it makes a thicker breading).
- Deep-fry the cutlets (see below an alternative preparation method): add 4-6 cups of oil (the amount depends on the size of the pot) into a medium pot and heat to 340°F-350°F (170-180°C). When the oil is hot, fry 2 cutlets at a time, for about 8-9 minutes for smaller cutlets and 10-11 minutes for bigger cutlets. Transfer to a plate lined with parchment paper, check the temperature in the center of the thickest part of each cutlet – it should be 160°F (71°C) and it should come to the safe temperature for poultry while resting – 165°C (74°C). Repeat with the remaining cutlets.
- Alternatively, you can just pan-fry the cutlets in a pan until browned on all sides (you will need about 1/4 cup of oil for that). Transfer the cutlets to an oven-safe baking dish and bake at 325°F (160°C) until done or until temperature in the thickest part of each cutlet reaches 160°F (71°C) – it should come to the safe temperature for poultry while resting – 165°C (74°C).
- Leave to rest for 5 minutes then serve and enjoy!
Notes
- A simpler way to prepare these cutlets is to simply stuff the breasts with butter without rolling them up. How to do it: pound the chicken breasts in their thickest part just very slightly, cut a slit horizontally in the chicken breast, creating a pocket (don’t cut the breast all the way through, see photos in the post for a reference), stuff it with flavored butter, close the pocket with a toothpick, bread the cutlets in flour, egg, breadcrumbs, and cook in a pan until browned on both sides and cooked through.
- Calories = 1 cutlet (1/4 of the recipe). This is only an estimate!


2 Comments
Lynn
4 February 2023 at 17:25Love the addition of the lemon for a change of pace…and THANK YOU for using its proper name: Kyiv!
Aleksandra
4 February 2023 at 17:30happy to support Ukraine!