
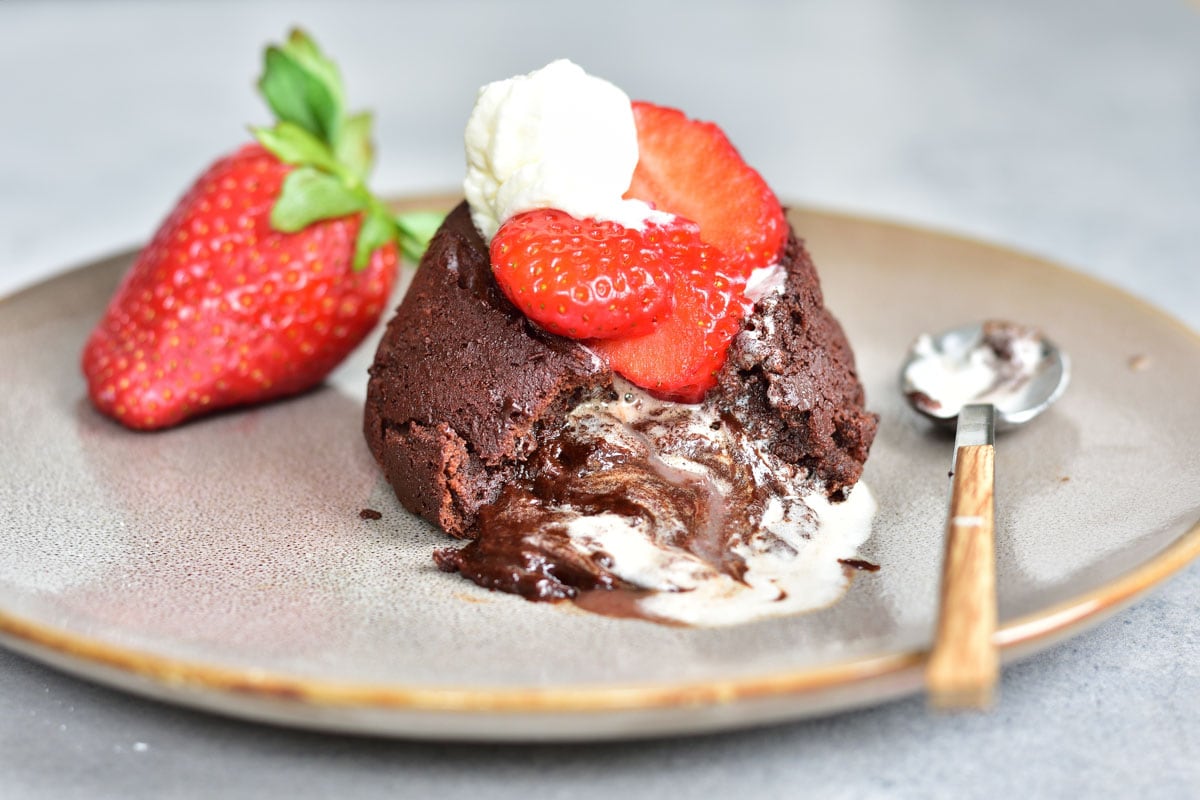
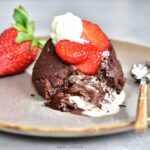
Chocolate lava cake is a small chocolate cake with a warm and gooey flowing center of melted chocolate. It’s super easy and quick to make. It will be ready in about 20 minutes! It’s perfect for a special occasion or when you have a chocolate craving.
In can be made traditionally in the oven and also in your Instant Pot!
What is chocolate lava cake?
It’s a small chocolate cake, that has a liquid chocolate center. It’s sometimes also called molten chocolate cake or chocolate fondant. It’s similar to flourless chocolate cake (it contains very little flour) and chocolate soufflé (it’s very light but not so airy like souffle which is made with whipped egg whites).
A few words about the ingredients. Here’s what you‘ll need:
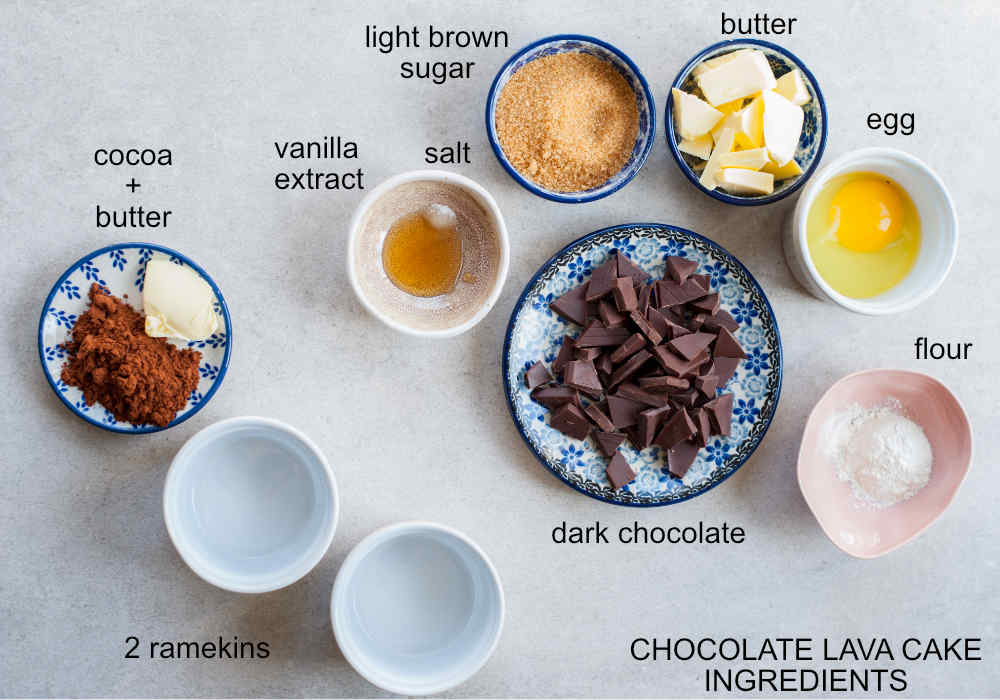
– Chocolate – this is the most important ingredient of this dessert, so it must be of good quality. It‘s best to use a dark chocolate bar with 70% of cocoa.
Can you use chocolate chips? yes, just make sure they are of good quality (they are sometimes coated with wax, which can affect the taste of the cake).
Can you use milk chocolate? I’ve once made this dessert with milk chocolate as I didn‘t have dark chocolate on hand that day and the chocolate craving was striking. I added only a tablespoon of sugar (instead of three) and the same amount of chocolate as in the recipe. The cake turned out ok, but it was too sweet. You can balance the sweetness with unsweetened whipped cream and orange segments. The bitter chocolate version is much better though!
– Eggs – some of the recipes call for adding extra egg yolks. I have also tried this version. It tasted indeed better, but it was not a big difference. One additional yolk can be added to the recipe below, but I would only add it if you have some leftover yolks in the fridge. The cake will rise slightly more.
– Sugar – I used light brown sugar, because I like its caramel taste, but of course, you can use cane sugar or white sugar in this recipe.
– Vanilla extract – improves the taste of almost everything. Use the real extract, not the aroma. If you don‘t have that on hand, you can use vanilla sugar (also, preferably with real vanilla beans).
– Butter – delicious, real butter with a minimum 82% fat content. It’s best to use European-style, unsalted butter.
– Salt – always add a pinch to sweet bakes, it complements the sweet taste of the dessert.
– Flour – it’s important not to add too much flour (I added just 1 tbsp). Chocolate lava in the center of this dessert is actually underbaked chocolate cake, so too much flour will cause it tasting floury and the ‘lava’ will be too thick.
Recipe variations:
- Instead of vanilla, you can add a teaspoon of grated orange zest.
- You can add some espresso or chocolate liquor (about a teaspoon) to boost the chocolate flavor.
- You can add spices, like cinnamon or even a pinch of ground chili.
- You can stir in a tablespoon of peanut butter.
What baking dish do you need:
I used two 6 oz (170ml) ceramic ramekins (they have a diameter of 3-inch (7.5 cm), measured at the bottom). I think this is the perfect-sized baking dish. If you would bake the cake in bigger ramekins (you would need to bake them longer) the serving would be too big in my opinion (these cakes are quite rich).
Instead of ramekins, you think can bake the cakes in a muffin pan (I haven’t tested that yet. You would also need to bake the cakes for a shorter period of time, as the muffin pan will fit a smaller amount of batter than a 6 oz ramekin. You need to line it with cupcake liners so that they are easy to take out of the form.
How to make chocolate lava cake step by step in the oven (traditional method):
Start with preheating the oven to 450 ° F / 220 °C / Gas Mark 8, no fan (yes, you can make this dessert while the oven is heating up!).
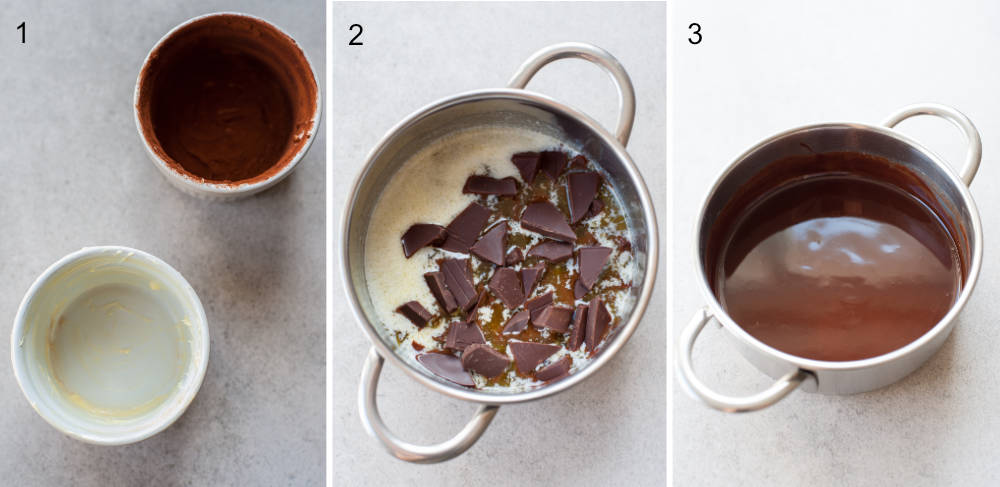
STEP 1: Prepare two (6 oz/170ml) small ramekins (mine have a diameter of 7.5 cm / 3 inch, measured at the bottom), grease them generously with butter (you will need about 1 tsp), then coat with the unsweetened cocoa powder (important, you will need about 1 Tbsp). Dump out any excess cocoa.
STEP 2: In a small pot, melt 1.8 oz (50g) butter, when hot (but not boiling), take off the heat. Add 2.8 oz (80g) broken into small pieces dark chocolate.
STEP 3: Stir until the chocolate is completely melted. Set aside.
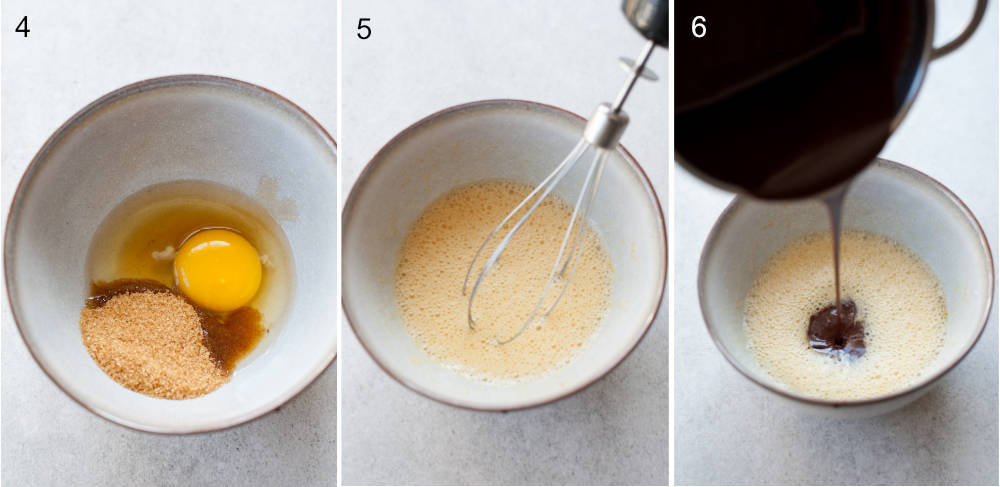
STEP 4: In a medium bowl, using a mixer, whisk 1 large egg, 3 Tbsp of light brown sugar (1.2oz/35g), 1 tsp of vanilla extract, and a pinch of salt.
STEP 5: Mix for about 1-2 minutes, just until lightly frothy (but it doesn’t have to be thoroughly mixed, light and pale).
STEP 6: Add the melted chocolate to the egg-sugar mixture, whisk until just combined.
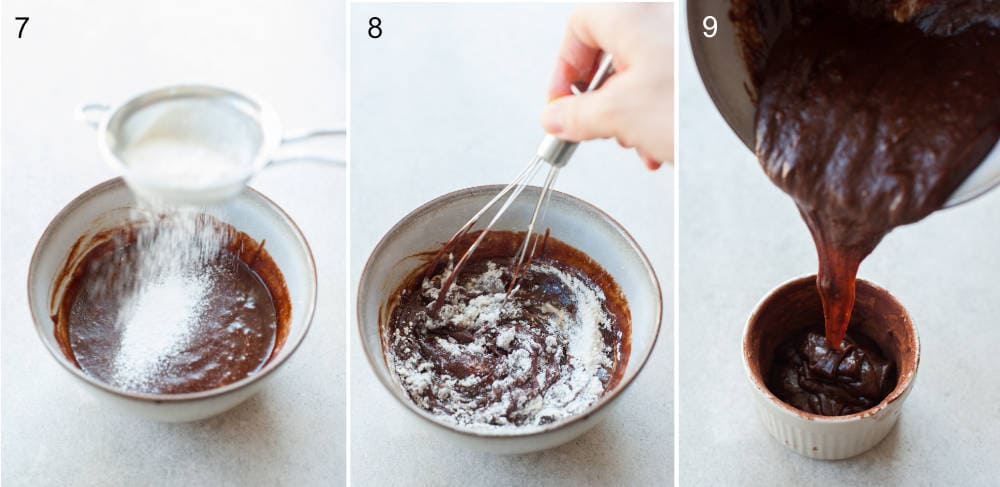
STEP 7: Add 1 Tbsp + a big pinch sifted flour (0.4 oz/10g).
STEP 8: Gently fold to combine.
STEP 9: Divide the batter evenly between the two ramekins (fill it up to approx. ¾ of their height, cakes will rise only slightly). Lightly tap the ramekins, put them in the oven, and bake for about 10-11 minutes (10 minutes for a lot of chocolate ‘lava’, 11 minutes for a medium amount of chocolate ‘lava’ / very fudgy center). Remove the ramekins from the oven.
Now you can serve the cake directly in the ramekin or invert it onto a plate (more tips on that below).
How to make Chocolate Lava Cake in the Instant Pot:
Did you know you can make chocolate lava cake in your Instant Pot? Cheesecakes are pretty popular, so I thought it must be also possible to make this little chocolate cake. I was really pleasantly surprised with the results! It came out really delicious. In comparison to baked chocolate fondant, it’s just a little more moist on the outside. Baked cake’s outside layer is a little more dry and crunchy. Other than that it tastes pretty much the same. I think it’s a great way to make this dessert if you don’t want to turn on the oven! In terms of time, it’s pretty much the same. The cake needs to be baked for 10-11 minutes. Making it in the Instant Pot takes about 4 minutes coming to the pressure + 7-8 minutes of cooking.
You can use the same ramekins that are meant to be used in the oven. I used two 6 oz(170ml) ceramic ramekins (they have a diameter of 3-inch (7.5 cm), measured at the bottom).
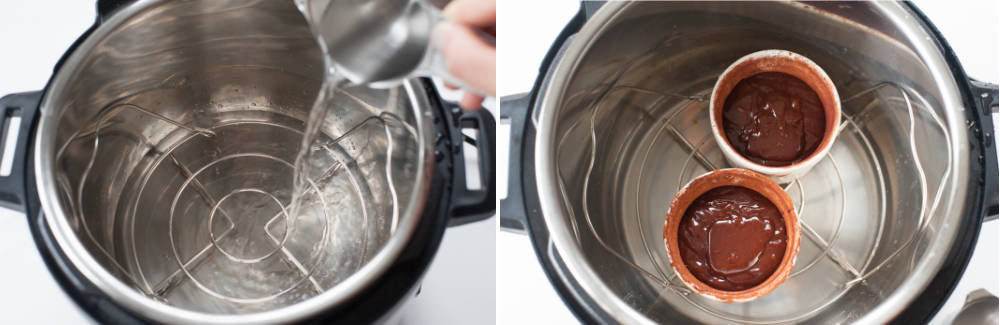
- Put the steamer rack in the Instant Pot.
- Add 1 cup of water to the pot.
- Place the ramekins on the steam rack (if you are doubling the recipe you can place 3 ramekins directly on the trivet and the fourth on top, in the center of the 3 ramekins). Don’t cover the ramekins.
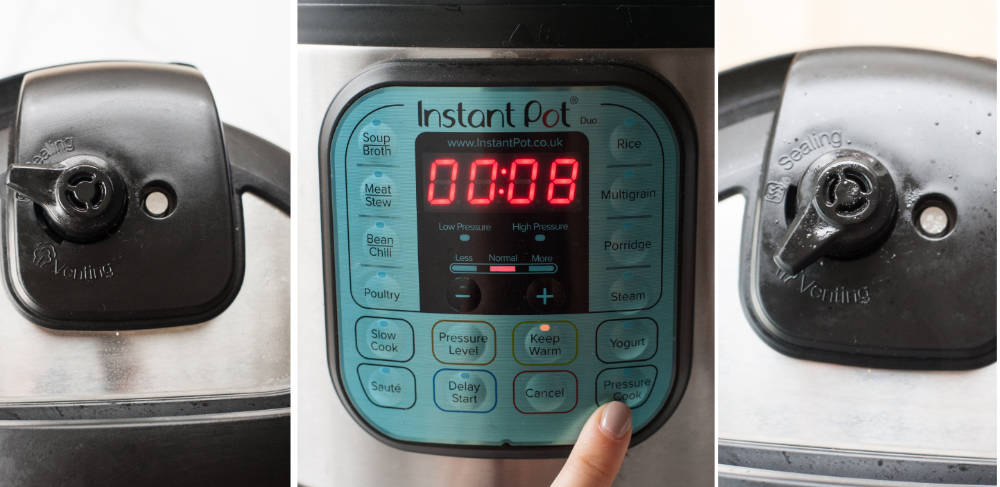
4. Close the lid, set the valve to ‘sealing position’.
5. Manually set the high pressure to 7-8 minutes (7 minutes for very liquid lava, 8 minutes to medium-liquid lava/fudgy center).
6. Make the quick release: when the timer is done, press the cancel button and move the valve to the venting position.
When the pressure pin is down, open the Instant Pot and carefully remove the ramekins from the pot (they will be hot and slippery!).
How to invert the cake onto a plate:
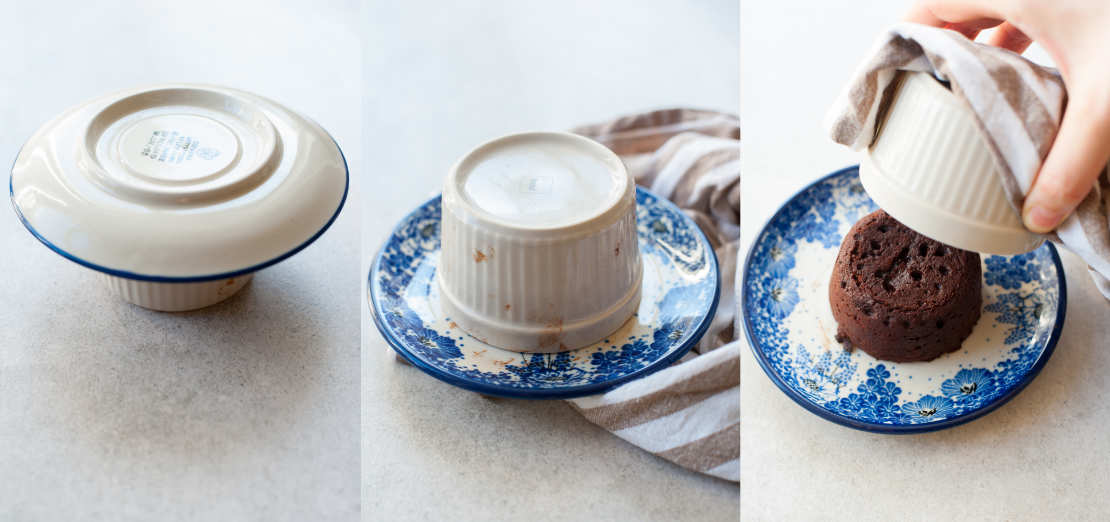
Cover each ramekin with a small plate, flip upside-down, tap the ramekin and slowly lift the ramekin using a damp kitchen towel (or paper kitchen towel) so that your lava cake stays on the plate.
This is actually the most (and only) difficult part of the recipe. I struggled with it a lot when I was making this dessert for the first time a couple of years ago, so please read the instructions carefully. If you haven’t thoroughly buttered the ramekins with butter the cake can stick to the baking dish and won’t come out onto a plate. If this is the case, you can just eat it straight from the ramekins with a teaspoon.
Bear in mind that the ramekins will be very hot and slippery so it’s extremely important that you lift them with a kitchen paper towel (to not burn yourself) and that it is wet (it will be easier to hold a slippery ramekin).
Top tips on how to make a perfect molten chocolate cake:
– The ramekins must be thoroughly greased with butter and sprinkled with cocoa powder, otherwise, the dessert can stick to the baking dish. If this happens, you can just eat the cake with a spoon! (In many restaurants a chocolate fondant is served directly in the ramekin). I like to grease it with a thick layer of butter to ensure that they pop out smoothly. Instead of this, you can use a non-stick cooking spray but I really like this additional layer of cocoa coating the cake.
– Make sure to use cocoa and not the flour for coating the ramekins, as the cocoa doesn’t leave white strikes on the brown cake and also tastes better!
– The baking time is extremely important, just 1 minute makes a difference to the cake’s consistency. Everything depends on your preferences. The longer the baking time, the less chocolate lava you‘ll have. Longer baked chocolate lava cake won‘t have a runny center at all and will be just a regular chocolate cake, but it still will be very delicious!
For us, the ideal baking time was:
- in the oven: 11 minutes, which yields a medium amount of chocolate lava (or if you want a runnier center, like on the video, bake the fondant for 10 minutes)
- in the IP: 8 minutes, which yields a medium amount of chocolate lava (or if you want a runnier center, like on the video, cook the fondant for 7 minutes)
Another thing to consider is that each oven bakes differently. Please make sure to test the recipe first before serving it on any important occasion (except if you’re ‘baking’ the cake in the Instant Pot, and you have the same appliance as I do – I tested this recipe in IP 6 qt/6l duo).
How to serve it:
- You can serve the cake directly in the ramekins (making sure your guest know that the dish is hot!). It’s often served this way in restaurants. I actually don’t bother to invert the cake on a plate when I’m not serving it for guests. Just top it with your favorite toppings and eat with a teaspoon.
- On a plate – invert the fondants onto small plates for a prettier presentation!
Some topping ideas:
I absolutely love it with whipped cream and fresh strawberries. It’s my absolute favorite flavor combination. They are cutting through the richness of the cake.
You could also try:
- any other fruit, like raspberries, blueberries, or blackberries also in the form of a sauce
- salted caramel or chocolate sauce (but it would be too sweet in my opinion)
- just sprinkle it with powdered sugar
- serve with vanilla ice cream!
Other decadent chocolate desserts you may like:
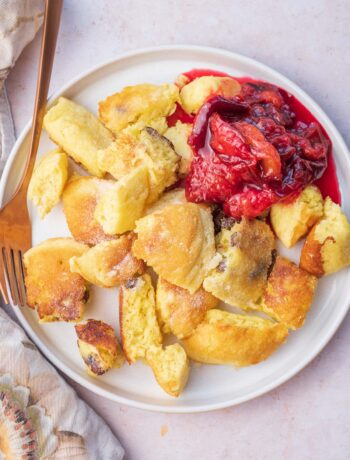
- plum and peanut brownie
- chocolate orange bundt cake
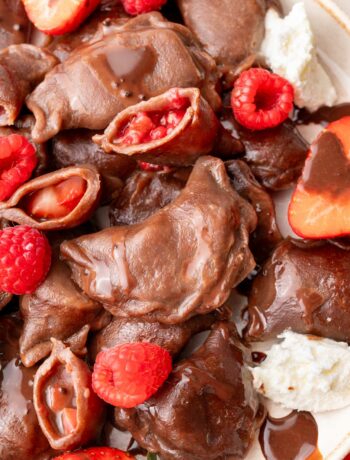
- chocolate crepes with raspberry sauce
- Chocolate covered strawberries
Did you make this recipe? RATE THE RECIPE or tell me in the COMMENTS how you liked it! You can also add a photo of your dish. It would make me very happy and will help other readers. Thank you!!
Chocolate lava cake
Ingredients
chocolate lava cake:
- 2.8 oz (80g) dark chocolate should be of good quality
- 1.8 oz (50g) butter 3.5 tablespoons
- 1 large egg
- 3 tablespoons light brown sugar or cane / white sugar, 1.2oz/35g
- 1 teaspoon vanilla extract or 1 teaspoon vanilla sugar
- pinch of salt
- 0.4 oz (10g) flour 1 Tbsp + a big pinch
for the ramekins:
- 1 teaspoon butter
- 1 tablespoon cocoa powder unsweetened
to serve:
- whipped cream: ¼ cup heavy whipping cream + 1 tablespoon sugar
- fresh strawberries raspberries, blueberries or other favorite fruits
Would you like to save this?
Instructions
In the oven:
- Preheat the oven to 450 ° F / 220 °C / Gas Mark 8, no fan.
- Prepare two (6 oz/170ml) small ramekins (mine have a diameter of 3-inch (7.5 cm), measured at the bottom), grease them generously with butter, then coat with the cocoa powder (important). Dump out any excess cocoa.
- In a small pot, melt the butter, when hot (but not boiling), take off the heat. Add broken into small pieces chocolate. Stir until the chocolate is completely melted. Set aside.
- In a medium bowl, using a mixer, whisk the egg, sugar, vanilla extract, and salt. Mix for about 1-2 minutes, just until lightly frothy (but it doesn't have to be thoroughly mixed, light and pale).
- Add the melted chocolate to the egg-sugar mixture, whisk until just combined.
- Add the sifted flour and gently fold to combine.
- Divide the batter evenly between the two ramekins (fill it up to approx. ¾ of their height, cakes will rise only slightly). Lightly tap the ramekins, put them in the oven and bake for about 10-11 minutes (10 minutes for a lot of chocolate 'lava', 11 minutes for a medium amount of chocolate 'lava' / very fudgy center).
- Remove the ramekins from the oven.
In a pressure cooker:
- Put the steamer rack in the Instant Pot.
- Add 1 cup of water to the pot.
- Place the ramekins on the steam rack (if you are doubling the recipe you can place 3 ramekins directly on the trivet and the fourth on top, in the center of the 3 ramekins). Don't cover the ramekins.
- Close the lid, set the valve to 'sealing position'.
- Manually set the high pressure to 7-8 minutes (7 minutes for very liquid lava, like on the video, 8 minutes to medium-liquid lava/fudgy center).
- Make the quick release: when the timer is done, press the cancel button and move the valve to the venting position.
- When the pressure pin is down, open the Instant Pot and carefully remove the ramekins from the pot (they will be hot and slippery!).
Serve:
- You can serve the cakes directly in the ramekins or invert them onto small plates. Run a small knife along the side of the ramekins (optional, just to be sure that they will seamlessly come out of the ramekins). Cover each ramekin with a small plate, flip upside-down, tap the ramekin and slowly lift the ramekin using a damp kitchen towel (or paper kitchen towel) so that your lava cake stays on the plate.
- Serve warm, preferably with whipped cream and fresh strawberries.
- Whipped cream: using a mixer, beat the cold heavy whipping cream with sugar for a few minutes until stiff.

No Comments