
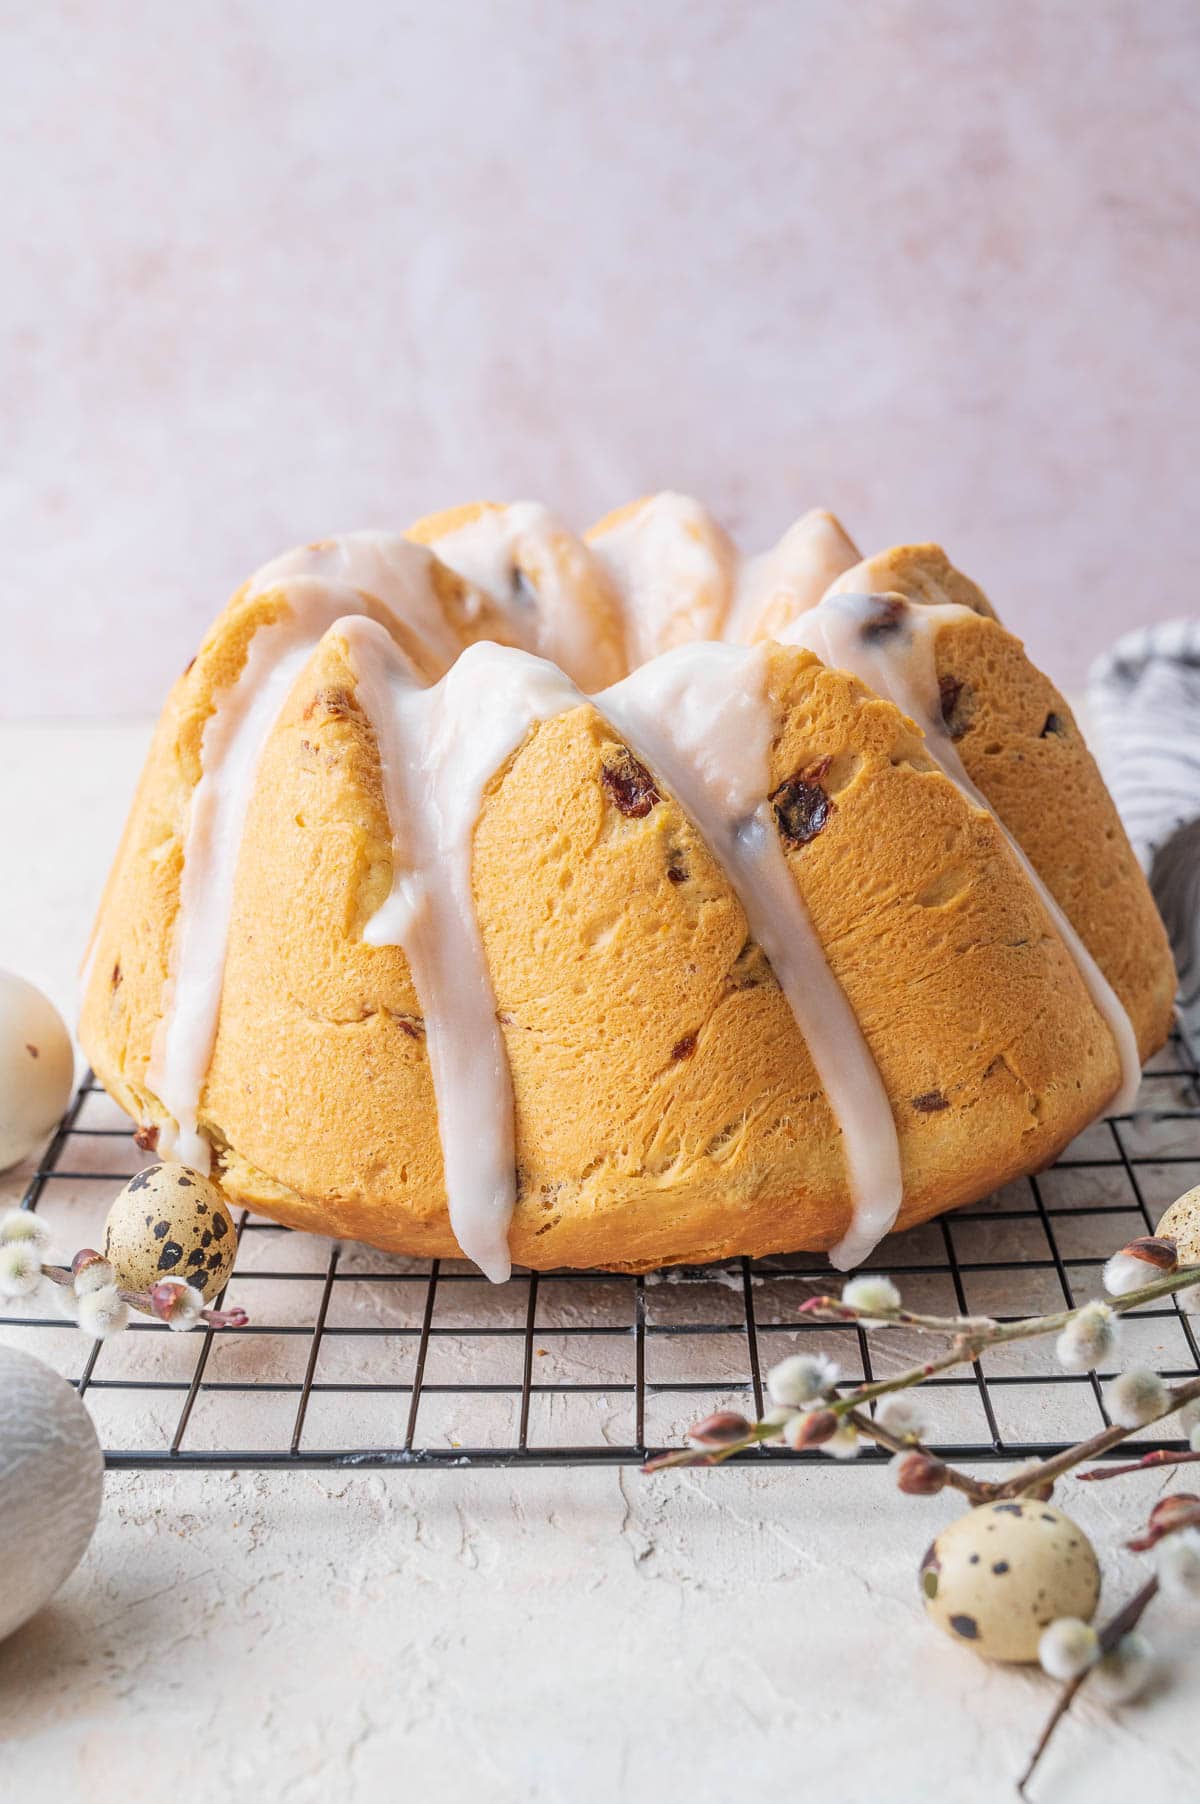
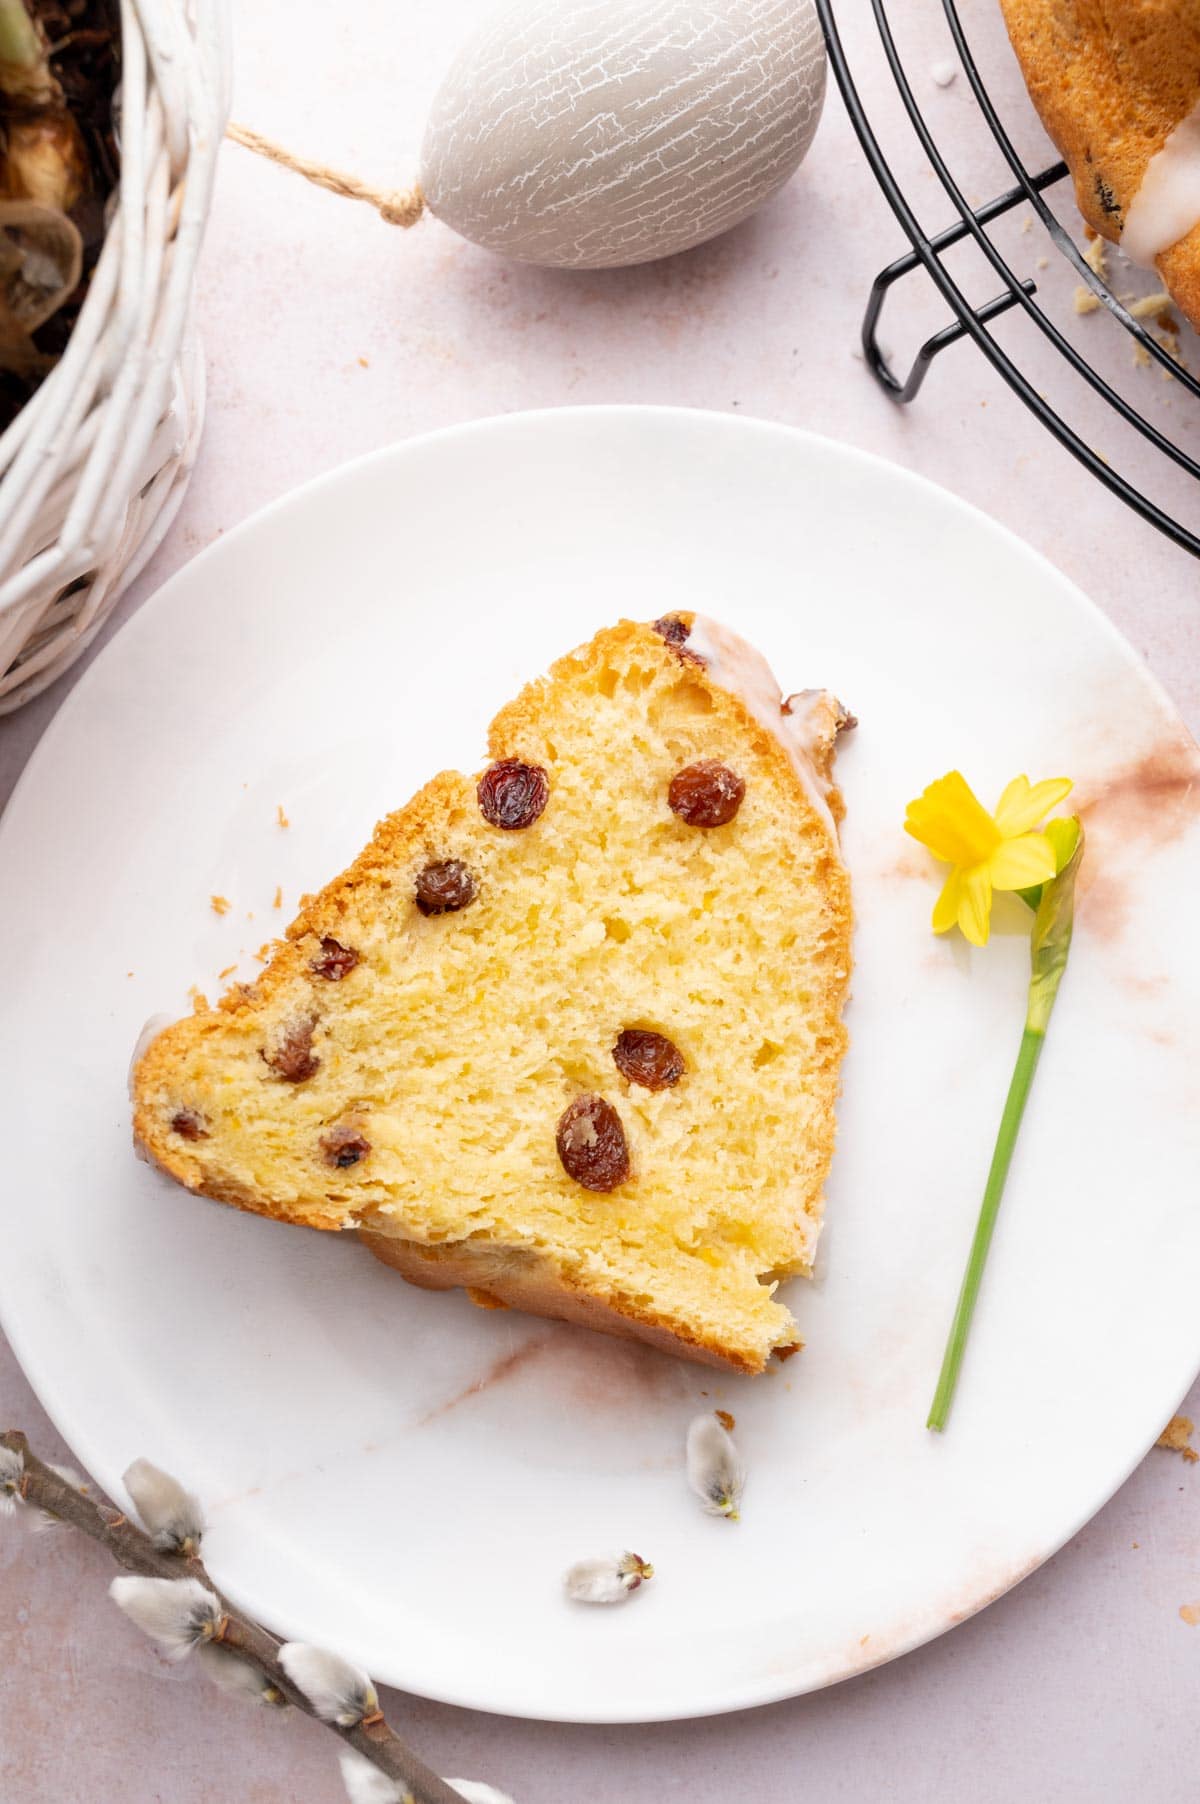
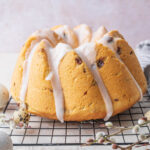
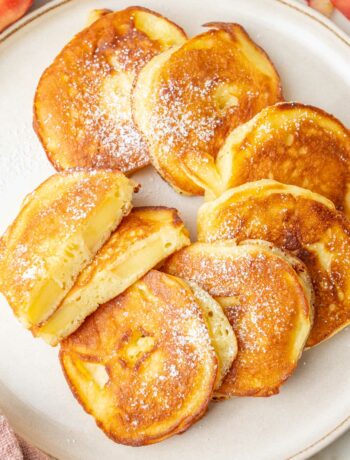
Polish Easter Babka (Babka Wielkanocna) is a rich yeast-based bundt cake filled with raisins and glazed with icing. It’s delicate, moist, and rich, like a brioche. This sweet raisin bread would be great for any occasion – it’s absolutely amazing!
Polish Easter Babka
Polish Easter babka is a rich yeast-leaven bread baked in a bundt cake pan. The babka from my recipe comes out delicate, moist, and not dry. It is basically a brioche recipe with the difference that egg yolks are added instead of whole eggs. Polish dessert recipes are known for the use of lots of egg yolks.
Babka is the general term for a bundt cake in Poland. Any type of cake baked in a bundt cake pan would be babka, for example, chocolate pound cake baked in a bundt pan would be chocolate babka (babka czekoladowa) and you should not confuse it with popular in the US Jewish chocolate babka which would be called ‘strucla’ in Poland. A bit confusing, I know!
To add a little bit to the confusion, Easter babka does not have to be yeast-based. This yeast sweet bread with raisins is definitely popular in Poland, especially for Easter, but many people make different kinds of babka for Easter. For example, in my family, my grandma always makes lemon babka (babka cytrynowa) for Easter which is basically just lemon pound cake. In conclusion, bundt cake-shaped baked goods are especially popular for Easter in Poland and are a part of the Easter basket that is taken to church for Easter by the Catholic people.
This particular type of babka is often called Easter babka (babka Wielkanocna) or yeast raisin babka (babka drożdżowa z rodzynkami).
This sweet raisin babka is really amazing and would be great for any occasion, all year round.
UPDATED RECIPE: I have updated this recipe because I got comments saying that this cake is dry. So I turned a regular yeast-cake recipe into a very rich brioche dough, meaning: added a lot more butter. I also swapped whole eggs for egg yolks. The resulting bread is definitely not dry but more difficult to make. You will need a stand mixer to make it because a yeast dough made with lots of butter is extremely difficult to make by hand. It needs to be kneaded with a mixer for about 30 minutes to develop gluten that gives the dough elasticity and structure. I´ve also added a video so you will know exactly what to expect. Please remember, this is NOT a cake, but a BREAD. This won´t taste like pound cake although it looks like it. It is a very rich brioche bread filled with raisins.
Ingredients
Here’s what you need to make Polish yeast raisin babka:
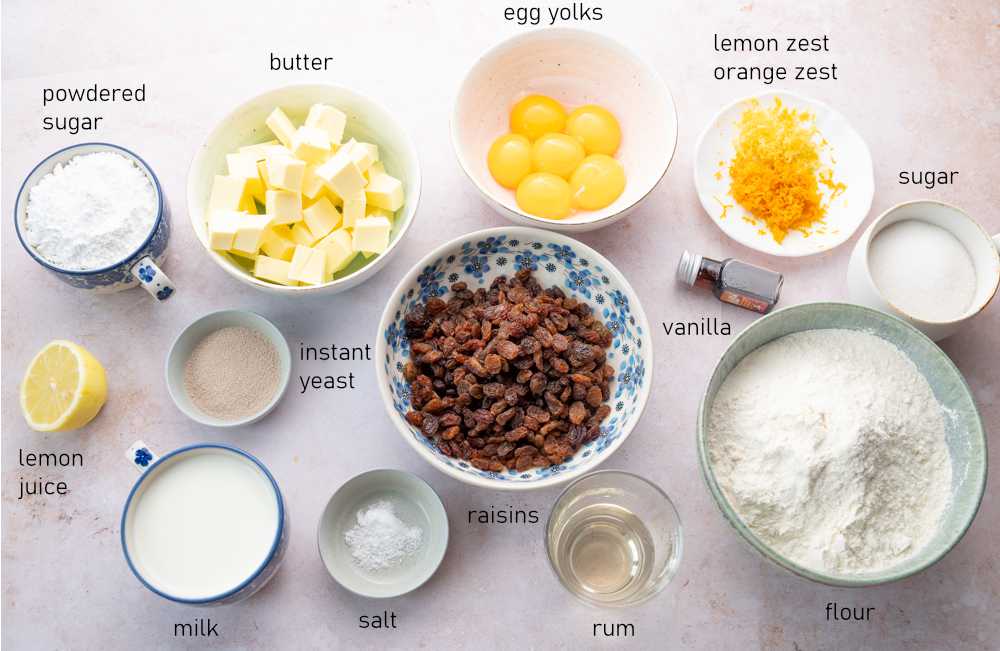
Rum or brandy is optional. They add some flavor to the raisins but you could soak them in just boiling water or for a longer period of time in orange juice. You could also soak them just in rum for a longer period of time. Boiling water is used to speed up softening raisins. Don’t omit this step or the raisins will soak up the moisture from the babka.
Yeast raisin babka is known for using many egg yolks. You could try adding 2 large eggs instead of 6 egg yolks, but I haven´t tried that.
In Poland, fresh yeast is most often used, they can be found in every grocery store. Yeast dough made with fresh yeast rises faster but the yeast flavor is more pronounced. I used instant yeast for this recipe.
From leftover egg whites, you can make Polish cookies kokosanki (coconut macaroons) or freeze it for later. If you´re looking for a savory use for egg whites, I use them for breading chicken cutlets! Simply whisk egg whites with mayo and use instead of whole eggs for breading. Frozen egg whites have saved me many times when I wanted to bread something but I run out of eggs.
How to measure flour
In the recipe card at the end of the post, I provided all the possible measurements for Polish babka – by volume and by weight. I’m always using a kitchen scale to make this recipe (and generally to develop the recipes for my website). If you’re weighing your ingredients on a scale your results will be very consistent and the same as mine. It’s really easier, quicker (you don’t have to clean all the measuring cups), and a kitchen scale is super cheap!
You can measure out all the ingredients for this recipe using measuring cups but I would recommend weighing flour.
Measuring the flour with measuring cups is unfortunately very inaccurate. 1 US cup of flour can weigh from 120g-140g, depending on how you’re filling your cup (1 US cup is 240ml, a European cup is 250ml). 20g is a little over 2 tablespoons of flour, so when this recipe calls for over 4 cups of flour, you could have added 8 tablespoons more flour which is 1/2 cup! This will result in a dry babka. Check the consistency of the dough – it should be soft and loose, it should not be dense.
If you’d like to measure flour with cups you need to:
- Fluff the flour by stirring it in the bag/flour container with a spoon.
- Spoon the flour and sprinkle it into your measuring cup.
- Sweep off the excess flour with the back of a knife.
How to make Polish babka step by step
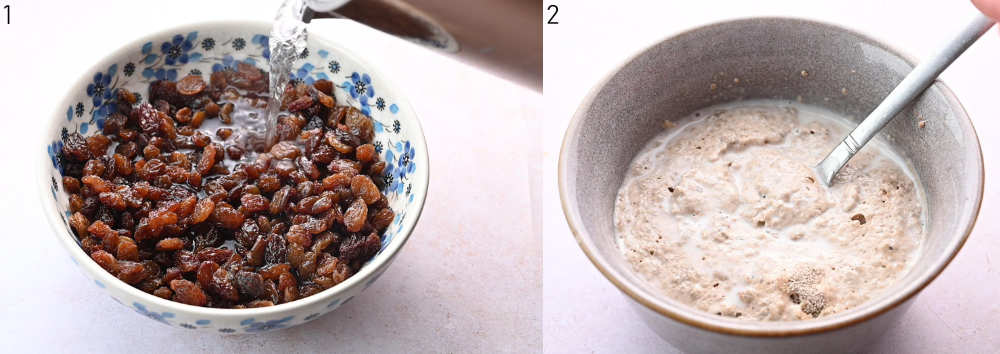
STEP 1: Soak the raisins: Add the raisins and rum into a medium bowl. Stir well then pour boiling water over to cover the raisins. Set aside and leave to soak for 1-2 hours (at least 1 hour).Leave the butter and egg yolks on the counter to warm up 1 hour before you plan on making the dough.
STEP 2: Bloom the yeast: Warm up the milk until 100-110°F (38-43°C) (pleasantly warm to your finger, it can’t be too hot) then stir in the yeast and 2 tablespoons of sugar. After about a couple of minutes you should see the yeast is starting to ‘bloom’ (will be frothy/foamy). If the yeast isn´t frothy – it´s not working, you need to start over.
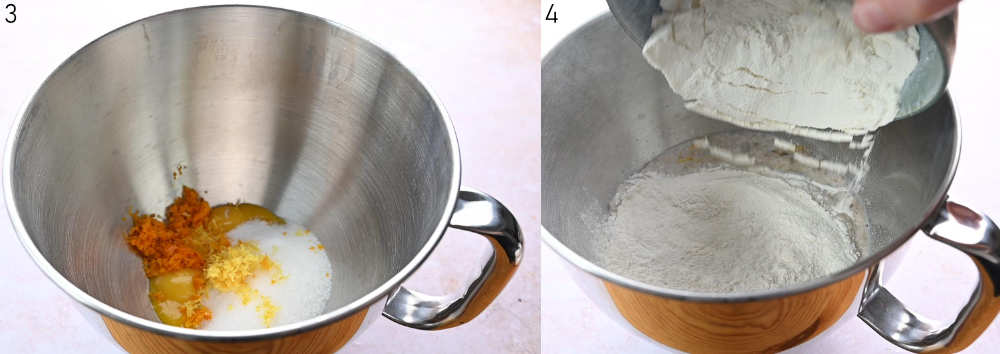
STEP 3: Knead the dough: Into a large mixing bowl, add the remaining sugar, vanilla, egg yolks, lemon and orange zest, salt.
STEP 4: Add flour and milk-yeast mixture.
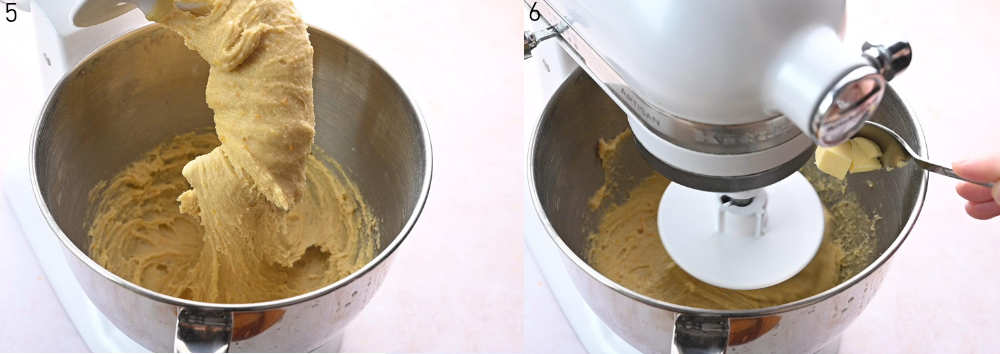
STEP 5: Mix with w stand mixer fitted with a dough hook attachment (speed 2 on Kitchen Aid) for about 5-7 minutes or until well combined.
STEP 6: Incorporate butter: Slowly start adding butter, about 2 tablespoons at a time, while mixing at speed 2. When you see the butter is almost incorporated into the dough, add another 2 tablespoons and repeat with the remaining butter. The whole process of adding butter should take about 10 minutes.
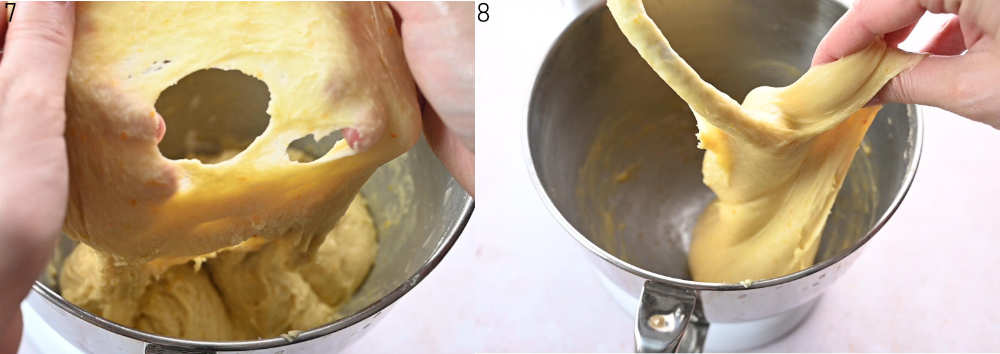
STEP 7: Finish kneading the dough: After this time, the dough will be still loose, soft and sticky. You need to kneed it further (on speed 2) for about 15-20 minutes (Yes, that long, this is not a typo).
The reason for this is that such a rich yeast dough takes much longer to knead/develop gluten that gives the dough its elasticity than a dough that has less butter/fat in it).
STEP 8; After this time, the dough should no longer stick to the sides of the bowl or your hands, it should be silky smooth, and elastic (photo 8+9).
STEP 9: It should pass the “window pane test” (photo 9) – take a small piece of the dough and stretch it slowly as much as you can. The dough must be thin enough to pass light through it and should not tear (=good gluten development). If your dough is tearing (photo 7) just knead it longer until it achieves correct consistency.
Please note that the dough consistency and window-pane test are shown on the video, that is on top of the recipe card.
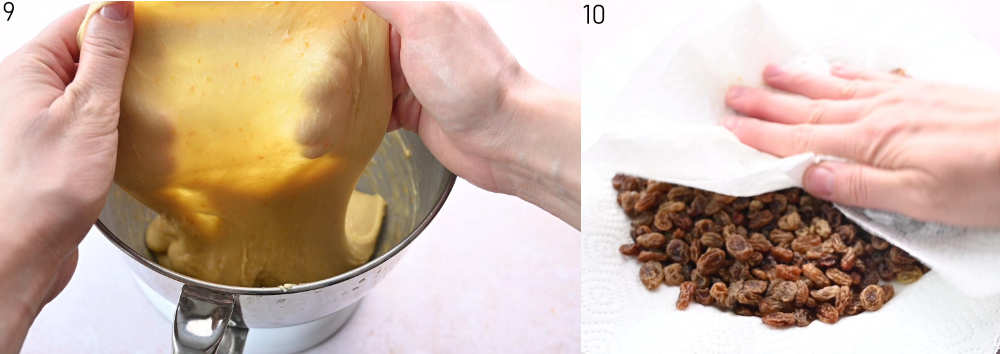
STEP 10: Add raisins: strain the raisins through a sieve (discard the liquid). Place on a plate lined with paper towels, pat dry with paper towels.
Knead the raisins into the dough (it´s easier to do by hand than with a mixer).

STEP 11: First rise: Form a smooth dough ball, put it back in the bowl, cover the bowl tightly with plastic foil.
STEP 12: Place in a warm place for about 2 hours or until doubled in volume (I’m putting it in a turned off oven with a light on).
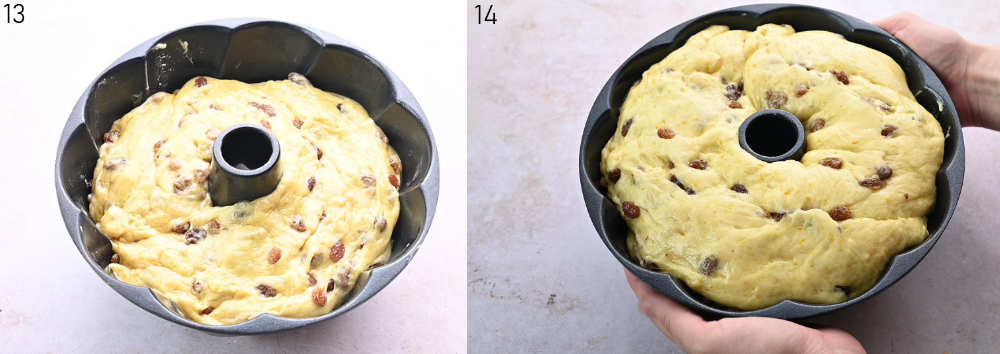
STEP 13: Grease a 10 or 12-cup bundt pan with butter (I used a 10 cup /25 cm (measured at the top) bundt cake pan).
Second rise: Take the risen dough out of the bowl and knead it for 30 seconds. Stretch the dough into a log, place it in the bundt pan, pinch both ends together.
STEP 14: Wrap tightly with plastic foil and let rise for 40 minutes or until the dough reaches the top of the pan.
STEP 15: Place the wire rack on the lowest shelf of the oven (the babka will be quite tall). Preheat the oven to 350°F (175°C).
Bake the babka for 50 minutes or until a thermometer shows 195°F (90°C) in the upper part of the babka (while the babka is still in the baking pan). I´m covering it loosely with a piece of aluminum foil 15 minutes before the end of the baking time because it can get too dark.The baking time may vary depending on the oven (every oven bakes differently) and baking pan (if you have a larger bundt pan with a bigger hole in the middle the babka will probably be done a little bit sooner).
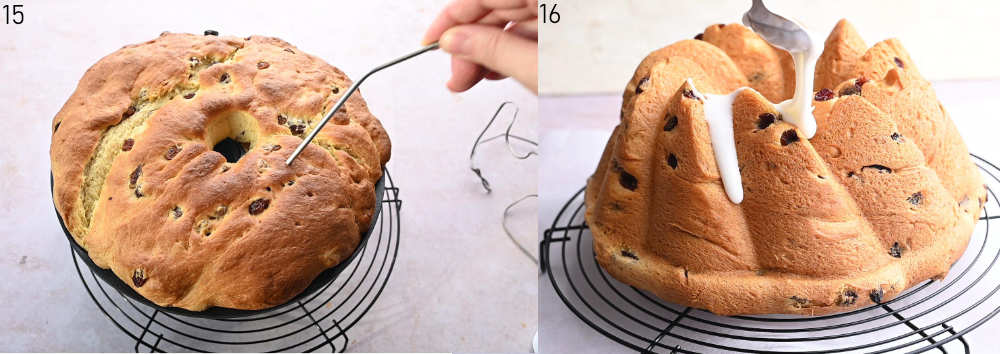
STEP 16: Invert the bread on a cooling rack and let cool completely (it will take at least 1 hour maybe longer, make sure the inner part of the babka is also cooled).
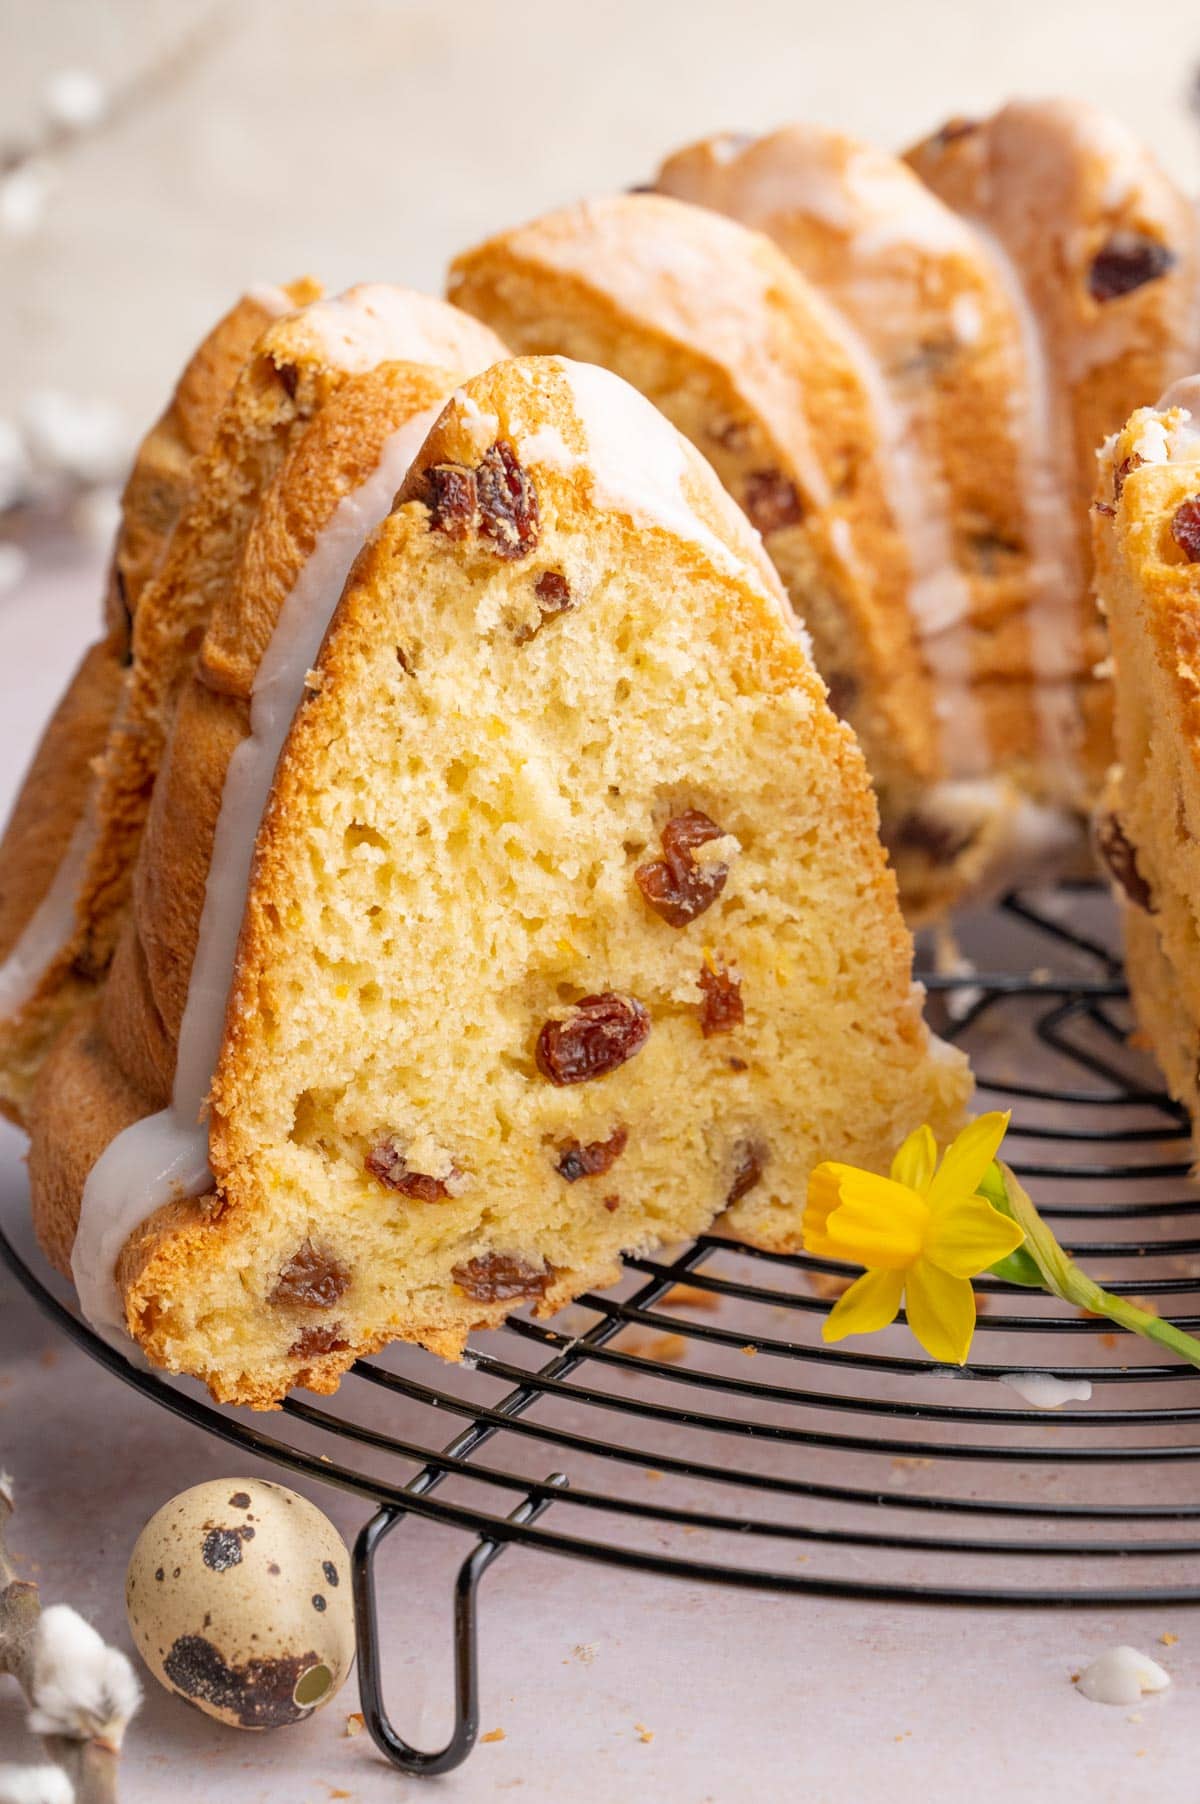
When the babka is cooled, make the glaze by whisking powdered sugar with lemon juice and water until thick glaze forms.
Pour the glaze over the babka. Let the glaze set a bit then cut the babka into servings with a serrated knife.
Enjoy!
Storage
Keep this babka tightly wrapped in plastic foil. It will be good for even 5 days but a little bit dryer. It can also be frozen.
More Polish dessert recipes you may like
- Chrusciki recipe (Faworki or Polish angel wings)
- Piernik – Polish Gingerbread Loaf
- Sernik – Polish cheesecake recipe
- Polish apple pancakes (with yeast)
- Sweet cheese pierogi
- Naleśniki recipe (Polish crepes with sweet cheese filling)
- Rogaliki recipe (orange walnut rugelach)
- Apple tart with meringue topping
- Fluffy sweet steamed buns with blueberry sauce (Pampuchy)
- Nut roll with chocolate (in form of a wreath)
- Polish rice with apples
- Pączki (Polish donuts)
Did you make this recipe? RATE THE RECIPE or tell me in the COMMENTS how you liked it! You can also add a photo of your dish. It would make me very happy and will help other readers. Thank you!!
Polish Easter Babka with Raisins (Babka Wielkanocna) – video!
Ingredients
for the babka:
- 1 ¼ cups (180g) raisins
- ¼ cup (60ml) rum or brandy
- boiling water
- *
- 3/4 cup milk 180g
- 1 tablespoon (10g) instant yeast 11g
- 2 tablespoons sugar from the 3/4 cup listed below
- *
- 3/4 cup (150g) granulated sugar
- 1 tablespoon vanilla extract
- 6 large egg yolks room temp
- grated zest of 1 lemon
- grated zest of 1 large orange
- ½ teaspoon fine sea salt
- 4 cups (500g) flour spooned and leveled not scooped
- *
- 2 sticks (230g) soft butter
for the glaze:
- 1 cup (120g) powdered sugar
- 1 tablespoon lemon juice
- 3/4 tablespoon water
Would you like to save this?
Instructions
- Soak the raisins: Add the raisins and rum into a medium bowl. Stir well then pour boiling water over to cover the raisins. Set aside and leave to soak for 1-2 hours (at least 1 hour).Leave the butter and egg yolks on the counter to warm up 1 hour before you plan on making the dough.
- Bloom the yeast: Warm up the milk until 100-110°F (38-43°C) (pleasantly warm to your finger, it can't be too hot) then stir in the yeast and 2 tablespoons of sugar. After about a couple of minutes you should see the yeast is starting to 'bloom' (will be frothy/foamy). If the yeast isn´t frothy – it´s not working, you need to start over.
- Knead the dough: Into a large mixing bowl, add the remaining sugar, vanilla, egg yolks, lemon and orange zest, salt, flour, and milk-yeast mixture. Mix with w stand mixer fitted with a dough hook attachment (speed 2 on Kitchen Aid) for about 5-7 minutes or until well combined.
- Incorporate butter: Slowly start adding butter, about 2 tablespoons at a time, while mixing at speed 2. When you see the butter is almost incorporated into the dough, add another 2 tablespoons and repeat with the remaining butter. The whole process of adding butter should take about 10 minutes.
- Finish kneading the dough: After this time, the dough will be still loose, soft and sticky. You need to kneed it further (on speed 2) for about 15-20 minutes (Yes, that long, this is not a typo). The reason for this is that such a rich yeast dough takes much longer to knead/develop gluten that gives the dough its elasticity than a dough that has less butter/fat in it).After this time, the dough should no longer stick to the sides of the bowl or your hands, it should be silky smooth, and elastic. It should pass the "window pane test" – take a small piece of the dough and stretch is slowly as much as you can. The dough must be thin enough to pass light through it and should not tear (=good gluten development). If your dough is tearing, just knead it longer until it achieves correct consistency.Please note that the dough consistency and window-pane test are shown on the video, that is on top of the recipe card.
- Add raisins: strain the raisins through a sieve (discard the liquid). Place on a plate lined with paper towels, pat dry with paper towels. Knead the raisins into the dough (it´s easier to do by hand than with a mixer).
- First rise: Form a smooth dough ball, put it back in the bowl, cover the bowl tightly with plastic foil, and place in a warm place for about 2 hours or until doubled in volume (I'm putting it in a turned off oven with a light on).
- Grease a 10 or 12-cup bundt pan with butter (I used a 10 cup /25 cm (measured at the top) bundt cake pan).
- Second rise: Take the risen dough out of the bowl and knead it for 30 seconds. Stretch the dough into a log, place it in the bundt pan, pinch both ends together. Wrap tightly with plastic foil and let rise for 40 minutes or until the dough reaches the top of the pan.
- Place the wire rack on the lowest shelf of the oven (the babka will be quite tall). Preheat the oven to 350°F (175°C).
- Bake the babka for 50 minutes or until a thermometer shows 195°F (90°C) in the upper part of the babka (while the babka is still in the baking pan). I´m covering it loosely with a piece of aluminum foil 15 minutes before the end of the baking time because it can get too dark.The baking time may vary depending on the oven (every oven bakes differently) and baking pan (if you have a larger bundt pan with a bigger hole in the middle the babka will probably be done a little bit sooner).
- Invert the bread on a cooling rack and let cool completely (it will take at least 1 hour maybe longer, make sure the inner part of the babka is also cooled).
- When the babka is cooled, make the glaze by whisking powdered sugar with lemon juice and water until thick glaze forms.
- Pour the glaze over the babka. Let the glaze set a bit then cut the babka into servings with a serrated knife.
- Enjoy!
Notes
- Keep this babka tightly wrapped in plastic foil. It will be good for even 5 days but a little bit dryer. It can also be frozen.
- How to measure flour: I’m using the “spoon and level method” so 1 cup of flour in my recipes weighs 125g. Fluff the flour by stirring it in the bag/flour container with a spoon. Spoon the flour and sprinkle it into your measuring cup. Sweep off the excess flour with the back of a knife. I really recommend using a digital scale for measuring flour for perfect and consistent results!
- Calories = 1 serving (1/12 of the recipe). This is only an estimate!


5 Comments
Aimee
17 August 2025 at 19:15Followed ingredients list/volumes (using kitchen scale) and instructions to a T.
Kneaded with dough hook on stand mixer as instructed.
Too much fat in this dough. The butter was weeping from dough.
Absolutely no rise despite the yeast blooming well.
Used high quality grassfed butter and free range eggs. Wasted a lot of money and time on this recipe. So disappointed.
Aleksandra
18 August 2025 at 13:19I’m so sorry to hear that! There isn’t too much fat in this dough. It’s very similar to French brioche, which uses the same amount of fat and sometimes even more. If the butter was weeping from the dough, it means it wasn’t properly incorporated—I think maybe it wasn’t kneaded long enough. Have you looked at the video to see how the dough should look?
If the dough hasn’t risen, there are two possibilities: either the yeast was dead, or the dough just needs more time. If you don’t want to keep the dough at room temperature for too long, you can put it in the fridge overnight, and you’ll see that it will rise for sure the next day.
I also know that other readers have had success with this recipe, and I’ve made it myself multiple times, so the recipe is not wrong. I’m really sorry you haven’t had success with it, though. If you have any more questions, I’ll be happy to answer them. Never throw away dough that hasn’t risen if you’re sure the yeast isn’t dead—it will always rise, just a bit later.
Alex
22 April 2025 at 10:17Tried this recipe as an alternative to my usual babka recipe which I always find a little dry, especially as it gets baked two days before being eaten. This recipe worked great and tasted great. The instructions are very clearly written and easy to follow. Using the photos and the instructions it was easy to tell when it had been kneaded enough, which for me was more like 30 minutes than 15-20 (UK flour has a lower gluten content than North American All Purpose), but I knew what I was looking for so had the confidence to wait and keep kneading until it was right. I will be using this recipe again next year although will probably drop the amount of sugar very slightly as it was a touch sweet for my personal taste. If you don’t have a Bundt pan, you can still make this in a cylindrical tin although it may need a bit longer in the oven.
Bryan Gogal
26 March 2024 at 21:59Very nice recipe and well presented. Great photos. I wanted a quick recipe for an Easter bread
and not having to deal with lining tin cans with parchment etc. and this recipe fit the bill nicely.
One thing – this recipe calls for instant yeast then goes on about blooming the yeast. IDY doesn’t need to be proofed. It’s good to go as is. It’s ADY – active dry yeast – that needs to be bloomed. I notice you don’t specify the flour to use. I’m assuming you mean bread flour – that’s what I used. With all that fat and sugar you need to develop as much gluten as possible to hold the bread up.
Aleksandra
27 March 2024 at 22:18Hi! Yes, instant yeast does not need to be proofed but I do it every time I’m using it because 1. I’ve found the dough rises faster and 2. I can be sure that my yeast is working and not dead so I really recommend proofing instant yeast. I used all-purpose flour for this recipe but you can also use bread flour. I’m glad you liked the recipe!