
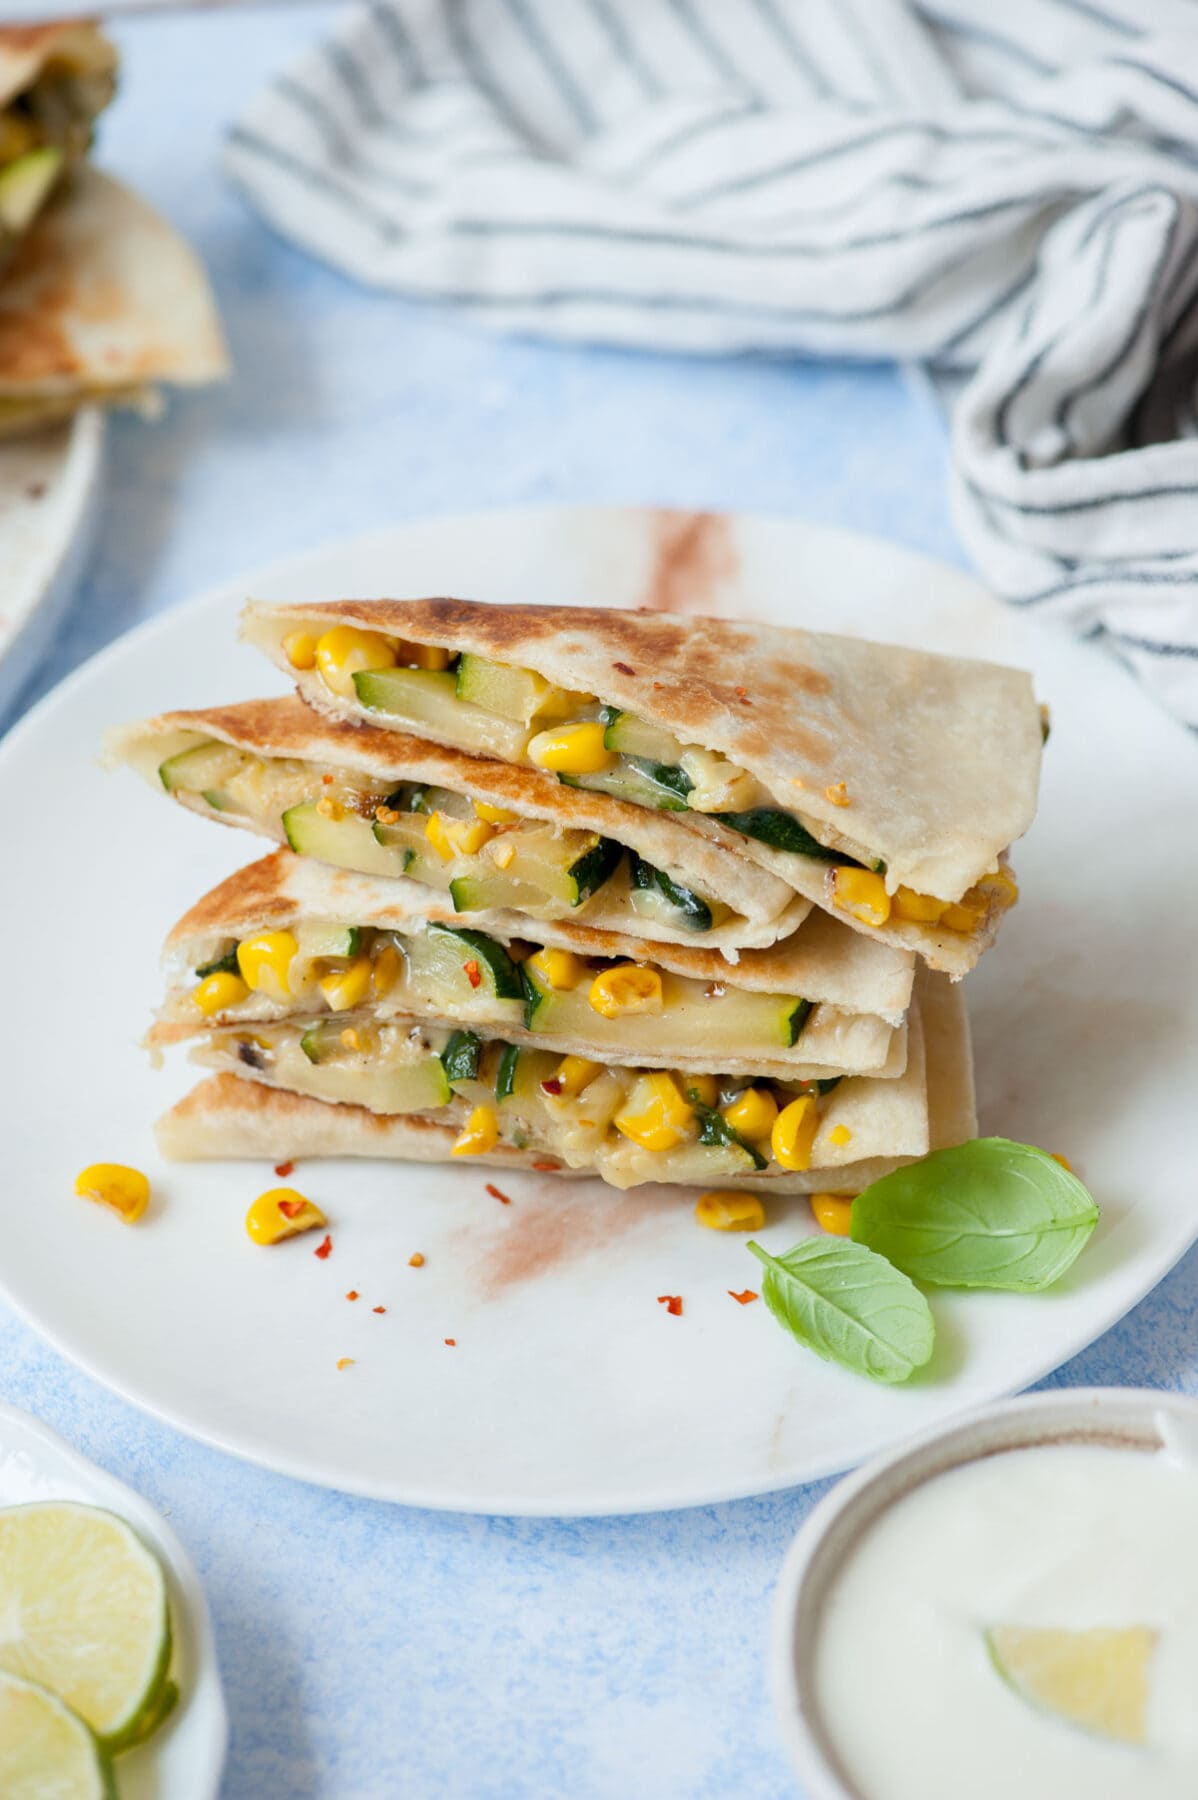
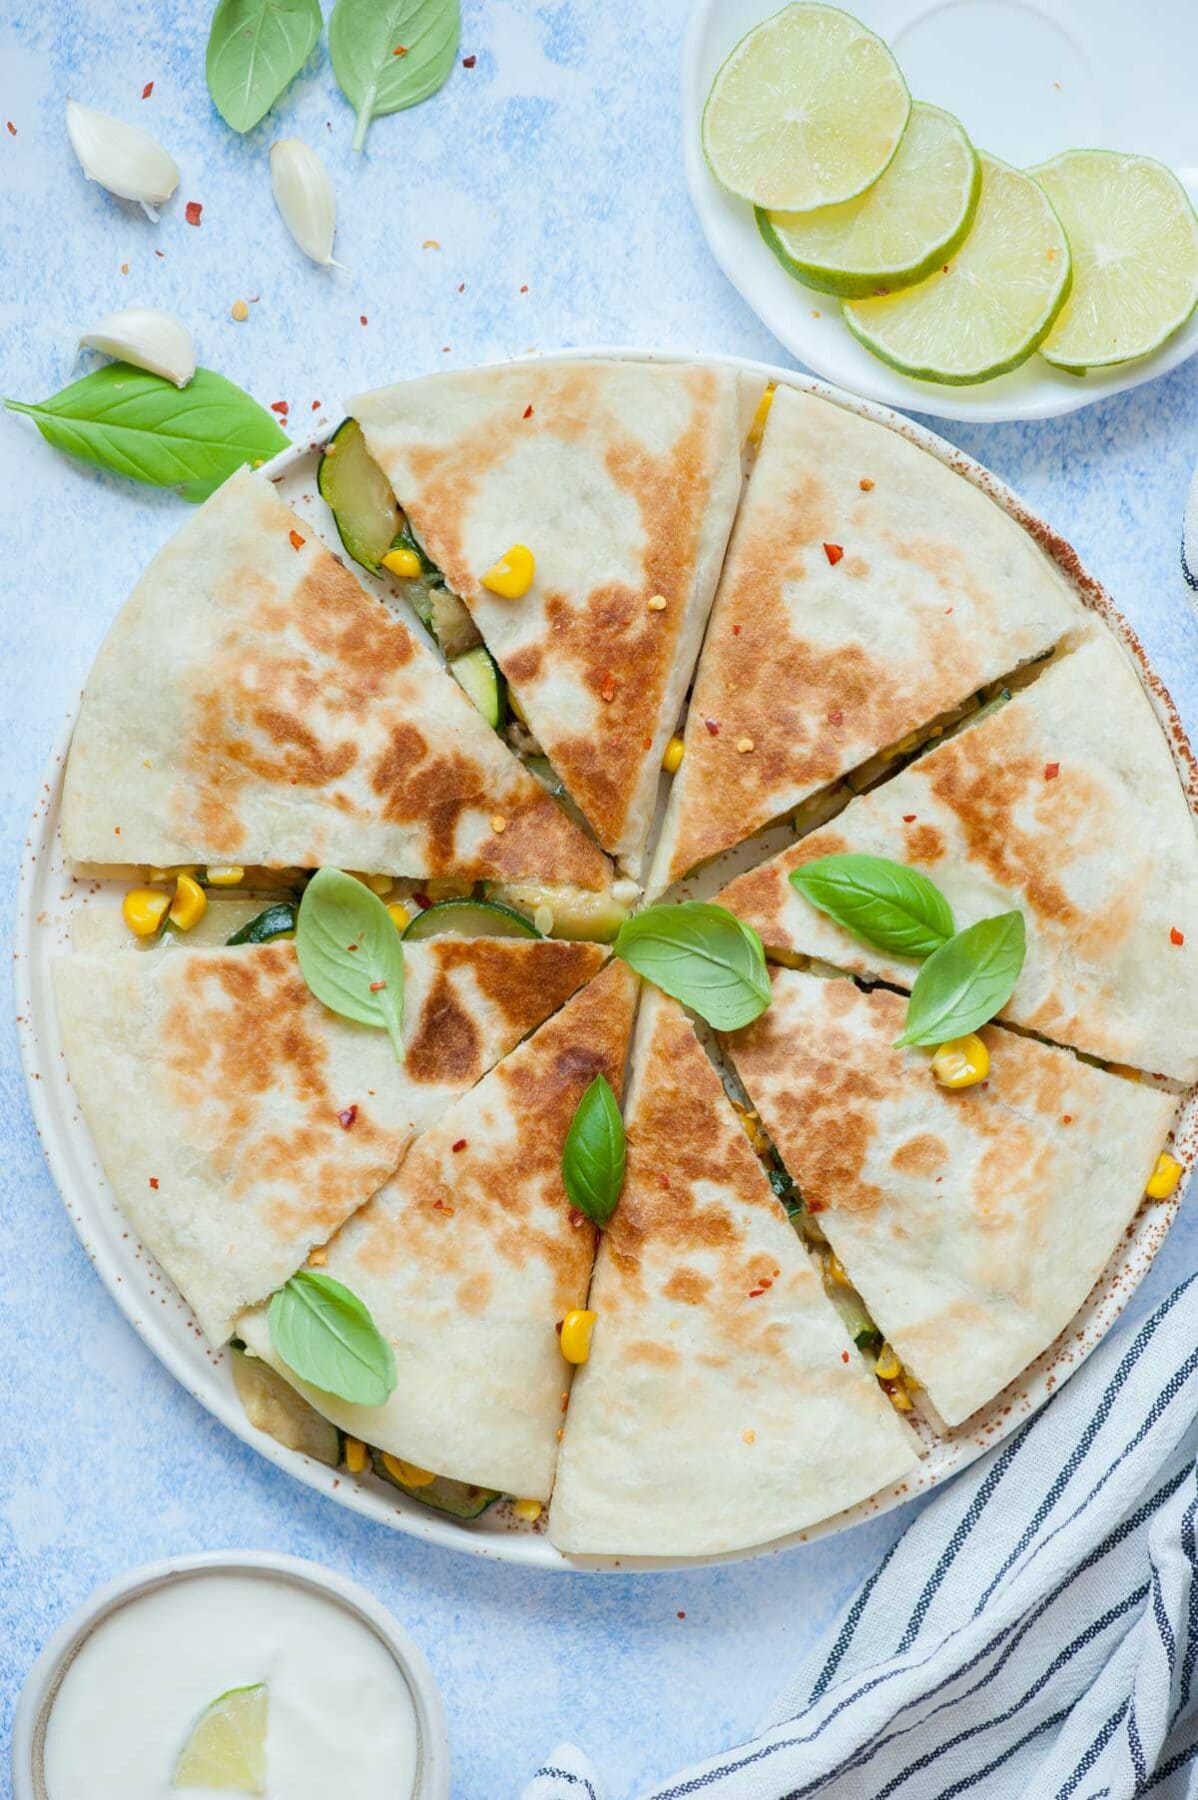
These cheesy zucchini quesadillas are a fun and delicious dinner idea. They will be ready in 30-minutes and are packed with veggies. The filling is made with sauteed zucchini and corn that are seasoned with garlic, basil, and chili flakes, then tossed with cheddar (or Gruyere) cheese. So simple, easy, and flavorful!
Zucchini and corn are just made for each other, if you like them together you may also want to try these cheesy zucchini corn fritters! If you’re looking for more zucchini recipes, you may want to give my zucchini and spinach lasagna, creamy zucchini soup, or cheesy zucchini gratin a try!
Ingredients
Here’s what you need to make these delicious zucchini quesadillas:
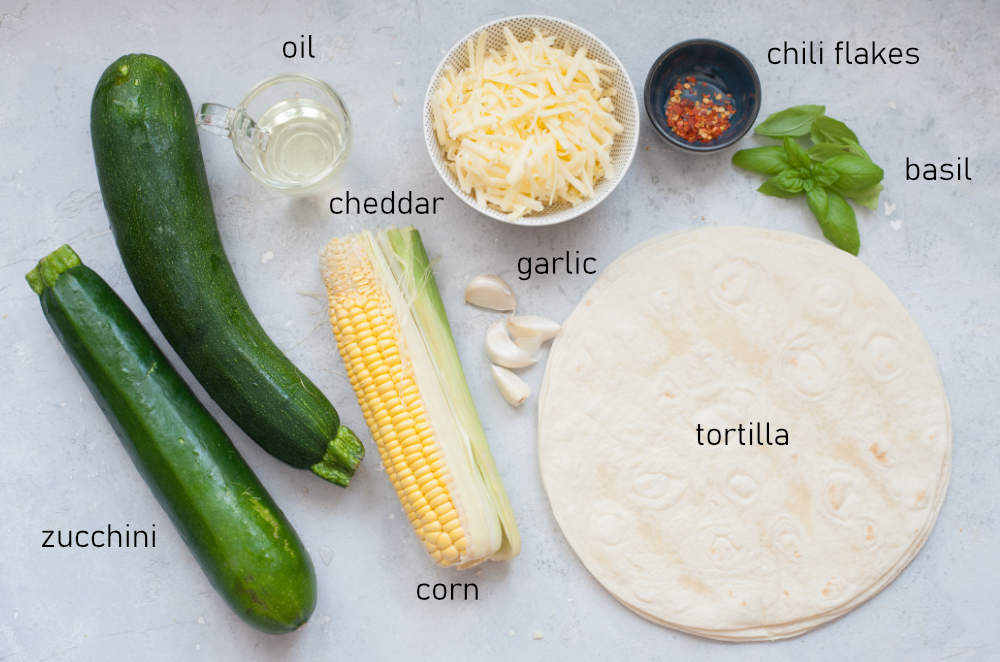
- Tortillas – wheat or corn, I used wheat.
- Zucchini – you will need 2 medium zucchini for this recipe.
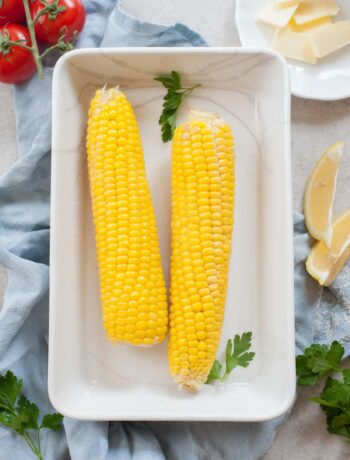
- Corn – use fresh corn if it’s in season (you will need 1 ear corn), frozen corn, or canned corn. Fresh corn tastes best – it’s sweet and crunchy. You can use leftover corn, for example from this Instant Pot corn on the cob recipe or Roasted corn on the cob recipe. You won’t have to sautee it in a pan, just warm it up.
- Fresh garlic – you could substitute garlic powder but it won’t taste as good.
- Chili flakes or chopped fresh chili – add it to your taste.
- Fresh basil or fresh cilantro – both these herbs will work here.
- Frying oil or clarified butter – for cooking the vegetables. Clarified butter is a butter that is suitable for pan-frying. It doesn’t burn like regular butter and still have a delicious buttery flavor. You can purchase it or make your own in 5 minutes.
- Cheese – I tried this recipe with Gruyere cheese and mild white cheedar and they were both delicious. I think that sharp cheddar would be a little bit too overwhelming for this filling. Gruyere cheese would be my preference but it’s more pricey. You could also use Jack cheese or Pepper Jack cheese (but omit the chili flakes).
Step by step instructions

STEP 1: Cut the zucchini in half lengthwise, then into 1/4-inch (5mm) slices. Finely chop the garlic and basil.
STEP 2: Place the corn vertically on a large chopping board. Cut off the corn kernels with a large and sharp knife from the top to bottom. Rotate the ear of corn and repeat until all the kernels have been removed.
You can save the bare corncob to add flavor to stock or soup, especially if you plan on making corn soup or chowder. You can also freeze it and use it later.
You can also use a bundt cake pan or two bowls (one large bowl with a small inverted bowl inside) to catch all the kernels in one dish (it is shown on the photos here), but I prefer just to use a large chopping board.
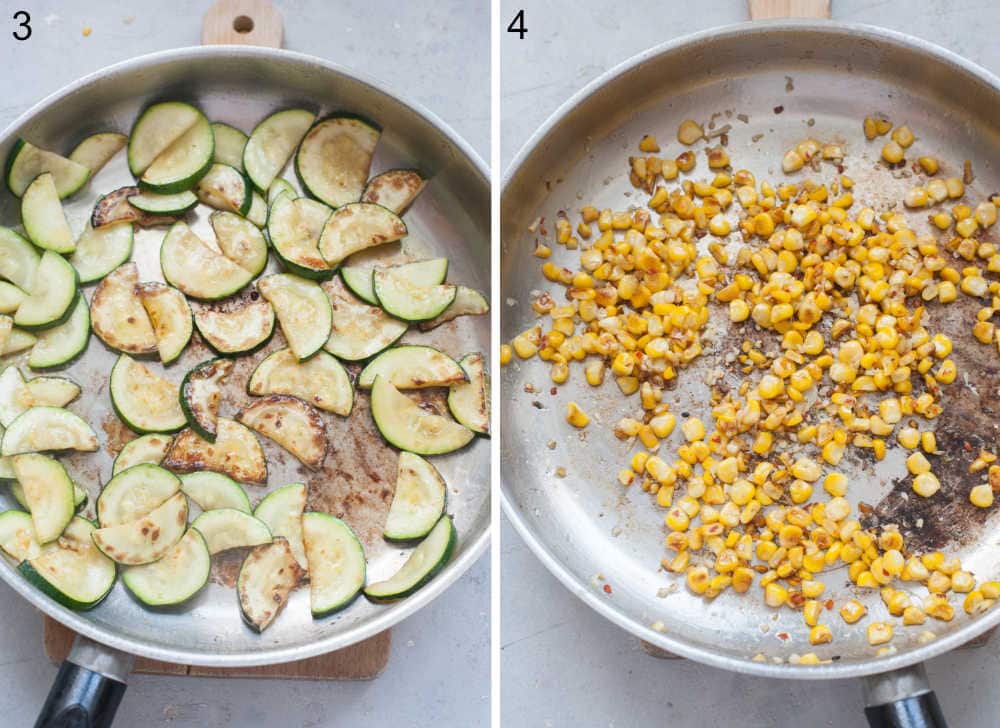
STEP 3: Heat the oil in a large frying pan. Cook the zucchini in two batches over high heat until it’s browned and tender, but it should still be crunchy, don’t overcook it! Transfer the zucchini into a large bowl.
STEP 4: Add the corn kernels to the pan, cook over high heat for 1-2 minutes or until soft and browned (if using canned corn, you don’t have to cook it).
Reduce the heat to medium-low, add the garlic and chili flakes, cook, stirring, for 30 seconds. Transfer the content of the pan to the bowl.
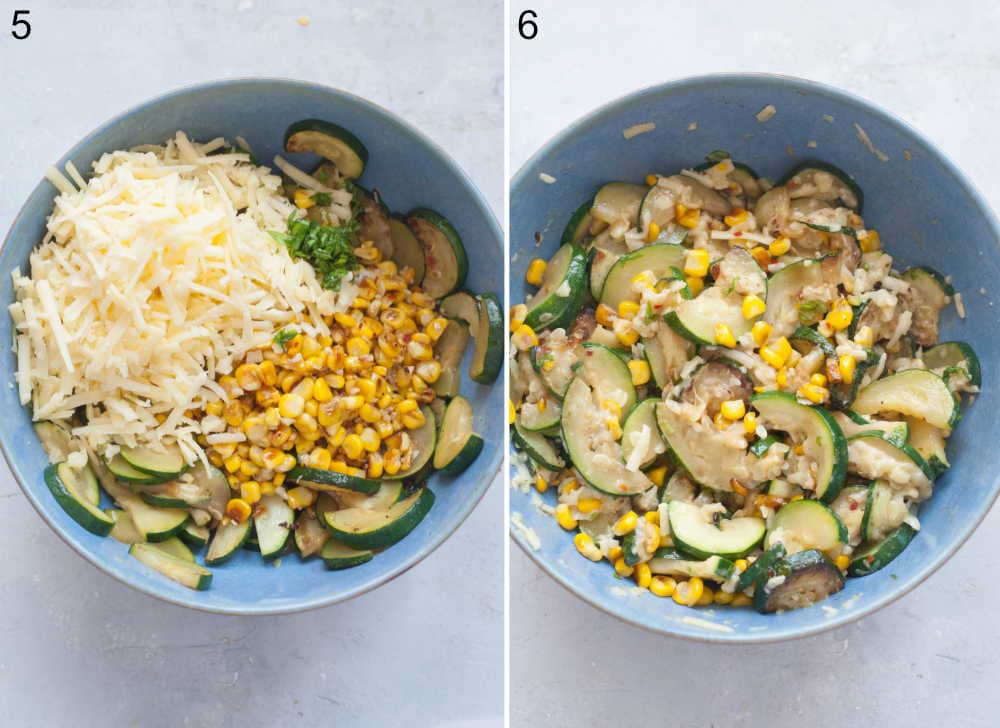
STEP 5: If the zucchini released some moisture or it’s too greasy, pat it dry with paper towels. You can’t have too much moisture in your filling or it will make the tortilla soggy. Let the filling cool a little then add shredded cheese and chopped basil.
STEP 6: Toss everything together until evenly distributed. Season to taste with salt and pepper.
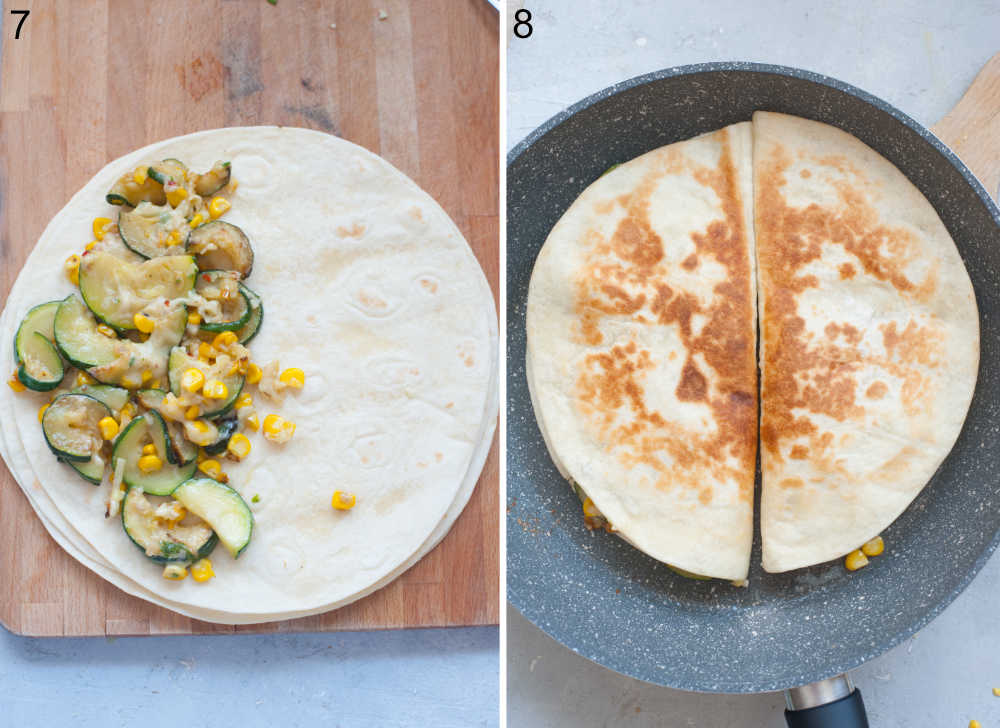
STEP 7: Spoon some of the filling on one half of a tortilla, fold it over.
STEP 8: Heat a small amount of oil in a large frying pan, place two quesadillas in the pan and cook them over medium heat until golden on both sides and the cheese is melted (move the quesadilla once or twice to make sure it doesn’t stick to the pan).
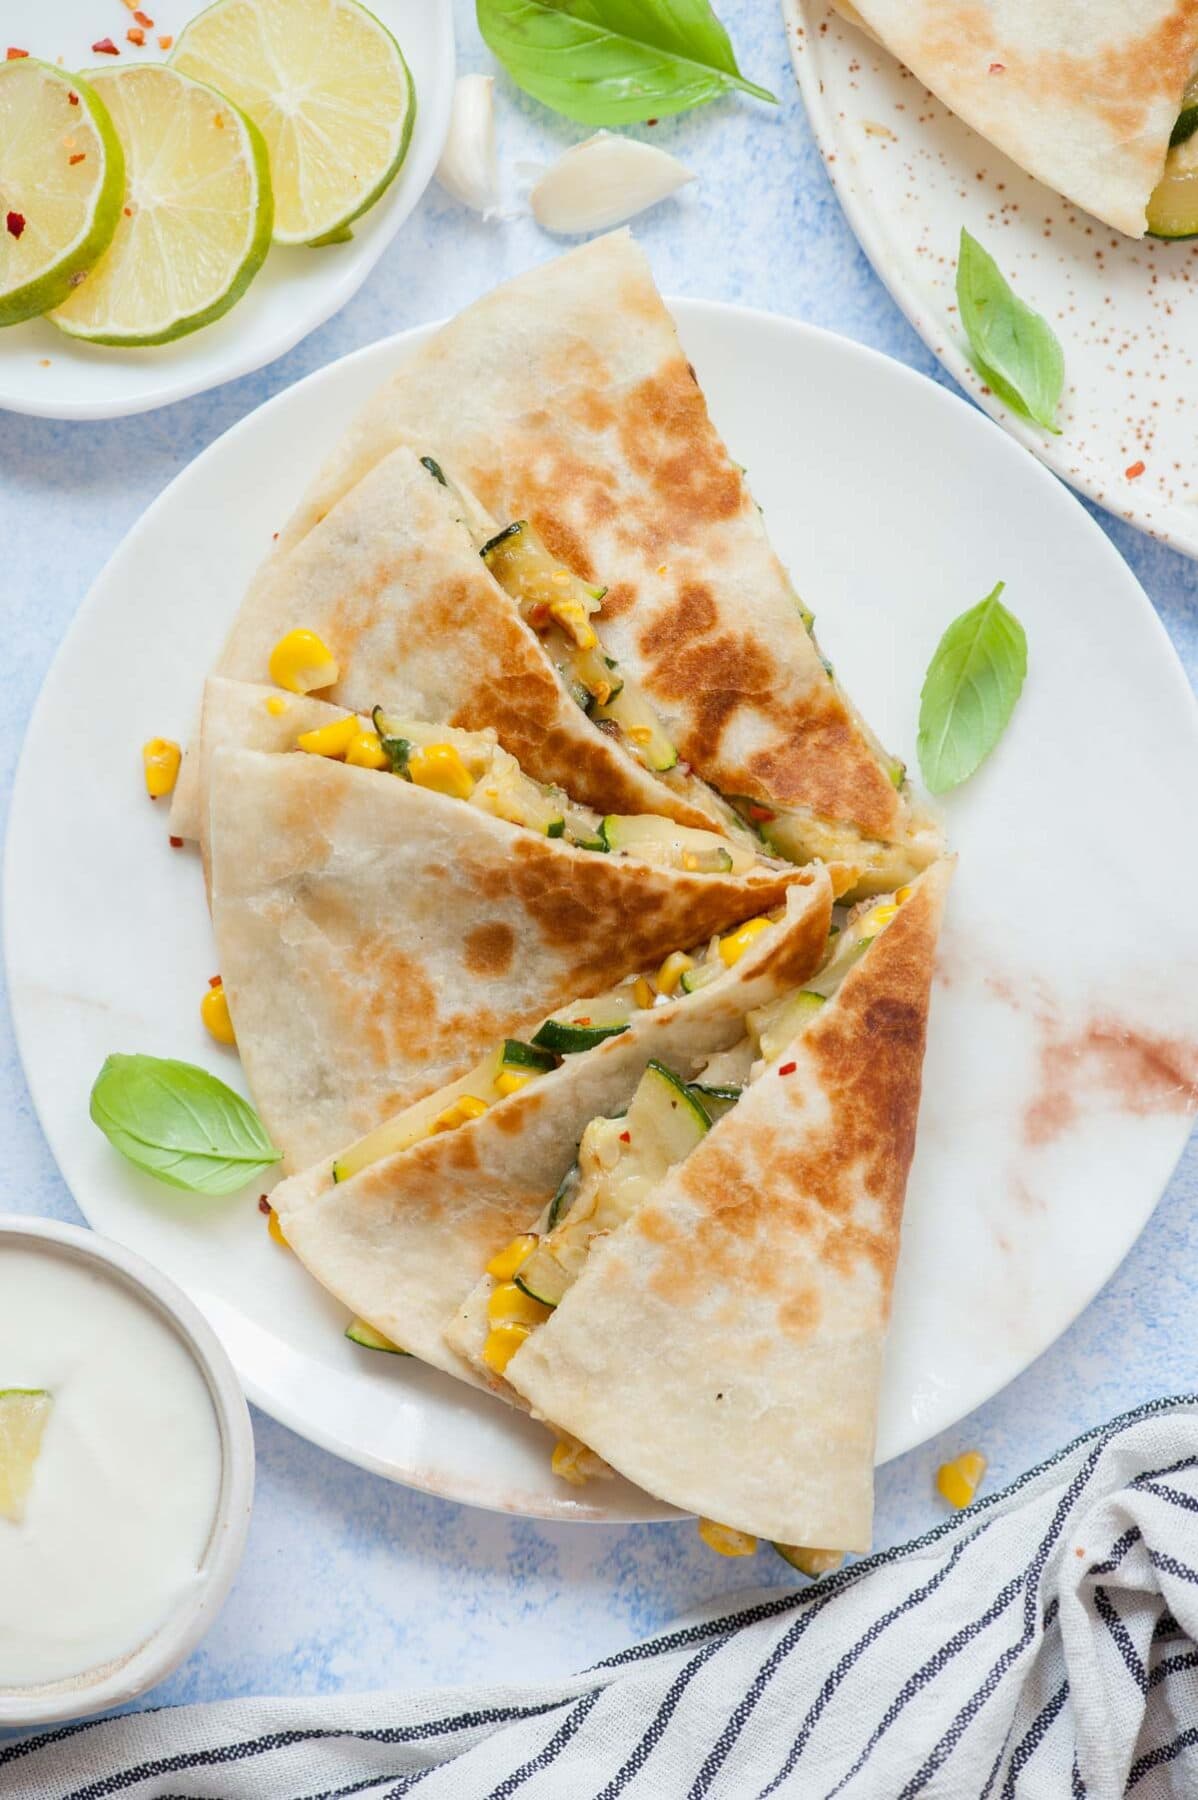
Transfer quesadillas to a large chopping board, sprinkle with salt on top, cut each quesadilla into 2 or 4 triangles.
Enjoy!
TIP: You can also cook quesadilla without the oil but I prefer it much more with oil – they are more crispy and tasty.
How to cook quesadillas in the oven
If you’re making more quesadillas you can also finish them in the oven instead of on the stovetop. Here’s how to do it:
- Brush the quesadillas on both sides with melted butter.
- Place on a baking sheet lined with parchment paper.
- Bake at 425°F/220°C for about 10 minutes or until golden.
How to serve it
- This quesadilla is really good on its own but I like to serve it with a simple yogurt dip: combine 1/2 cup of plain yogurt with 1 Tbsp of sour cream, 1 ts lime juice, 1 small clove garlic (pressed), then season with salt and pepper.
- Another option would be quick blender tomato salsa: mix all the ingredients in a blender/food processor until just a little chunky: 1 can crushed tomatoes (14-oz/400ml), 1 handful fresh cilantro, 1/4 teaspoon cumin, 1 large clove garlic, 1 deseeded jalapeno or some hot pepper flakes to taste, 2 tablespoons lime juice, 1 teaspoon brown sugar, 1 small white or yellow onion, salt, and pepper to taste.
- Guacamole / sliced avocado.
- Pico de gallo (I have a recipe for this condiment in the post for breakfast tacos).
Storage
Make ahead: These quesadillas are great to make ahead! Wrap them in plastic foil then store them in the fridge for up to 2 days. Reheat on a dry pan over medium-low heat on both sides until crunchy and golden. Please note that reheated quesadillas won’t be as crunchy as freshly prepared. They will always be a little more soggy, but they are still great.
Alternatively, you can store the filling and tortillas separately and assemble just before serving.
How to freeze them: wrap each quesadilla in plastic wrap and freeze in a single layer. Once frozen transfer to bags or containers. Thaw in the fridge then reheat in a pan. You can also thaw them in a microwave or in the oven. You can also bake them straight from the freezer at 350°F/180°C then broil at the end (or turn on the fan) to make them crispy.
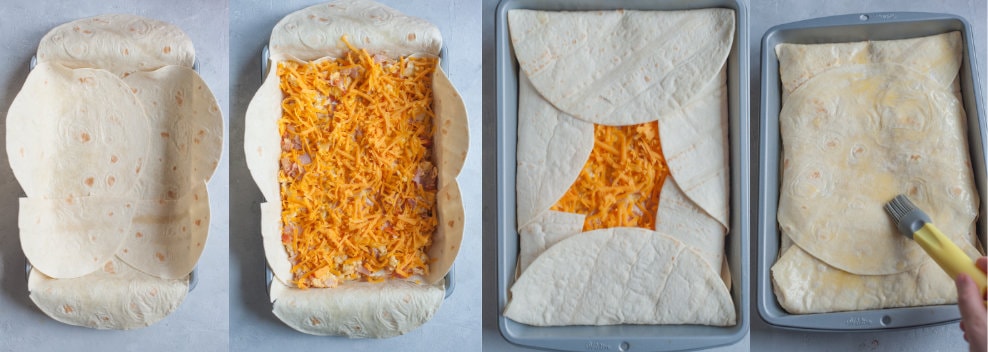
Sheet pan quesadilla for a crowd
This is another option to cook quesadillas and it’s great if you’re feeding a crowd! The filling with tortillas is baked in the oven until golden then cut into servings/squares. These quesadillas are crispy and taste great.
I haven’t tried making a sheet pan quesadilla with this particular filling but I estimate you would need to double the filling. You will need 6 large quesadillas for a 9×13 inch pan (22x33cm) (the photo below shows how to make sheet pan quesadillas with a different filling).
How to make it:
- Brush 9×13-inch (23x33cm) baking pan or baking sheet with melted butter.
- Arrange tortillas overlapping around the edges of the pan so that half of the tortillas overhang the rim and the entire bottom surface of the pan is covered.
- Spread the filling evenly over the tortillas.
- Fold the overhanging tortillas back towards the center, then place an additional tortilla on top so that all the filling is covered.
- Brush the top generously with melted butter.
- Bake at 425°F/220°C for about 10 minutes or until golden.
- Take out of the oven then let rest for 5 minutes.
- Cut into squares and serve. Enjoy!
More quesadilla recipes
- BBQ Chicken Quesadillas
- Mushroom quesadilla with caramelized onions
- Easy breakfast quesadilla recipe
- The Best Vegetarian Quesadillas (sweet potato and black bean quesadilla)
- Chicken fajita quesadillas
- Broccoli cheddar quesadillas
- Chicken quesadilla recipe with mushroom bell pepper and corn
Check out all my quesadilla recipes here.
Did you make this recipe? RATE THE RECIPE or tell me in the COMMENTS how you liked it! You can also add a photo of your dish. It would make me very happy and will help other readers. Thank you!!
Zucchini quesadilla

Ingredients
- 2 tablespoons frying oil
- 2 medium zucchini
- 1 ear corn or about 1 cup corn, 130g
- 4 cloves garlic
- 1/2 tablespoon chopped basil or cilantro
- 1/4 teaspoon chili flakes or to taste
- 1 cup shredded cheese mild white cheddar or Gruyere, 100g
- salt and pepper to taste
- 4 large tortillas
Would you like to save this?
Instructions
- Cut the zucchini in half lengthwise, then into 1/4-inch (5mm) slices. Finely chop the garlic and basil.
- Place the corn vertically on a large chopping board. Cut off the corn kernels with a large and sharp knife from the top to bottom. Rotate the ear of corn and repeat until all the kernels have been removed.
- Heat the oil in a large frying pan. Cook the zucchini in two batches over high heat until it’s browned and tender, but it should still be crunchy, don’t overcook it!
- Transfer the zucchini into a large bowl.
- Add the corn kernels to the pan, cook over high heat for 1-2 minutes or until soft and browned (if using canned corn, you don’t have to cook it).
- Reduce the heat to medium-low, add the garlic and chili flakes, cook, stirring, for 30 seconds. Transfer the content of the pan to the bowl.
- If the zucchini released some moisture or it’s too greasy, pat it dry with paper towels. You can’t have too much moisture in your filling or it will make the tortilla soggy.
- Let the filling cool a little then add shredded cheese and chopped basil. Toss everything together until evenly distributed. Season to taste with salt and pepper.
- Spoon some of the filling on one half of a tortilla, fold it over.
- Heat a small amount of oil in a large frying pan, place two quesadillas in the pan and cook them over medium heat until golden on both sides and the cheese is melted (move the quesadilla once or twice to make sure it doesn’t stick to the pan).
- Transfer quesadillas to a large chopping board, sprinkle with salt on top, cut each quesadilla into 2 or 4 triangles.
- Enjoy!
Notes
- How to serve these quesadillas:
- This quesadilla is really good on its own but I like to serve it with a simple yogurt dip: combine 1/2 cup of plain yogurt with 1 Tbsp of sour cream, 1 ts lime juice, 1 small clove garlic (pressed), then season with salt and pepper.
- Another option would be quick blender tomato salsa: mix all the ingredients in a blender/food processor until just a little chunky: 1 can crushed tomatoes (14-oz/400ml), 1 handful fresh cilantro, 1/4 teaspoon cumin, 1 large clove garlic, 1 deseeded jalapeno or some hot pepper flakes to taste, 2 tablespoons lime juice, 1 teaspoon brown sugar, 1 small white or yellow onion, salt, and pepper to taste.
- Guacamole.
- Pico de gallo (I have a recipe for this condiment in the post for breakfast tacos).
- These quesadillas are great to make ahead and can be frozen. Reheat them on a dry pan on both sides until crispy.
- Calories = 1 serving (1/2 of the recipe, 2 quesadillas). This is only an estimate!
No Comments