
This is my favorite pierogi dough recipe – soft, elastic, smells of butter and is easy to roll out. This is the best pierogi dough recipe you’ll find. Below I’m also sharing many tips on how to make the perfect pierogi and answer all the questions you could have.
What are pierogi/pierogies?
Pierogi are Polish dumplings, made with unleavened dough and filled with sweet or savory fillings. They are boiled and then sometimes additionally pan-fried.
Pierogi in Poland:
Pierogi are one of the most popular Polish dishes. They are served as a main dish or as a side dish. The most popular pierogi are potato and cheese pierogi, sauerkraut and mushroom pierogi, and pierogi with meat filling (at least in the region where I’m coming from). In summer sweet pierogi (filled with fruits, like strawberries and blueberries) are popular. The flavor combinations are countless.
In Poland you can find small restaurants, where only pierogi are being served, they are filled with many different fillings. Such a restaurant is called ‘pierogarnia’.
Pierogi, Pierogies or Perogies?
Although the word ‘pierogies’ is popularized in English-speaking countries, it is not the true name of these Polish dumplings. The correct name is: singular – 1 pieróg and plural – pierogi. There are no other terms to name it.
What is the difference between pierogi and ravioli:
Ravioli are Italian dumplings, that are wrapped in pasta dough (this dough must contain eggs and is more rich and tough). Italian fillings also differ from traditional pierogi fillings.
Top tips for making the perfect pierogi dough:
- Traditional pierogi dough is easy to make without a recipe (I think no Polish grandmother makes it with a recipe, at least both my grandmothers don’t). The exact recipe is not important here, if the dough is too dry, you need to add some water, if too wet – a little bit of flour. However, it is worth having your favorite recipe and a kitchen scale on hand – the preparation goes much faster, the ingredients are added into a bowl and kneaded together, you don’t need to add additional water or flour.
- One of the most important things is, that the dough is well-kneaded!
- After kneading the dough, let it rest. You can see on my video how much softer and pliable the dough is after it has rested.
- Best water temperature – very hot but not boiling.
- Add some fat – it can be butter (more flavor) or oil.
- Don’t add eggs to the dough (more on that below).
- Dough to filling ratio: it’s very important, but it’s also a matter of taste. I like it when my dough is not very thin but also not very thick. I like to stuff my pierogi with lots of filling but I also like to taste the dough. Experiment what works best for you.
Easy pierogi dough ingredients:
- The best flour to make pierogi – I’m using all-purpose flour.
- Water – it’s important to add hot water to the dough. It makes the dough soft and pliable. You should warm the water with butter until they are very hot, but not boiling (temperature around 80-90 °C / 176-194 °F, that is when the water starts to move and steam). Too hot water will make the dough a little bit more chewy and sticky. Cold water will make the dough harder to roll out and it will be more difficult to shape the pierogi.
- Fat – you could make the dough without it, but it really makes the dough perfect. I’m using butter for its taste but any vegetable oil will also work.
- Salt – also the dough should be seasoned, not only the filling.
- I’ve seen some recipes that call for sour cream. Personally, I’ve never heard of such pierogi dough ingredient and don’t know anyone who is making pierogi with it (at least in Poland). I think it’s more an American or Russian/Ukrainian ingredient. Nowadays though, many home cooks experiment with the ingredients. Authentic Polish pierogi dough recipe call just for flour, water, salt, and optionally some fat and an egg.
Pierogi dough with egg or no egg:
There are two ways of making the pierogi dough – with or without an egg. Many Polish home cooks are arguing, which way is the best.
For me, the perfect pierogi dough is made without the egg. The dough with eggs is a bit tougher in my opinion, but the difference with a well-kneaded dough is not that huge (but there is a difference).
The second reason why I don’t add an egg is that it’s more hygienic – having a small child at home, I usually make a lot of pierogi in one batch, but making a lot of breaks in between. I do not have to worry about washing my hands thoroughly all the time, taking care if the table is well cleaned and watching out if my daughter is eating a dough with a raw egg.
By the way, you should try making pierogi with your kids. Rolling out the dough, cutting out rounds, shaping the pierogi – I think it’s a fascinating activity for every child!
Since this pierogi dough is made without eggs it is suitable for vegetarian diet, vegan diet or dairy-free diet (swap the butter for vegetable oil), or egg-free diet.
What equipment do you need:
- I love making my pierogi dough in my Kitchen Aid but you can also make it by hand. You’ll need to knead the dough for about 10 mins. A food processor can also be used (fitted with the dough blade), but I prefer the stand mixer.
- A rolling pin (or alternatively a wine bottle!). For rolling out the dough you can use a pasta maker (I’m sometimes using my Kitchen Aid pasta attachment). I find that it’s equally easy to roll out the dough by hand and with the pasta maker. Pierogi dough is much more pliable and soft in comparison to pasta dough, which makes it easier to roll out by hand.
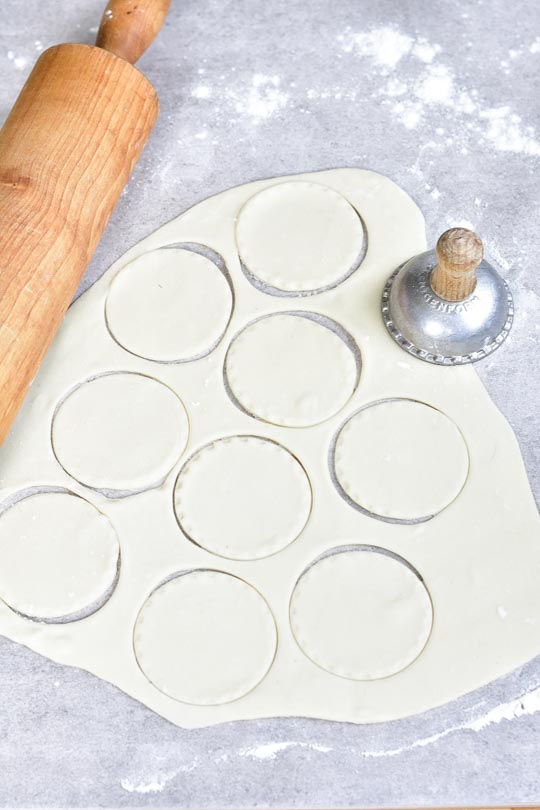
- Pierogi cutter / pastry cutter / a cup (preferably with sharp edges). I prefer to use a real pierogi cutter or a pastry cutter – it’s easier to cut out rounds. A regular glass/cup can also be used but I find cutting out round a little bit harder as its edges are more thick and blunt. It would be better to use a glass that has thin, sharp edges if you don’t have a pierogi cutter (both my grandmas are using a regular glass though ;)).
- A pot to cook the pierogi (obviously) and a slotted spoon.
- There are pierogi maker press or pierogi molds available if you search online. I haven’t personally tried them out. Feel free to let me know if there are any that you really like!
How to make pierogi dough – step by step:
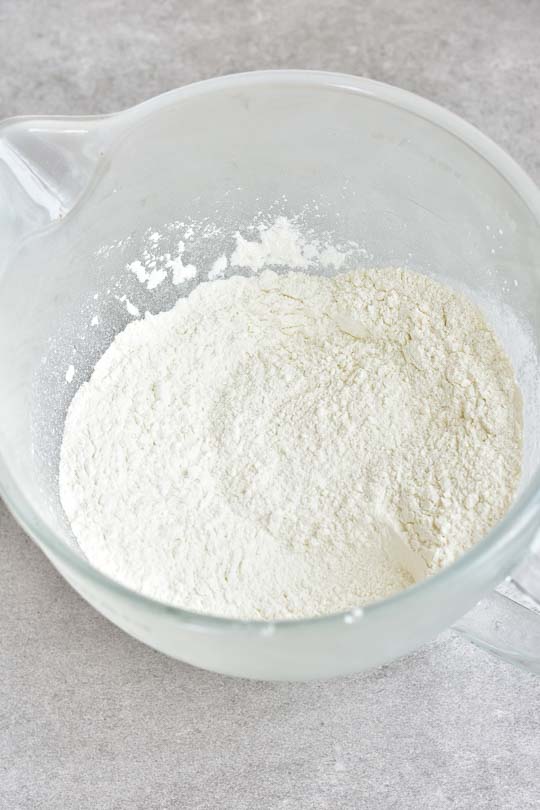
STEP 1: Add flour and salt to a large bowl.
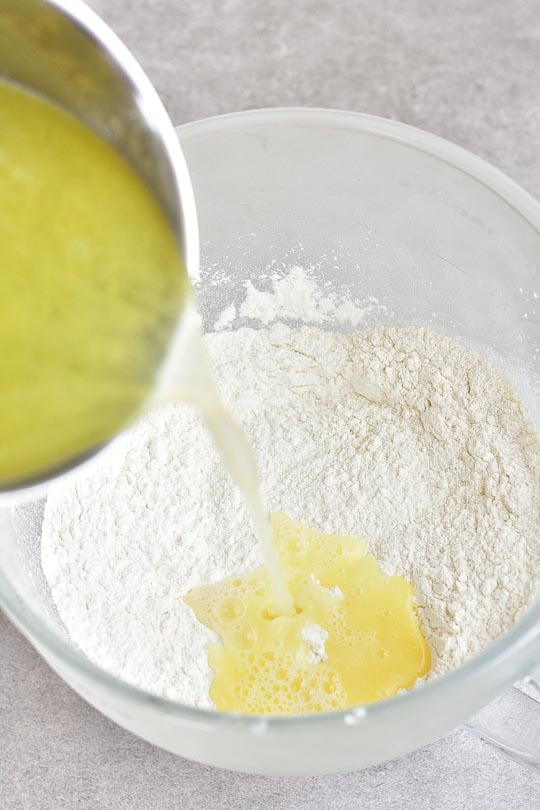
STEP 2: Add hot water with butter.


STEP 3: Mix with a wooden spoon until roughly combined.
STEP 4: Knead the dough until smooth and soft.
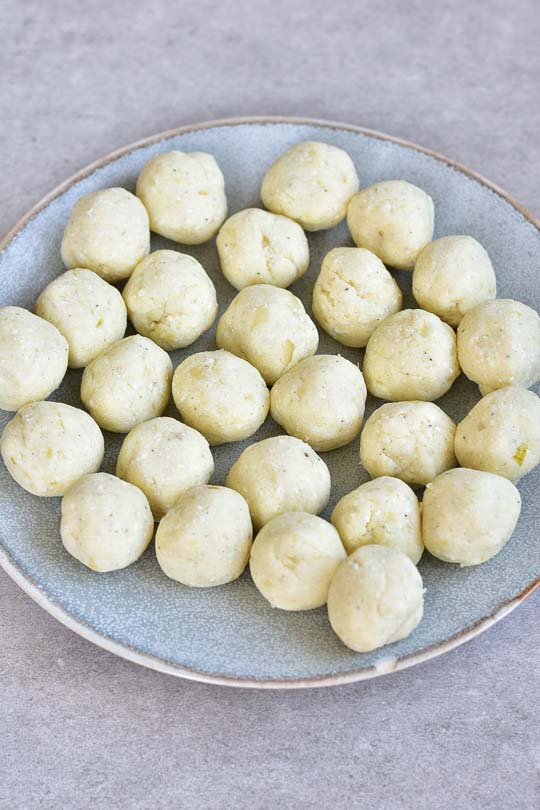
STEP 5: Prepare the filling.
STEP 6: Roll out the dough and cut out the rounds.
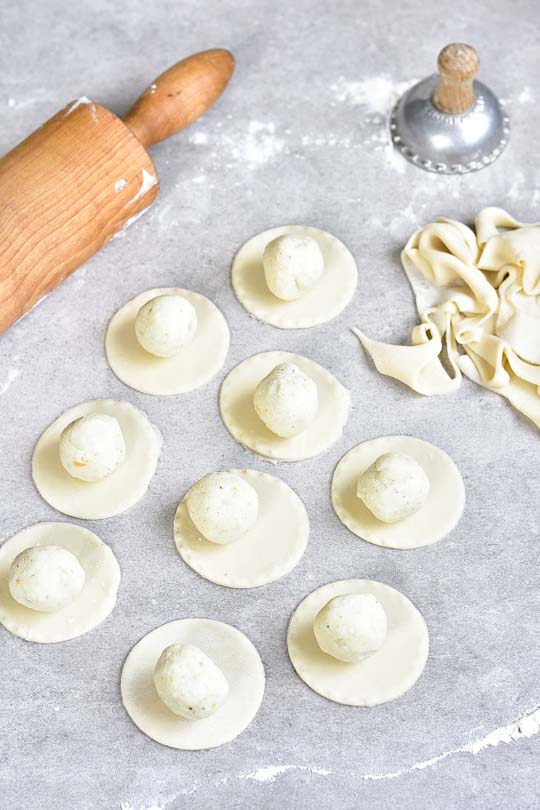
STEP 7: Place the filling on the round.
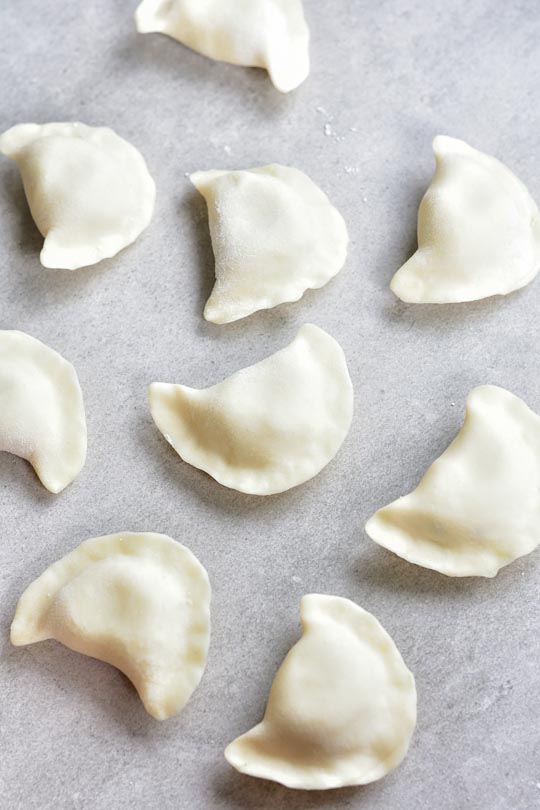
STEP 8: Shape the pierogi. Ready to be cooked!
How to measure the flour:
In the recipe card below, I provided all possible measurements for the pierogi dough – by volume and by weight. I’m always using a kitchen scale to make my pierogi (and generally to develop the recipes on my website). If you’re weighing your ingredients on a scale your results will be very consistent and the same as mine. It’s really easier, quicker and a kitchen scale is super cheap!
If you’re measuring the flour with measuring cups there is a possibility that you will add more or less flour than I did. You need to check the consistency of the dough and add more flour if it’s too wet and more water if it’s too dry and too tough.
Measuring the flour with measuring cups is unfortunately very inaccurate. 1 US cup of flour can weigh from 120g-140g, depending on how you fill the cup. 20g is a little over 2 tablespoons of flour, so when this recipe calls for 4 cups of flour, you could have added 8 tablespoons more flour which is 1/2 cup! For measuring flour I’m spooning the flour into the measuring cup with a tablespoon and not scooping it with the cup. Level the flour with the back of the knife and don’t tap the cup or press down the flour. Read this article for more information on how to measure flour.
1 US cup is 240 ml. An European cup is 250 ml!
How to roll out the dough with a pasta maker:
Pierogi dough can also be rolled out using a pasta machine. I have a Kitchen Aid pasta roller attachment. I roll out the dough on setting 4. According to the manufacturer’s instructions you need to roll out the dough on each setting until you get to the setting 4. I’m not doing this, pierogi dough without an egg is easier to roll out than an egg dough or pasta dough. To make it possible, the dough must be well sprinkled with flour, at room temperature, slightly rolled out with a rolling pin (to a thickness of approx. ¾ cm / ½ inch) and smooth (otherwise will tear).
How to store pierogi:
To ensure that the cooked pierogi don‘t stick to each other, brush them lightly with melted butter or oil. Store in a tightly-closed container in the fridge for about 2 days. On the next day, it‘s best to pan-fry them with butter until golden.
Freshly cooked pierogi taste best for me, so I usually do this: I prepare only the amount of dumplings that we are going to eat on a given day (about 14 per person, my pierogi are rather small, see the video for the reference). I wrap the rest of the dough tightly in plastic foil and put it in the fridge. I place the rest of the filling (or make filling balls from all of the filling) and also tightly wrap in plastic foil and put in the fridge. On the next day (or even on the third day) I’m preparing the rest of the pierogi.
If I have more time and I’m making more pierogi in one batch, I freeze them or pan-fry with butter the next day.
After removing the dough from the fridge, it is good to slightly warm it up (leave it for about 15-30 minutes on the counter), it will be more elastic (this is optional). The next day the dough can look a little gray in color, but we don‘t mind that.
Freezing tips:
- Cooked pierogi: Place the pierogi apart on a tray, sprinkled well with flour. Freeze until solid. Transfer to containers on plastic bags. Cook like fresh pierogi but take them out once they float on the water surface.
- Uncooked pierogi: Note that not boiled raw pierogi are more likely to crack in a freezer than cooked pierogi. I most often freeze raw pierogi though. Place the pierogi on a tray / wooden board sprinkled well with flour (important, dumplings can easily stick to the tray and tear). Arrange the dumplings so that they do not touch each other. When frozen, transfer them into containers or plastic bags. I cook frozen dumplings just like fresh ones, with the difference that you can cook a smaller amount of them at a time, I cook max. 7-8 frozen pierogi at once (and about 10-12 fresh). When you drop too many frozen pierogi at once it will lower the temperature of the water too much and they will burst.
Store-bought frozen pierogi:
I’ve never eaten store-bought frozen pierogi that tasted amazing (maybe I’m just spoiled with homemade pierogi!). In terms of taste, some of them were not that bad, but for me, the dough is always too thick. This is not surprising since these pierogi are not made by hand. The dough manufactured in a factory need to be thicker so it won’t easily break and can be filled by a machine. Homemade pierogi all the way!
FAQ:
Knead the dough well then let it rest before rolling it out. A good recipe is also important – add butter and hot (but not boiling) water to the dough.
Toss the hot, freshly cooked pierogi with butter or oil until coated on all sides.
You can freeze cooked pierogi or uncooked pierogi. See the instructions above.
There’s no need to do that. You can throw frozen pierogi direct into boiling water.
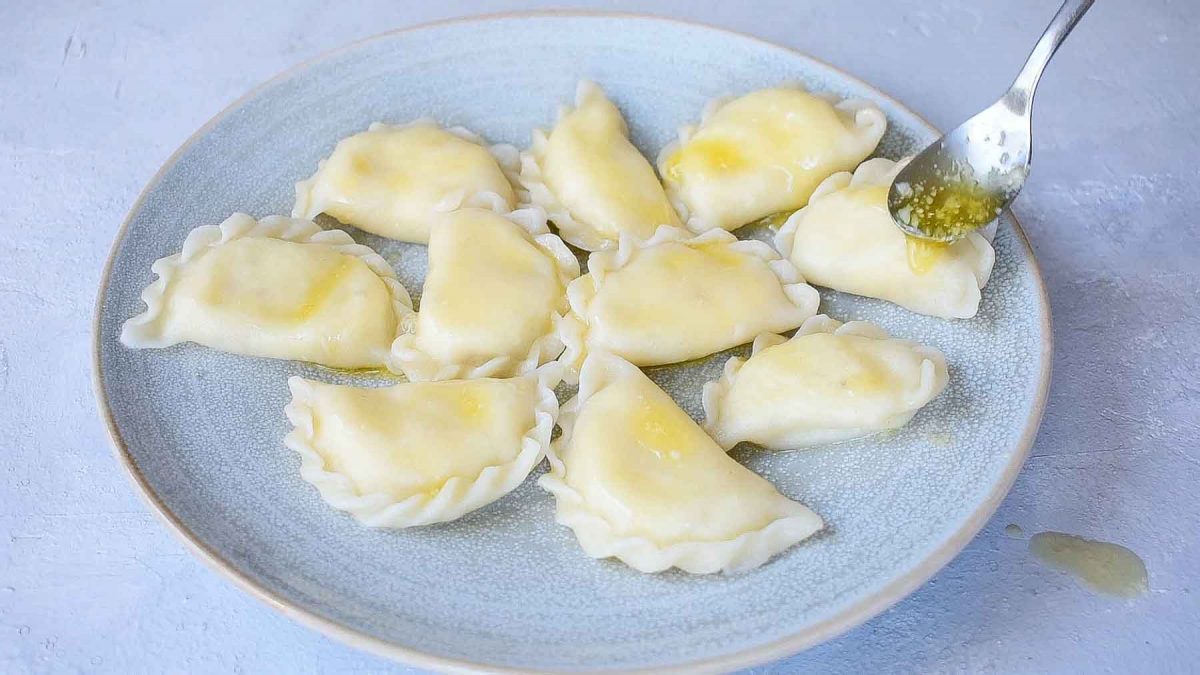
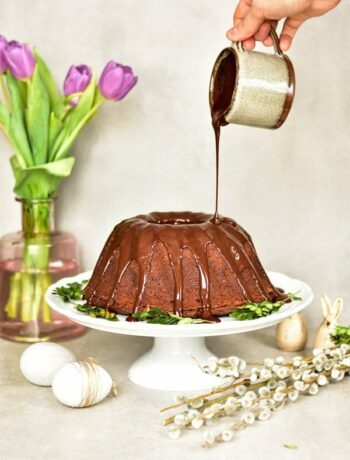
I like to keep it simple and just pour melted butter over them. Other options are: sauteed/caramelized onions, pan-fried bacon, chopped parsley. Sweet pierogi are often served with sweetened heavy cream/sour cream.
Here you’ll find all my pierogi sauces and toppings ideas.
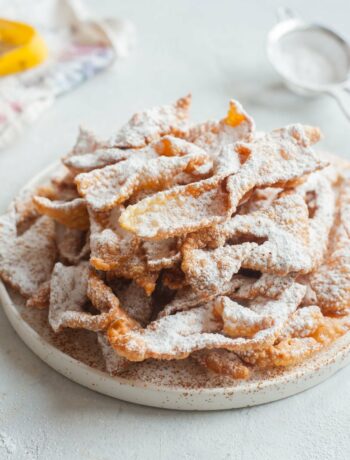
Yes! You can wrap the filling in shortbread pastry and bake until golden. This kind of pierogi is not that popular but in some regions, people are making baked pierogi.
Your dough was probably not evenly rolled out. Thicker pierogi will be a bit bigger, also when you fill them with more filling. If the dough is of the same thickness you can cook the small and big pierogi the same way.
Cut it into thick strips and use as pasta eg with soup.
It’s probably not well-kneaded, not rested or you’ve used cold water. It’s also possible that you’ve added too much flour – add more water until the dough is smooth and soft.
It really depends on your preferences. I really dislike dough that is rolled out too thick. When the dough is thinly rolled out it literally melts in your mouth after you cook the pierogi.
It will take a minimum of 5 minutes by hand and about 3 minutes in a stand mixer. It can take longer or shorter. You need to pay attention to the dough’ consistency – it should be smooth and soft (check out the video to see the consistency of the dough). It will be even softer when it’s rested.
The dough can be too elastic and shrink as you try to roll it out when it’s not rested. Make sure to rest the dough for about 20-30 minutes, then it should be easy to roll out. This is caused by gluten that is in every type of wheat flour.
Filling recipes:
I have a separate post, where I talk about all the traditional and modern pierogi filling ideas.
Here are the written recipes:
- authentic potato and cheese pierogi (pierogi ruskie) – with potato, twaróg cheese, and onion filling
- potato and cheese pierogi the American way (cheddar pierogi)
- sauerkraut and mushroom pierogi
- spinach and feta pink pierogi (basic pierogi dough is colored with beetroot juice!) with potatoes, onion, feta cheese, and spinach filling
- vegan/vegetarian pierogi with spicy lentil and sun-dried potato filling
- uszka (‘little ears’) pierogi – porcini (wild mushroom) filled mini pierogi for Christmas Eve Borscht
- sweet cheese pierogi
The best pierogi dough recipe + how to make perfect pierogi
Ingredients
- 4 cups flour 500g / 17.5-oz, spoon and leveled, all-purpose flour
- 1 cup + 2.5 Tbsp water 280g / 280ml / 10-oz (to weight on a scale)
- 3 tablespoons butter 1.4 oz/40g, or vegetable oil
- 1 teaspoon salt
Would you like to save this?
Instructions
→ Make the dough:
- Add the flour and salt into a large bowl, mix together.
- In a small saucepan, warm the water with butter until they are very hot, but not boiling (temperature should be around 80-85 °C / 176-185 °F, that is when the water starts to move and steam).
- Pour hot water with butter into the bowl with flour, mix with a wooden spoon until roughly combined.
- Knead the dough using your hands or with a stand mixer fitted with a hook attachment, for about 5 minutes. A food processor can also be used (fitted with the dough blade). The dough should be smooth, soft, and elastic, it shouldn’t stick to your hands. When you follow the recipe (especially if you weigh the ingredients, instead of using measuring cups), the dough should be perfect, but if for some reason it’s not, add some water if it’s too dry, or a little bit of flour if it’s too wet. If the dough already forms a ball, is relatively smooth, but still tough, it means that it’s not ready, it must be further kneaded until soft and elastic (after resting time it will be even softer).
- Wrap the kneaded dough in plastic foil (so it doesn’t dry out), leave to rest for about 30 minutes (it will be easy to roll out).
→ Rolling out, stuffing and shaping the pierogi:
- Divide the dough into 4 parts.
- Onto a lightly floured surface, roll out thinly the first piece of the dough, to a thickness of approx. 2 mm / 1/16 inch. If the dough is hard to roll out, set it aside for about 5-10 minutes to rest.
- Use a cup or a pierogi/pastry cutter to cut out rounds. Place one ball of filling / 1 teaspoon of filling on each round.
- Gather scraps, cover with plastic wrap and set aside.
- Fold the dough over the filling to create a half-moon shape. Press edges together, sealing and crimping with your fingers. Do not leave any gaps or pierogi may open during cooking.
- Place the pierogi apart on a towel lightly sprinkled with flour (this is important, they can stick to the board), cover loosely with a kitchen cloth so that they don‘t dry out.
- Repeat with the remaining dough.
-> Cook the pierogi:
- Bring a large pot of salted water to a boil.
- Cook the pierogi in batches (for a 21 cm /8-inch pot I cook about 10-12 dumplings at a time). When they float to the water surface cook them for 1-2 minutes, then remove from the water with a slotted spoon. The cooking time will depend on the thickness of the dough.
- Drain well and transfer onto a plate. Serve warm, pour over some melted butter.
- Enjoy!
Notes
To ensure that the cooked pierogi don‘t stick to each other, brush them lightly with melted butter or oil. Store in a tightly-closed container in the fridge for about 2 days. On the next day, it‘s best to pan-fry them with butter until golden.
Freshly cooked pierogi taste best, so I usually do this: I prepare only the amount of pierogi that we are going to eat on a given day (about 14 per person). I wrap the rest of the dough tightly in plastic foil and put it in the fridge. I place the rest of the filling (or make filling balls from all of the filling) and also tightly wrap in plastic foil and put in the fridge. On the next day (or even on the third day) I’m preparing the rest of the pierogi. If I have more time and I’m making more pierogi in one batch, I freeze them or pan-fry then with butter the next day.
After removing the dough from the fridge, it is good to slightly warm it up (leave it for about 15-30 minutes on the counter), it will be more elastic (this is optional). The next day the dough will be a little gray in color, but we don‘t mind that. – How to freeze pierogi: Cooked pierogi: Place the pierogi apart on a tray that is sprinkled well with flour. Freeze until solid. Transfer to containers on plastic bags. Cook like fresh pierogi but take them out once they float to the water surface. Uncooked pierogi: Note that not boiled raw pierogi are more likely to crack in a freezer than cooked pierogi. I most often freeze raw pierogi though. Place the pierogi on a tray / wooden board sprinkled well with flour (important, dumplings can easily stick to the tray and tear). Arrange the dumplings so that they do not touch each other. When frozen, transfer them into containers or plastic bags. I cook frozen dumplings just like fresh ones, with the difference that you can cook a smaller amount of them at a time, I cook max. 7-8 frozen pierogi at once (and about 10-12 fresh). When you drop too many frozen pierogi at once it will lower the temperature of the water too much and they will burst. – Rolling out with pasta machine: I have a Kitchen Aid pasta roller attachment. I roll out the dough on setting 4. According to the manufacturer’s instructions you need to roll out the dough on each setting until you get to the setting 4. I’m not doing this, pierogi dough without an egg is easier to roll out than an egg dough or pasta dough. To make it possible, the dough must be well sprinkled with flour, at room temperature, slightly rolled out with a rolling pin (to a thickness of approx. ¾ cm / ½ inch). and smooth (otherwise will tear). – 1 cup is 240 ml. – The amount of pierogi: based on the feedback that I got from readers, the amount of pierogi you’ll get from this recipe can vary greatly! My pierogi are rather small and I like to pack them with a lot of filling, that’s why I got 100 pierogi from this recipe. This may be different for you and you can get only half of this amount.
Did you make this recipe? RATE THE RECIPE or tell me in the COMMENTS how you liked it! You can also add a photo of your dish. It would make me very happy and will help other readers. Thank you!!

419 Comments
Ria
23 September 2021 at 16:57Can this recipe be doubled or tripled without changing the consistency of the dough?
Aleksandra
23 September 2021 at 18:15yes!
Liz
31 July 2021 at 09:53Hi Aleksandra, I’ve been making my mothers (deceased 20 yrs) pierogi dough recipe every year for the last 50 years!!! (With egg/ kneading by hand, substituting with 1/4 potato flour). My mother-in-law also Polish always told me my pierogi dough was too firm because of the eggs. I tried ur recipe only substituted 1 cup Potato Flour to the 3 cups flour. And they turned out . My Polish workmate could not fault them. Which made my very happy and proud. Thank you for sharing your technique and recipe. I found the process so much easier using my kitchen aid( something my mum never owned) and ur right the eggs do make the cooked dough tougher.
Aleksandra
1 August 2021 at 08:24Thank you so much for your comment, I’m glad you enjoyed the recipe!
Donovan
15 June 2021 at 16:46Do you think tweaking this recipe with half whole wheat flour/half all purpose would work? And if so how long would I have to boil them?
Aleksandra
15 June 2021 at 17:18Yes, it should work, but I think you may need to add just a little bit more water because whole wheat flour usually absorbs more liquid than all-purpose, but I can’t say how much without testing it, though. The cooking time should be the same.
Aleksandra
15 June 2021 at 19:27I forgot to add, the cooking time depends only on the thickness of the dough, not on the flour used.
Jule
11 June 2021 at 17:56Thank you for this amazing vegan pierogi dough recipe! I made Pierogi quite a lot since I discovered your recipe 🙂 my partner also loves them!!
So thank you for sharing!
Aleksandra
11 June 2021 at 17:59you’re welcome! thank you for the comment!
LuAnn Ainsworth
4 June 2021 at 18:48I have been making perogi for 40+ years and have been trying to replicate my baba’s recipe to no avail. I had been told over the years that she only ever added flour, salt and water to her dough. I have been adding sour cream over the years, which added some acidity and flavor but not the tenderness I was looking to achieve. Who knew just adding a little bit of fat and using proper measurements would finally yield what I have been looking for. Thank you sooooo much!!! LuAnn from Canada
Aleksandra
4 June 2021 at 19:29So happy I could help, LuAnn, thank you for commenting!
Lisa S Conforto
6 September 2021 at 22:55Going to try this recipe, my great gram came over from Poland, she also made everything homemade. My favorite the blueberry ones, a sweet blueberry filling perfect for desert
Aleksandra
7 September 2021 at 07:13I also love blueberry pierogi! I hope you will like the recipe!
Richard
2 June 2021 at 11:54I have used this dough recipe several times now and it always works out well.
J. Mark Foran
30 May 2021 at 21:39This is the most comprehensive article on pierogi dough I’ve ever read. Your basic recipe conforms with the one I remember in my family. And I might try some of the variations.
Aleksandra
31 May 2021 at 04:38thank you!
Thepea
10 April 2021 at 01:37Where can I buy the flour 480? I’m in the US. I looked online and see that 480 is aka German type 405 and equivalent to 9% protein. The one wawelska flour brand is not sold online especially in us. Can you guide me in using the proper flour or brand I should purchase? Thank you!! I’m excited to make this!!
Aleksandra
10 April 2021 at 05:37Just use regular all-purpose flour, this recipe is very forgiving, the protein % in the dough just means that the dough can be less or more chewy. I used different kinds of flour when I was in Poland and the difference was really almost not noticeable. I can’t recommend a specific flour brand because I’m not in the US but one of the readers mentioned that he had success with the ‘Gold Medal’ brand. So many people have already successfully made this recipe and I assume most have used all-purpose flour so I just wouldn’t overthink it and use what you have on hand! Let us know which brand have you used!
Patrycja
21 May 2021 at 23:45I use Organic King Arthur AP and it works well!
Aleksandra
22 May 2021 at 05:18Thank you for sharing!
Kevin
1 April 2021 at 00:19I’ve been experimenting with different pierogi recipes for several years now and have never been satisfied with the mediocre results. There are so many different recipes and I was about to give up until I saw this one and decided to give it another try.
I followed the recipe exactly, and this is absolutely the best pierogi dough I have ever made. The potato and cheese filling was also the best ever. I used all purpose Gold Medal flour and was lucky enough to find Twarog (farmer’s) cheese in my grocery. It’s way better than ricotta. My folding technique needs more practice but my pierogi recipe search is finally over! This is it!
Thank you Aleksandra.
Aleksandra
1 April 2021 at 05:34Thank you, Kevin, for such a fantastic review! I’m so glad you liked the recipe!
Peg Martin
3 April 2021 at 17:19After three batches I finally got the consistency right….or so I thought. I weighed everything but to get 480g of water was more than one cup plus 2.5 tblsp of water. The dough was sticky so had to use some extra flour. The dough is resting. The real test will be how everything tastes tomorrow for Easter supper. I usually do a dough recipe that had egg and oil but I wanted to try something different
Aleksandra
3 April 2021 at 17:48Hi Peg, the recipe calls for 280g water, not 480g, which is exactly 1 cup (240g) + 2.5 Tbsp (40g). The dough shouldn’t be sticky. I hope everything will turn out okay..
Peg Martin
4 April 2021 at 21:26I really don’t know why I saw 480g which is why I had to add flour. I am making another batch as I have more filling. I can hardly wait for supper today. Thanks for straightening me out!
Aleksandra
5 April 2021 at 06:00you’re welcome! I hope you will enjoy your meal!
Catherine Poncet
28 March 2021 at 11:27Can you mix flour with semolina (50/50)?
Aleksandra
28 March 2021 at 12:31I wouldn’t do that. You can always make just a small batch of dough to test it.
Carol
26 March 2021 at 03:05OMG I tried this recipe today measuring ingredients on a digital scale. The dough was very pliable and easy to roll out, and the finished product was the BEST EVER! The taste was simply delectable! Thank you for sharing.
Aleksandra
26 March 2021 at 07:01You’re welcome! Thank you for commenting!
John
23 March 2021 at 20:25Aleksandra,
I have made this recipe 5 times now, and I have to say it’s the best pierogi dough, hands down. I like the recipe’s precision, weigh everything, and the results are consistent time after time. I do make one small adjustment and use a ¼ stick of butter for simplicity. A nice bonus feature at the end when you are kneading the dough by hand is nice and warm. I run the dough through my Atlas 150 Pasta Machine on setting 5 or 6, and it’s perfect!
I find the consistency to be the best on the day it’s made, but it works fine later in the week. Thank you for sharing. I’m now the self-proclaimedPierogi King!
Aleksandra
23 March 2021 at 20:29Self-proclaimed Pierogi King! – I love that! 🙂 Thank you for your detailed review, John, I’m happy you enjoyed the recipe!
Dr. Manarii Tane
19 March 2021 at 00:21Hi, I loved this recipe, but the thickness you mentioned (¾ cm / ½ inch) are not consistent. I used 3/4 cm which is about 1/4 inch and it worked out great. 1/2 inch is way too thick.
Thank you for the great recipe.
Aleksandra
19 March 2021 at 09:27Hi, I’m glad you liked the recipe. What I meant was you should roll the dough by hand to a thickness of 1/2 inch and then put it through the pasta attachment to get the dough 1/8-1/16-inch thick. I’ve rewritten it, hopefully it’s more clear now.
Elizabeth
7 March 2021 at 03:41This recipe was fantastic! It was the first time I’ve made pierogi and the recipe was easy to follow. My fillings were very unconventional because I wanted unique flavors. I made one batch with bison and berry filling and a second batch with cream cheese and mango salsa. I dipped both in raspberry balsamic. I ate so many, because they were amazing! Thanks for the awesome recipe for the dough.
Aleksandra
7 March 2021 at 06:15Wow! That’s what you call creative! I would definitely love to try the bison and berry filling!
Elizabeth
15 March 2021 at 23:22It was very simple, I browned ground bison and green onion in a little oil then added a pinch of salt, a pinch of black pepper, blackberries, a few tablespoons honey, and a little homemade raspberry jam.
Agata
4 March 2021 at 22:00Not sure if it was asked, but where did you buy your perogi cutter?
Aleksandra
5 March 2021 at 06:27it’s very old! I got it from my MIL
Nicki
14 February 2021 at 22:33I have never made the dough before and tried it this past week. It is the best!! I gave my neighbour some and she said it is the best dough she has ever had in her life…and she is 90. This recipe is a winner x 10.
Aleksandra
15 February 2021 at 06:48Thank you, Nicki!
Terry
7 February 2021 at 12:00Made this dough yesterday and it does NOT make 100 piergi. I think we made 45 out of this and we rolled it as thin as it could possibly get
Aleksandra
7 February 2021 at 12:12pierogi can be of different sizes, mine are rather small
Mary
29 January 2021 at 05:49I loved the recipe! It turned out great! Only one comment though. I noticed you said you don’t use egg so you don’t have to worry about your daughter eating raw dough. If the flour isn’t cooked, it still poses a risk of giving her ecoli, as consuming raw flour is unsafe as well!
Aleksandra
29 January 2021 at 06:47Hi Mary, I’m well aware, but thank you for mentioning that. She wasn’t eating that, she just put it in her mouth once or twice (raw pierogi dough is not very tasty anyway). At the time I was writing it, she was a little over 1 yo so she was touching everything on the counter all the time and ‘stealing’ some dough scraps and running away so I felt like I need to wash my hands every 2 mins while making pierogi;) that’s what I meant! 🙂
Gene
3 February 2021 at 23:25Substitute the water with 14 0/0 sour cream one tub 500ml
Substitute butter with 6 Tbsp oil (any kind)
Add 2 eggs
1Tsp salt
You could add 1 more cup of flour
Mix all ingredients in large bowl adding cup of flour one at a time
Pour out and knead till not sticky let rest
This is my 97 year old Ukrainian mother’s receipt
Jennifer
28 January 2021 at 00:49Your recipe turned out amazing pierogi. Genuine and perfect in every way. Using a digital scale for the ingredients makes bringing together a wonderful dough so much easier. Thank you!
Aleksandra
29 January 2021 at 06:49I’m happy to hear that, thank you!
Joanna
17 January 2021 at 15:57Hello! Can I use milk instead of water? (I’m trying to save it from spoiling)
Aleksandra
17 January 2021 at 16:10I haven’t tried that, but I think you can. Let us know how it worked out!
william Krochak
15 August 2021 at 00:55A great recipe Aleksandra. Thank you for sharing your tips. I do many of the same things you do with the dough preparation. From each dough quarter, I add the scraps to the next quarter of the dough then roll it out for the next 13 rounds. I use a Campbell’s soup can as my cutter. I freeze them in Zip Lock bags. When cooking them frozen, I add a splash of oil to the water and some salt. Being able to cut the stuffed cooked round with a fork is the test that the dough is soft. I also add love to this dish because I love making them and eating them! It is a reflection of the person that made them. I found that the more I made them, the better I got. I am smiling as I write that. The most I ever boil frozen at once is two dozen when company is at my home. You need to keep stirring them in the pot with a wooden spoon or plastic spatula until the water gets bubbly again so they don’t stick together and stay at the bottom of the pot. When they rise to the top as you wrote and get puffy, they’re done! I always take two to test to make sure they’re cooked because they are so delicious. I am laughing also when I write that.